Welcome to Zaira - Laravel CMS Documentation.
- Item Name : Zaira - Laravel CMS
- Created: 20 october 2025
- Item Version : v 1.0
- Author : ThemeDox
- Support Ticket: Theme Support
Zaira - Laravel CMS Features
Zaira - Laravel CMS comes with a powerful set of modern tools and modules to help you build, manage and scale your website easily. From dynamic content management to SEO, payment gateways, multi-language support and a full-featured admin panel — everything is included in one elegant system.
Key Features
- Built with Laravel 11 framework
- Tailwind CSS based modern and responsive design
- Multiple ready themes with easy customization
- User-friendly and clean code structure
- SEO-friendly architecture with meta settings
- Secure authentication and authorization system
- Powerful Admin Dashboard with analytics
- Blog Management System with categories & comments
- Dynamic Menu Management (Unlimited Menus)
- Unlimited Custom Page creation
- About Page & Contact Page Management
- Homepage customization with Section Builder
- Team & Testimonial Management System
- FAQ, Terms & Conditions, Privacy Policy Management
- Multi Language & Multi Currency Support
- Social Media Login (Google, Facebook)
- Google reCaptcha & Google Analytics integration
- Tawk Live Chat integration
- Newsletter with email verification
- Maintenance Mode & Cookie Consent support
- Custom 404 Error Page Management
- Powerful Email Template & SMTP Configuration
- Database Clear & Cache Clear Options
- And much more...
Payment Gateways
Zaira CMS supports multiple international payment gateways to make transactions smooth for global users:
- Razorpay – Razorpay payment.
- 2Checkout – Global payment solution accepting credit cards and PayPal worldwide.
- Flutterwave – African payment gateway supporting cards, mobile money, and bank transfers.
- Instamojo – Indian payment solution with UPI, cards, and wallet support.
- Mollie – European payment provider with local payment methods and seamless integration.
- PayMongo – Philippines-focused gateway with GCash, cards, and installment options.
- PayPal – Fast and secure payment through your PayPal account.
- Paystack – African payment platform with card, bank, and mobile money integration.
- Stripe – Instant payment processing with advanced fraud protection.
Admin Panel Features
- 100% Secure Admin Panel
- Category, Brand, Tag, Product & Order Management
- Blog & Comment Management
- Section & Homepage Builder
- Custom Page Management
- Website Settings & Theme Selection
- Logo & Favicon Management
- Google ReCaptcha, Analytics & Facebook Pixel Settings
- SMTP Email Configuration & Email Templates
- Multi Language & Multi Currency Management
- SEO Settings and Optimization Tools
- Newsletter Management & Bulk Email Sending
- Profile & Password Settings
- Database Clear (Fresh Install) & Cache Clear
- Maintenance Mode & Cookie Consent Control
- Social Login Configuration
- Payment Gateway Credential Management
- 404 Error Page Management
- And more powerful options…
User Features
- 100% responsive frontend design
- Language & Currency Switcher
- User Registration with Email Verification
- Secure Login, Forgot Password, and Social Login
- User Dashboard for Profile & Bookings Management
- Wishlist & Review System
- Add to Cart & Secure Checkout
- Order History & Account Deletion
- Multi-payment options for global transactions
- And many more…
Installation on Local Server
Installing Zaira Laravel CMS on your local environment is simple. Just follow these steps carefully to get your project up and running smoothly.
1. System Requirements
Before starting, make sure your local machine meets the following requirements:
- Operating System: Windows, macOS, or Linux
- Web Server: XAMPP or WampServer (installed on your PC)
- PHP: Version 8.1 or later
- Database: MySQL, PostgreSQL, SQLite or supported by Laravel
- Composer: PHP dependency manager (must be installed)
- Node.js & npm: For managing frontend assets
- PHP Extensions: openssl, fileinfo, mbstring, tokenizer, json, ctype, xml
Note: Make sure all the above requirements are installed and configured properly on your local machine.
1. Installation Steps
![]()
2. Installation Steps
![]()
3. Installation Steps
![]()
Manual Upload via FTP (Optional)
If you want to install it manually, upload the entire Zaira folder to your web server using FTP. Place it inside your web root directory, then follow the same steps (Composer install, npm install, env setup, migration).
The application files will be stored in your local server folder (e.g.
htdocs/zaira).
Note: Do not upload the entire ZIP package directly. Make sure to extract and use the main project folder.
Installing Laravel and Setting Up the Local Host
-
Download or clone your Laravel script from codecanyon on your local machine. The
installation of this script is super easy. If you can install normal php based
scripts on your local host, you can install our script. We will tell you how to
install this script step by step on a localhost.
If you extract the zip file, you will see that there are total three folders.
The folder names are: sql, documentation and main_files. The "main_files" folder is the main laravel source codes. The "sql" folder contains the main database file "database.sql"
-
To create database on localhost go to your localhost phpmyadmin
http://localhost/phpmyadmin/index.phpand now click 'New'
Installation on Local Server
Installing Zaira Laravel CMS on your local environment is simple. Just follow these steps carefully to get your project up and running smoothly.
1. System Requirements
Before starting, make sure your local machine meets the following requirements:
- Operating System: Windows, macOS, or Linux
- Web Server: XAMPP or WampServer (installed on your PC)
- PHP: Version 8.1 or later
- Database: MySQL, PostgreSQL, SQLite or supported by Laravel
- Composer: PHP dependency manager (must be installed)
- Node.js & npm: For managing frontend assets
- PHP Extensions: openssl, fileinfo, mbstring, tokenizer, json, ctype, xml
Note: Make sure all the above requirements are installed and configured properly on your local machine.
1. Installation Steps
![]()
2. Installation Steps
Steps 1
![]()
Steps 2
![]()
Steps 3
![]()
Steps 4
![]()
Steps 5
![]()
Steps 6
![]()
3. After extracting the main zip go to the extract folder.
![]()
4. Inside the "mail_files" you can see 2folders (main_files, all_version). The "main_files" folder is the main laravel source codes. The "all_version" folder will be use for version update.
![]()
5. Now go to "xampp >> htdocs" and create new folder. Inside the folder paste your "main_files"(laravel source code) folder content.
![]()
6. Now open the .env file and update with your database credentials, app_name, app_url as needed.
![]()
7. Now open your web browser and visit the local URL to access your Laravel application (by default, http://localhost).
![]()
Manual Upload via FTP (Optional)
If you want to install it manually, upload the entire Zaira folder to your web server using FTP. Place it inside your web root directory, then follow the same steps (Composer install, npm install, env setup, migration).
The application files will be stored in your local server folder (e.g.
htdocs/zaira).
Note: Do not upload the entire ZIP package directly. Make sure to extract and use the main project folder.
Installing Laravel and Setting Up the Local Host
-
Download or clone your Laravel script from codecanyon on your local machine. The
installation of this script is super easy. If you can install normal php based
scripts on your local host, you can install our script. We will tell you how to
install this script step by step on a localhost.
If you extract the zip file, you will see that there are total three folders.
The folder names are: sql, documentation and main_files. The "main_files" folder is the main laravel source codes. The "sql" folder contains the main database file "database.sql"
-
To create database on localhost go to your localhost phpmyadmin
http://localhost/phpmyadmin/index.phpand now click 'New'
Installation on Live Server
System Requirements
To use Zaira - Laravel CMS, make sure your local or live server meets the following minimum requirements:
- PHP: Version 8.1 or higher
- Database: MySQL, PostgreSQL, SQLite, or any database supported by Laravel
- Composer: PHP dependency manager (required)
- Node.js & npm: Required for managing frontend assets
Required PHP Extensions
- BCMath PHP Extension
- Ctype PHP Extension
- Fileinfo PHP Extension
- JSON PHP Extension
- Mbstring PHP Extension
- OpenSSL PHP Extension
- PDO PHP Extension
- Tokenizer PHP Extension
- XML PHP Extension
Recommended PHP Configuration Limits
If you face issues like blank pages, timeout during installation, or errors while importing demo data, it may be due to low PHP configuration limits. Please increase them as follows or contact your hosting provider to do so:
max_execution_time = 180memory_limit = 256Mpost_max_size = 64Mupload_max_filesize = 32Mmax_input_time = 60max_input_vars = 3000
Also consider upgrading your PHP version to the latest stable version for best performance and security.
Credentials
The default credentials of the script are:
Admin Login
Login Email: admin@gmail.com
Login Password: password
Author
Login Email: author@gmail.com
Login Password: password
User Login
Login Email: user@gmail.com
Login Password: password
Theme Activation Process
To activate a specific theme in your platform, please follow the steps below:
Step 1: Navigate to Appearance > Theme Manager.
Step 2: You will see all available themes listed on the Theme Manager page.
Step 3: Each theme will have an Active button under it.
Click the Active button for the specific theme you want to activate.
Once activated, the button will change to a blue ✓ Active state, indicating the theme is now active.
Note: Only one theme can be active at a time. Activating a new theme will automatically deactivate the previous one.
General Settings
To access and configure general settings for your platform, follow these steps:
Step 1: Click on Settings in the left sidebar (located at the bottom of the menu).
Step 2: The Settings page will open. You will see the General option with "Update general settings" description.
Step 3: Click on the General section.
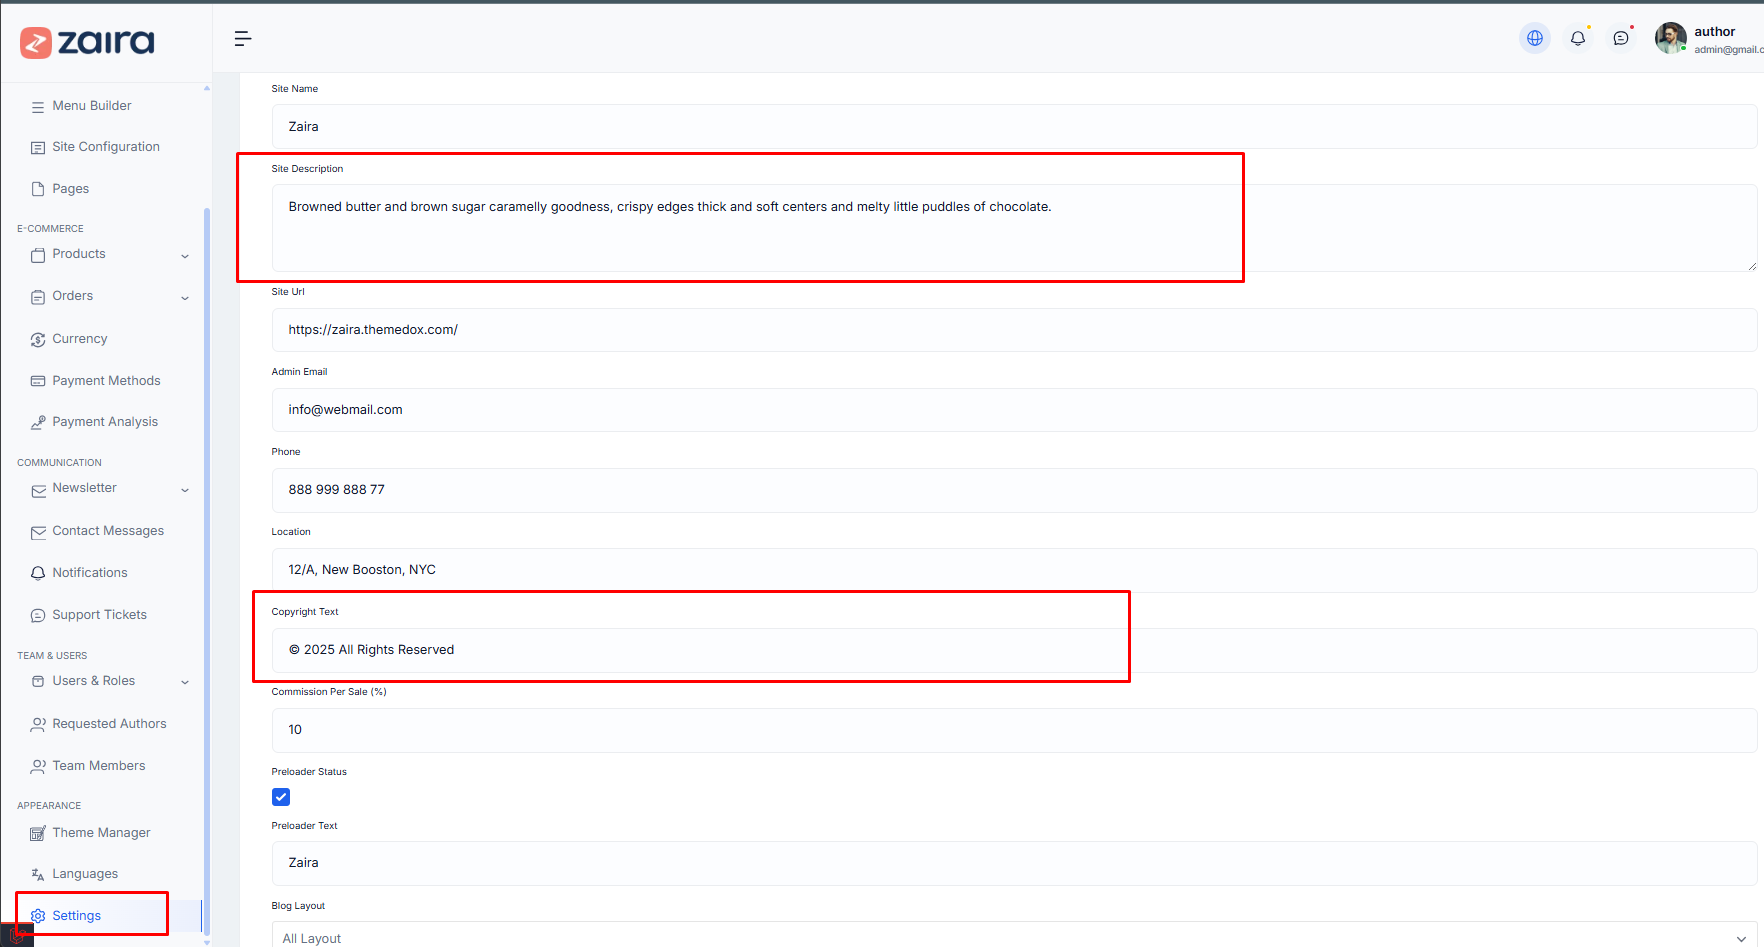
Step 4: The General Setting page will load where you can modify:
- Site Name: Enter your website or business name that will be displayed across your platform
- Site Description: Add a brief and compelling description of your website to help users understand your business
- Site URL: Set the complete URL of your website (e.g., https://zaira.themebux.com/)
- Admin Email: Enter the primary email address for administrative communications and notifications
- Phone Number: Add your contact phone number for customer inquiries and support
- Location: Specify your business location or headquarters address
- Copyright Year: Set the copyright year that will appear in your site footer (e.g., © 2025)
- Commission/Sale Percentage: Define the commission percentage for sales transactions on your platform
- Currency Status: Select and configure your preferred currency for displaying prices and transactions
- Blog Layout: Choose from different layout options for your blog page (e.g., All Layout, Grid Layout, etc.)
- Blog Detail Layout: Select the layout style for individual blog post pages
- Primary Color: Set your main brand color that will be used throughout the site's interface
- Secondary Color: Choose a secondary color to complement your primary brand color
- Timezone: Select your timezone to ensure accurate time-based operations (e.g., Asia/Dhaka)
Step 5: Scroll down to the bottom of the page to find additional feature toggles. You can enable or disable:
- Back to Top Status: Enable/disable the back-to-top button that helps users quickly return to the top of the page
- Dark/Light Mode Status: Toggle dark mode functionality to allow users to switch between light and dark themes
- Show Search Bar: Display or hide the search bar in your site's navigation
- Show Wishlist Icon: Enable/disable the wishlist feature so customers can save their favorite products
- Show Cart Icon: Display or hide the shopping cart icon in the navigation menu
- Multi Theme Blog: Enable this option to add and manage multiple language blogs. When activated, you can create blog content in different languages to serve a global audience
- Language Switch Status: Allow users to switch between different language versions of your website
Step 6: After making all desired changes, click the Save changes button located at the bottom right of the page.
Note: All changes will be saved and applied to your platform immediately upon clicking the Save changes button. Make sure to review all settings carefully before saving to ensure your platform is configured correctly.
Logo & Favicon Settings
To manage and update your site's logo and favicon, follow these steps:
Step 1: Click on Settings in the left sidebar (located at the bottom of the menu).
Step 2: The Settings page will open. You will see the Logo & Favicon option with "Update your logo and favicon" description.
Step 3: Click on the Logo & Favicon section to access logo management options.
Step 4: The Logo & Favicon page will load with the following upload areas:
- Site Logo: Upload your main website logo that will be displayed in the header. This is the primary logo visible to visitors on your site. Click on the upload area and select an image file (PNG, JPG, etc.)
- White Logo: Upload a white version of your logo. This logo is typically used in dark backgrounds or specific page sections where the main logo may not be visible. This helps maintain visual consistency across different design contexts
- Favicon Icon: Upload your favicon (favorite icon). This small icon appears in the browser tab and bookmarks. It helps users quickly identify your website. The recommended size is 32x32 pixels
- Dashboard Logo: Upload a logo specifically for the admin dashboard. This logo appears in the administration panel and can be different from your public-facing site logo
Step 5: For each logo upload area, click on the dotted rectangle box to select and upload your image file from your computer.
Step 6: After uploading all desired logos and favicons, click the Save changes button located at the bottom right of the page.
Note: All logos will be saved and applied to your platform immediately. Make sure to upload high-quality images for the best appearance across all devices and browsers.
Tawk Live
Email Settings
To configure email settings for your platform, follow the steps below:
Step 1: Click on Settings in the left sidebar (at the bottom of the menu).
Step 2: On the Settings page, locate the Email section with the description "Update email settings".
Step 3: Click on the Email section to open the email configuration options.
Step 4: The Email Settings page will display various SMTP configuration fields:
- Sender Name: The name that will appear as the sender in outgoing emails (e.g., Zaira).
- Sender Email: The email address used to send emails (e.g., nayemail2019@gmail.com).
- SMTP Host: Your SMTP server address (e.g., sandbox.smtp.mailtrap.io).
- SMTP Username: Your SMTP account username.
- SMTP Password: Your SMTP account password.
- SMTP Port: The SMTP port number (e.g., 2525).
- SMTP Encryption: Select the encryption method (TLS or SSL).
- SMTP Driver: Choose the SMTP driver (usually smtp).
Step 5: Fill in all the required fields accurately using the details provided by your email service provider.
Step 6: After entering the configuration details, click Update Setting to save your changes.
Step 7: Test your configuration to ensure everything is working correctly:
- Enter a test email address in the Test Email Address field.
- Click Send Test Email to verify your SMTP settings.
- Check the test email inbox to confirm successful delivery.
Note: Proper email configuration is essential for sending transactional emails, notifications, and other system messages. Always use valid SMTP credentials to ensure reliable email delivery.
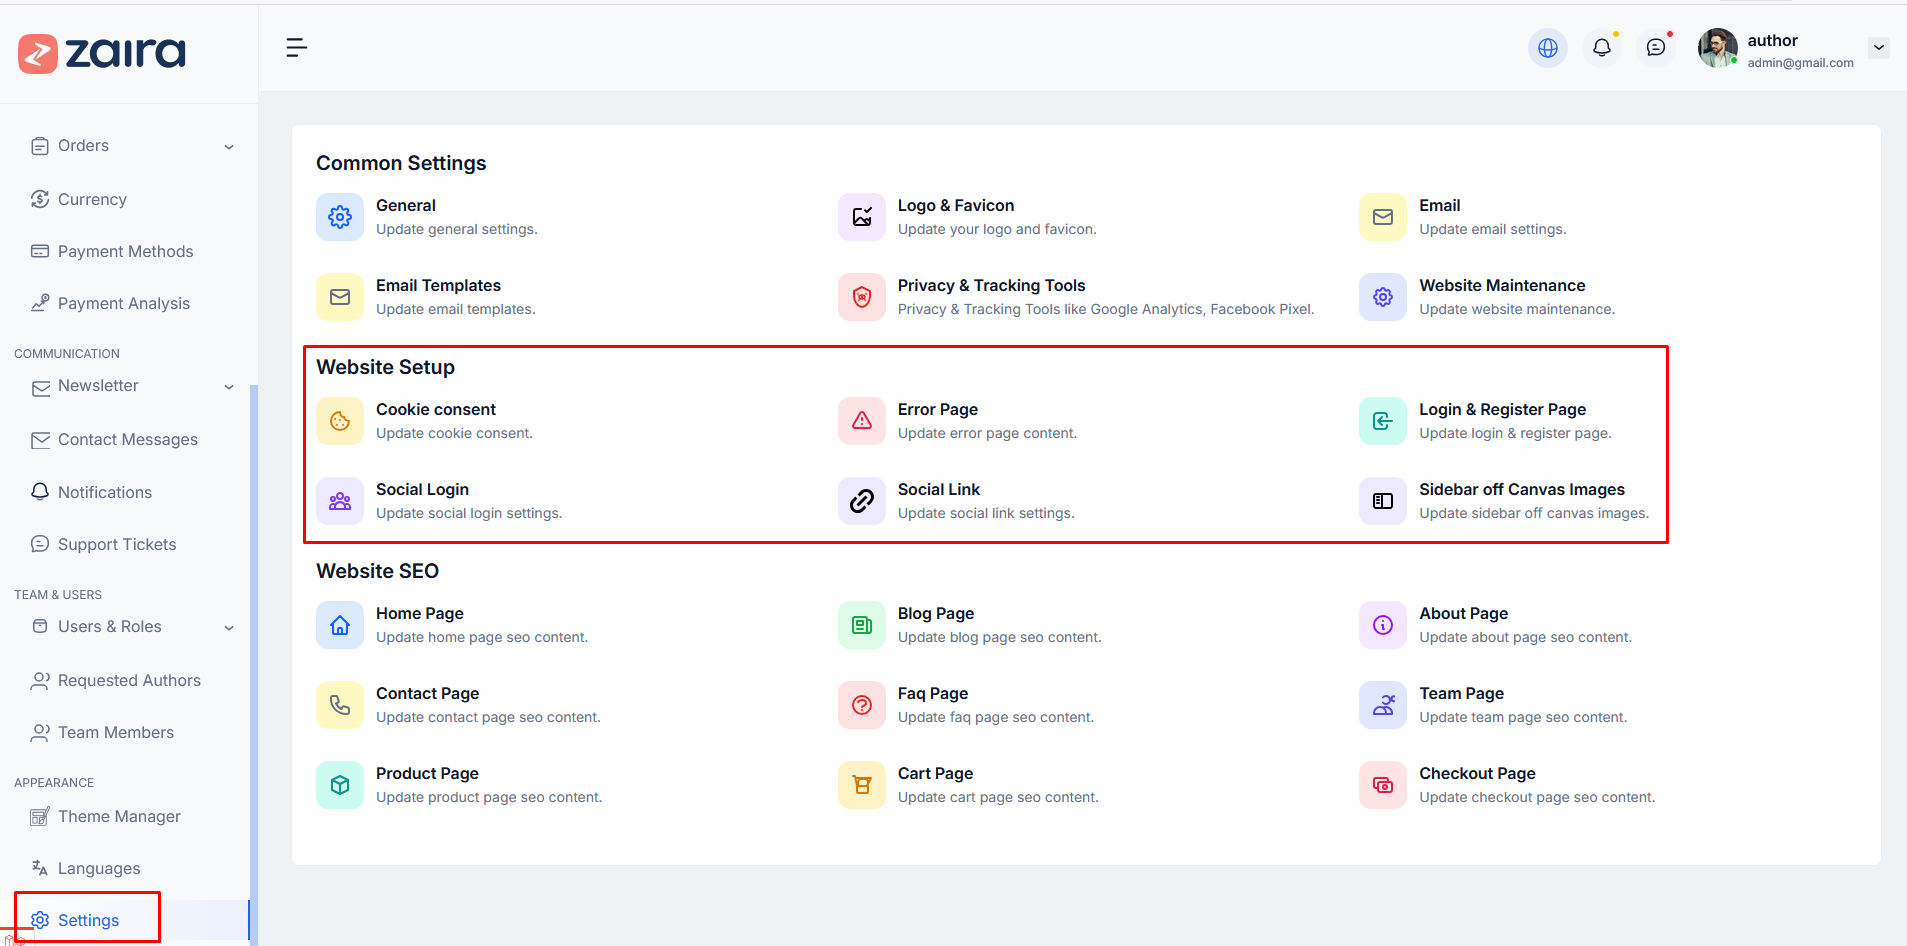
How to Configure Website Setup
Website Setup includes:
- Cookie Consent - Update cookie consent message and visibility
- Error Page - Set custom error page title and message
- Login & Register Page - Update login and registration page content
- Social Login - Configure Google and Facebook login settings with Client ID and Secret
- Social Link - Add social media profile links (Facebook, Twitter, Instagram, LinkedIn, YouTube, etc.)
- Sidebar off Canvas Images - Manage sidebar images
For each section, click and fill in the required information, then click Save changes.
Here is the screenshot:
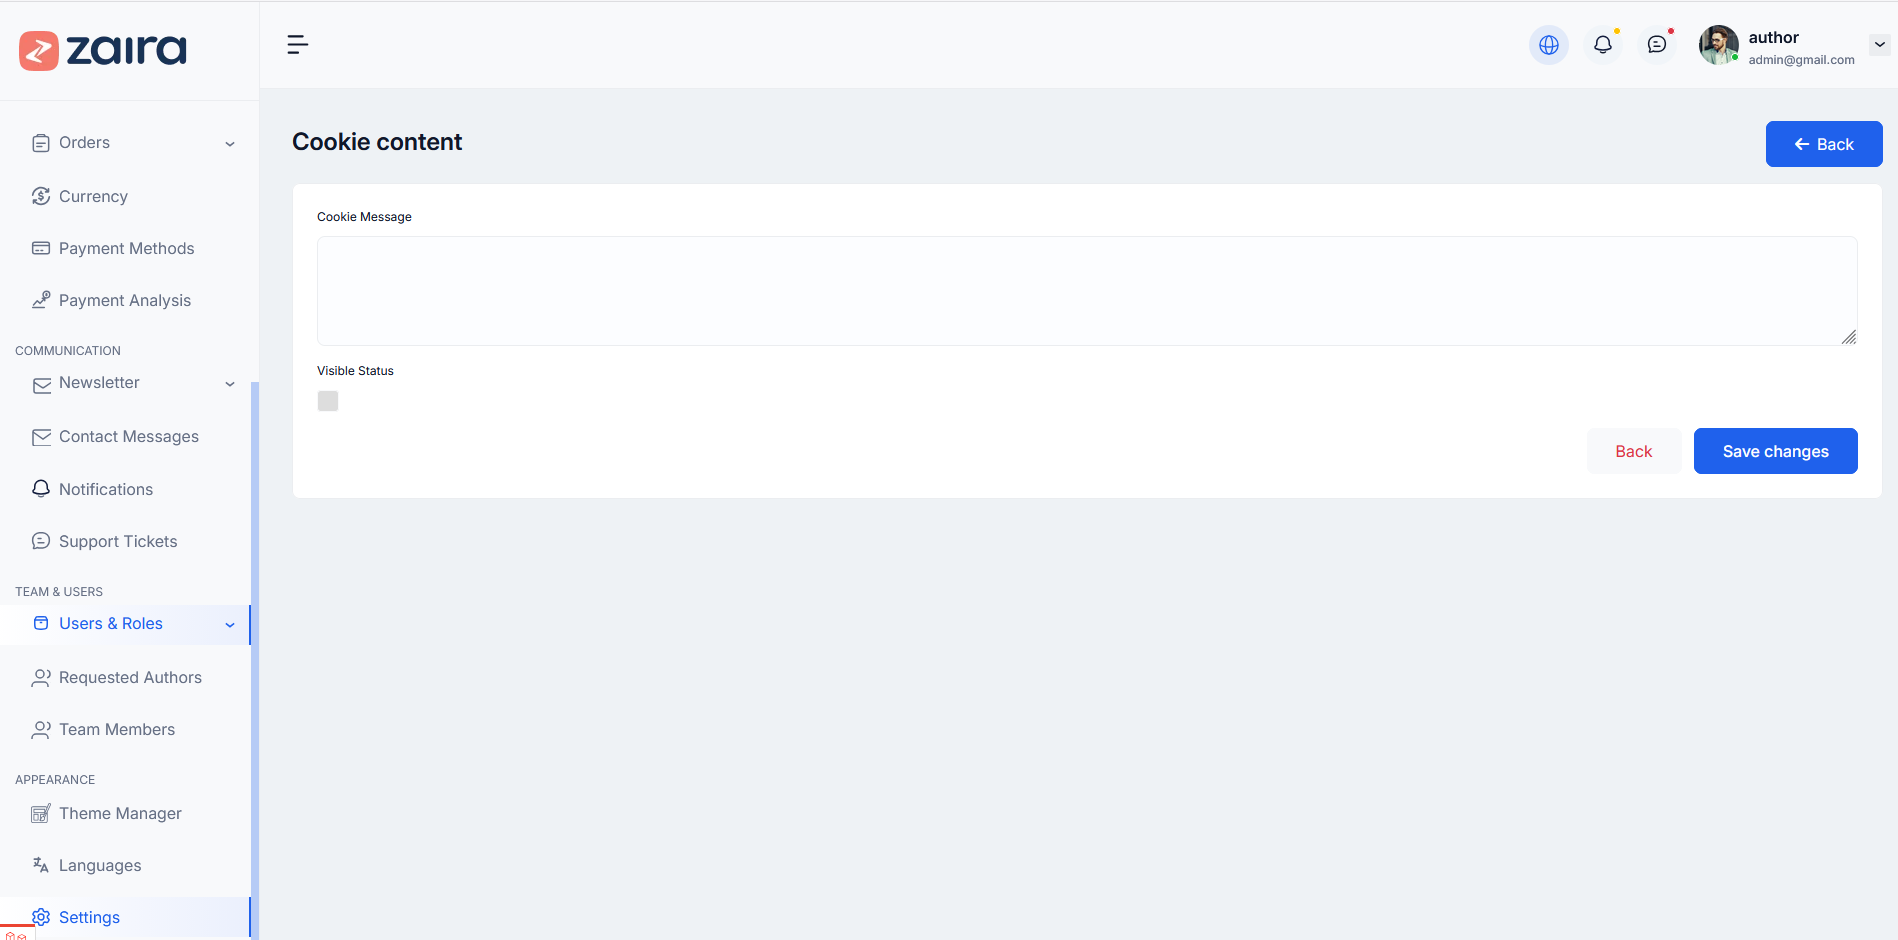
How to Configure Cookie Consent
Step 1: Click on Cookie consent in Website Setup.
Step 2: Add Cookie Message for users.
Step 3: Toggle Visible Status to enable/disable the cookie banner.
Step 4: Click Save changes.
Here is the screenshot:
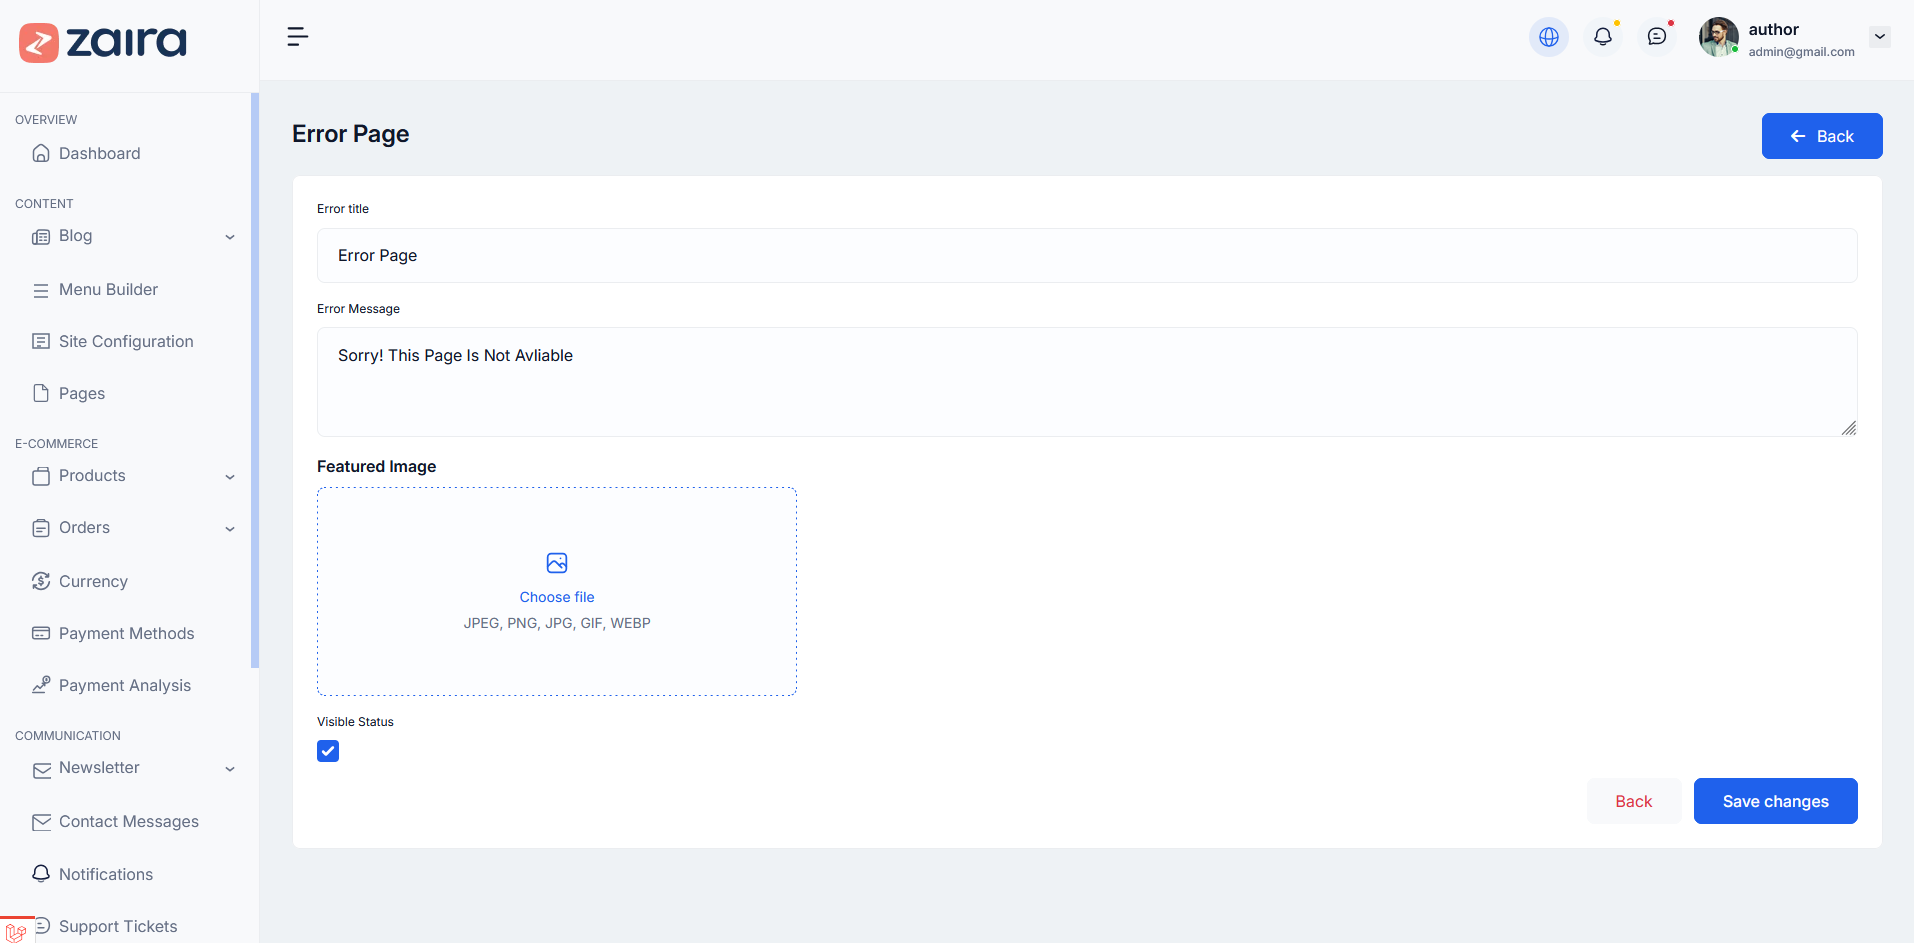
How to Configure Error Page
Step 1: Click on Error Page.
Step 2: Add Error title and Error message.
Step 3: Upload Featured Image for the error page.
Step 4: Toggle Visible Status and click Save changes.
Here is the screenshot:
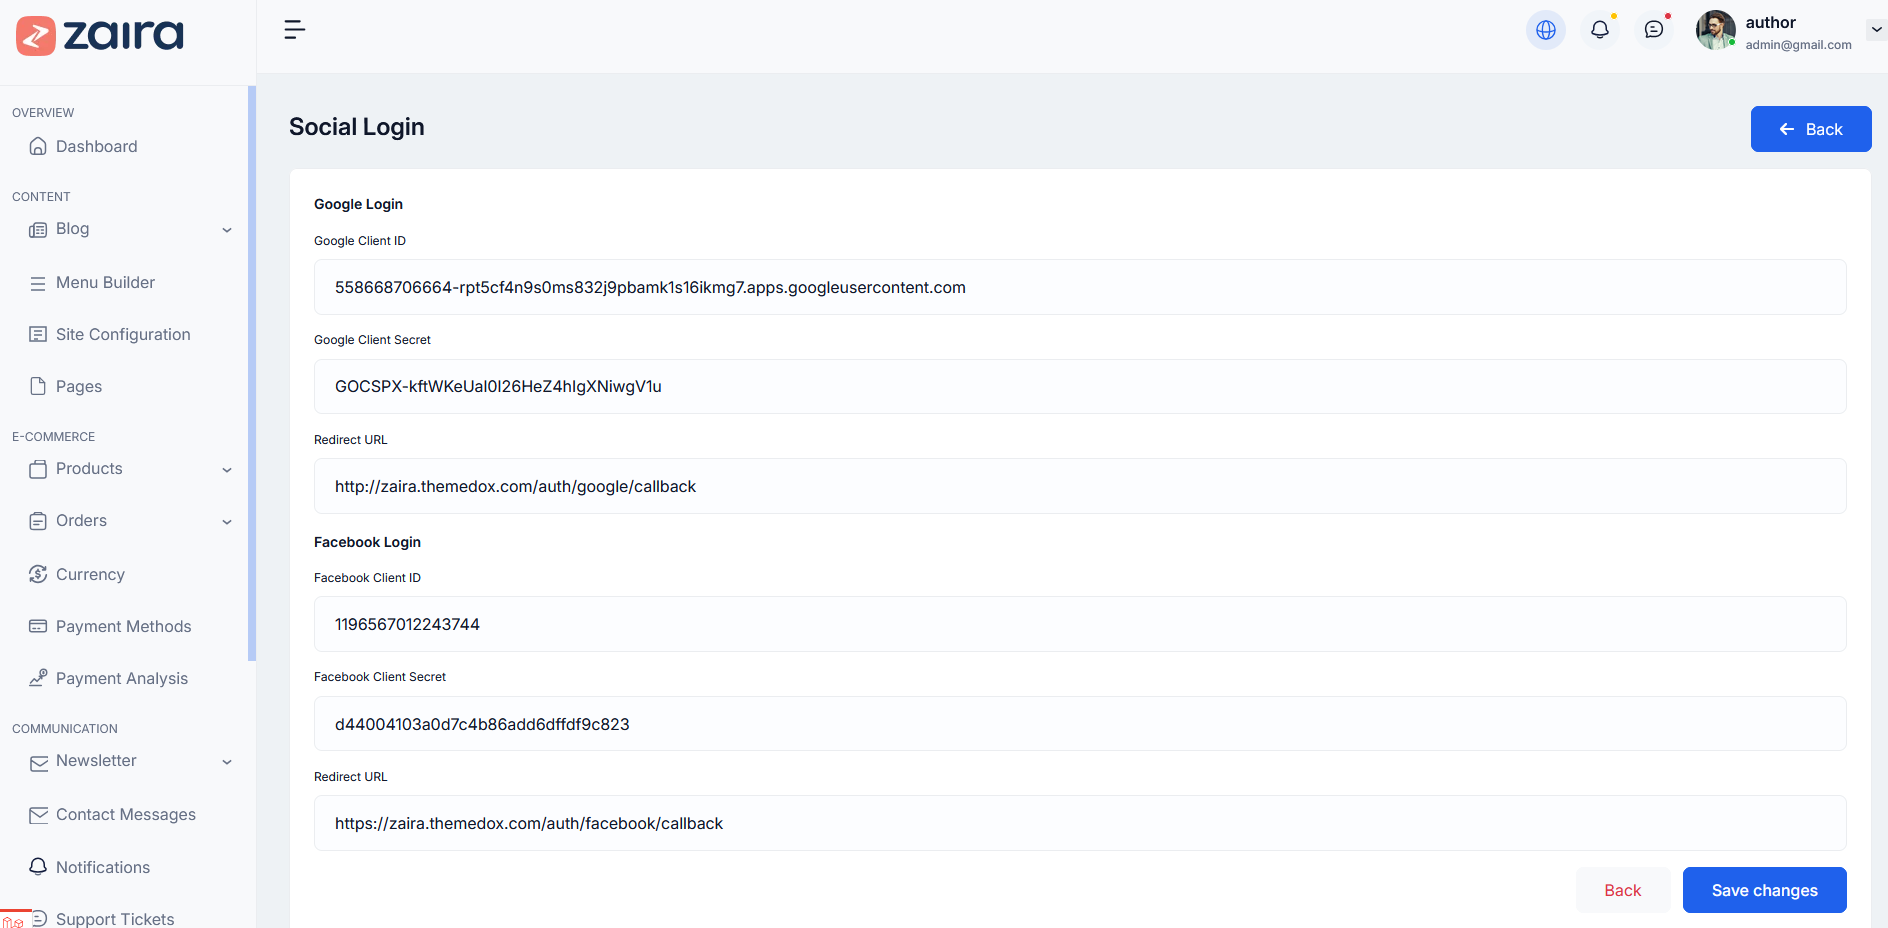
How to Configure Social Login
Step 1: Click on Social Login.
Step 2: Configure Google Login:
- Enter Google Client ID
- Enter Google Client Secret
- Set Redirect URL
Step 3: Configure Facebook Login:
- Enter Facebook Client ID
- Enter Facebook Client Secret
- Set Redirect URL
Step 4: Click Save changes.
Here is the screenshot:
How to Configure Social Links
Step 1: Click on Social Link.
Step 2: Toggle "Show Social Links" to enable.
Step 3: Add links for:
- Facebook, Twitter/X, Instagram
- LinkedIn, YouTube, TikTok
- GitHub, Behance, Dribbble, Pinterest
Step 4: Click Save changes.
Here is the screenshot:

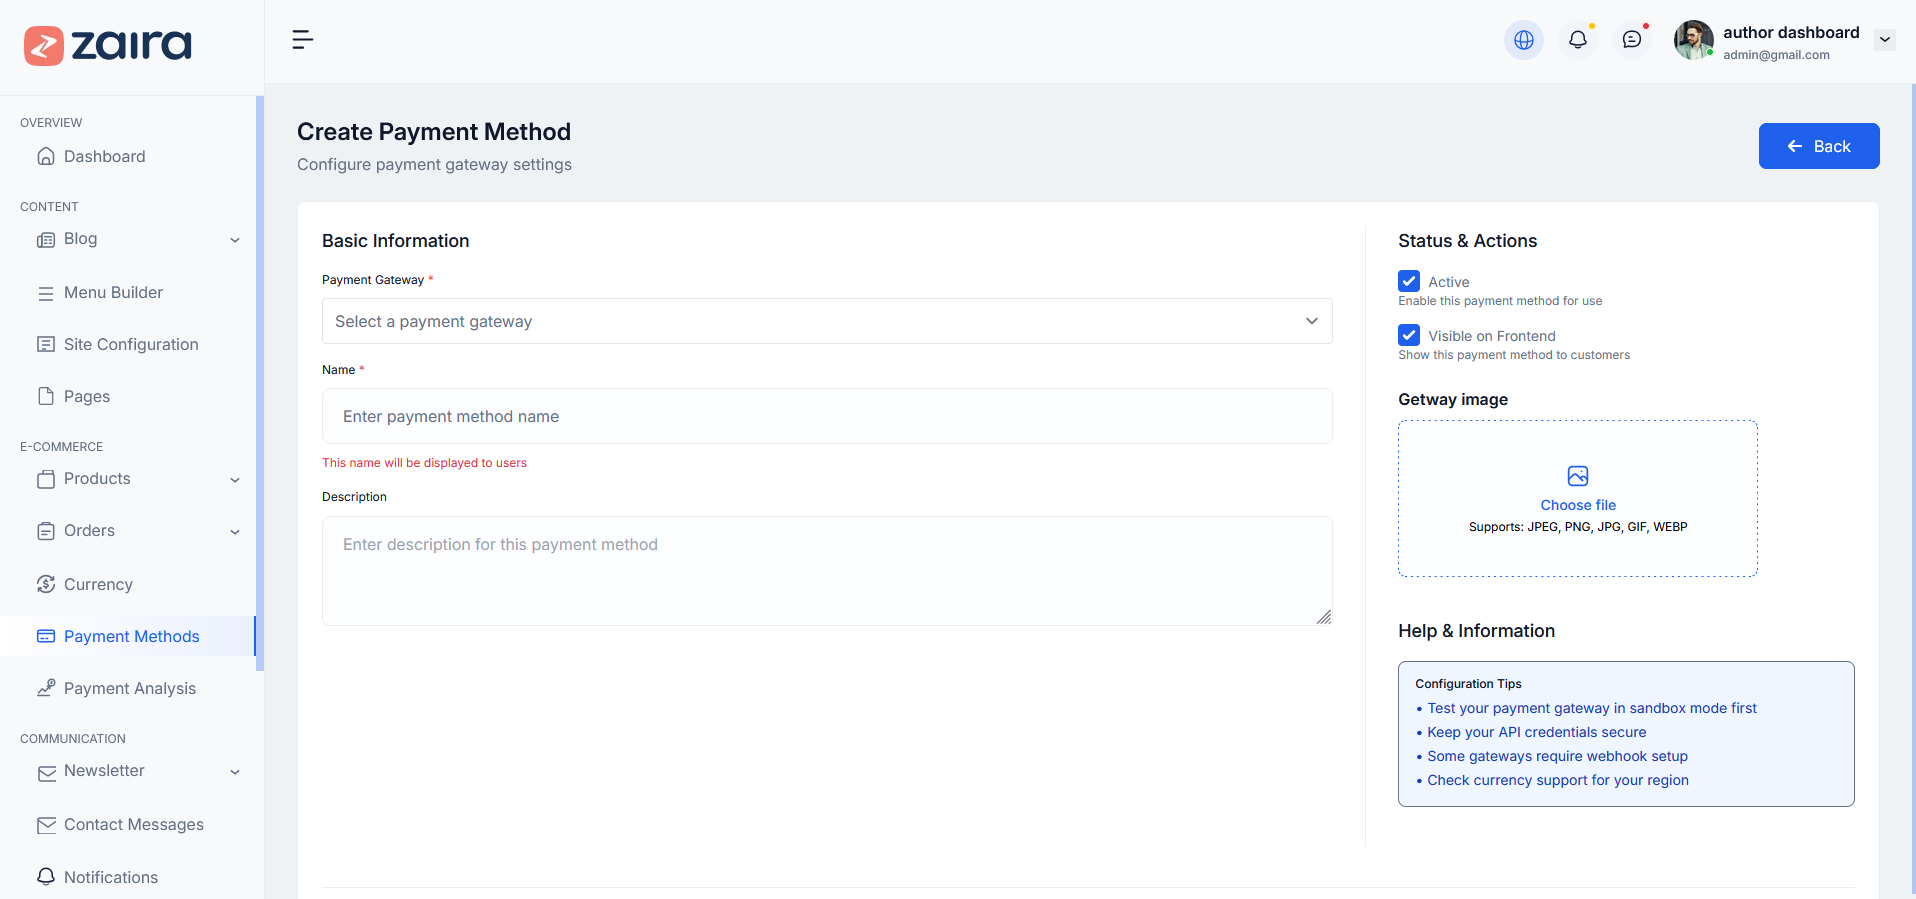
How to Create a New Payment Method
Step 1: Navigate to Dashboard > Payment Methods > Add Payment Method
Step 2: Select a payment gateway from the dropdown (Razorpay, PayMongo, 2Checkout, etc).
Step 3: Fill in the following details:
- Name (displayed to customers)
- Description
- Gateway Image
Step 4: Check the status options:
- Active (enable this payment method)
- Visible on Frontend (show to customers)
Step 5: Click Create Payment Method to save.
Here is the screenshot:
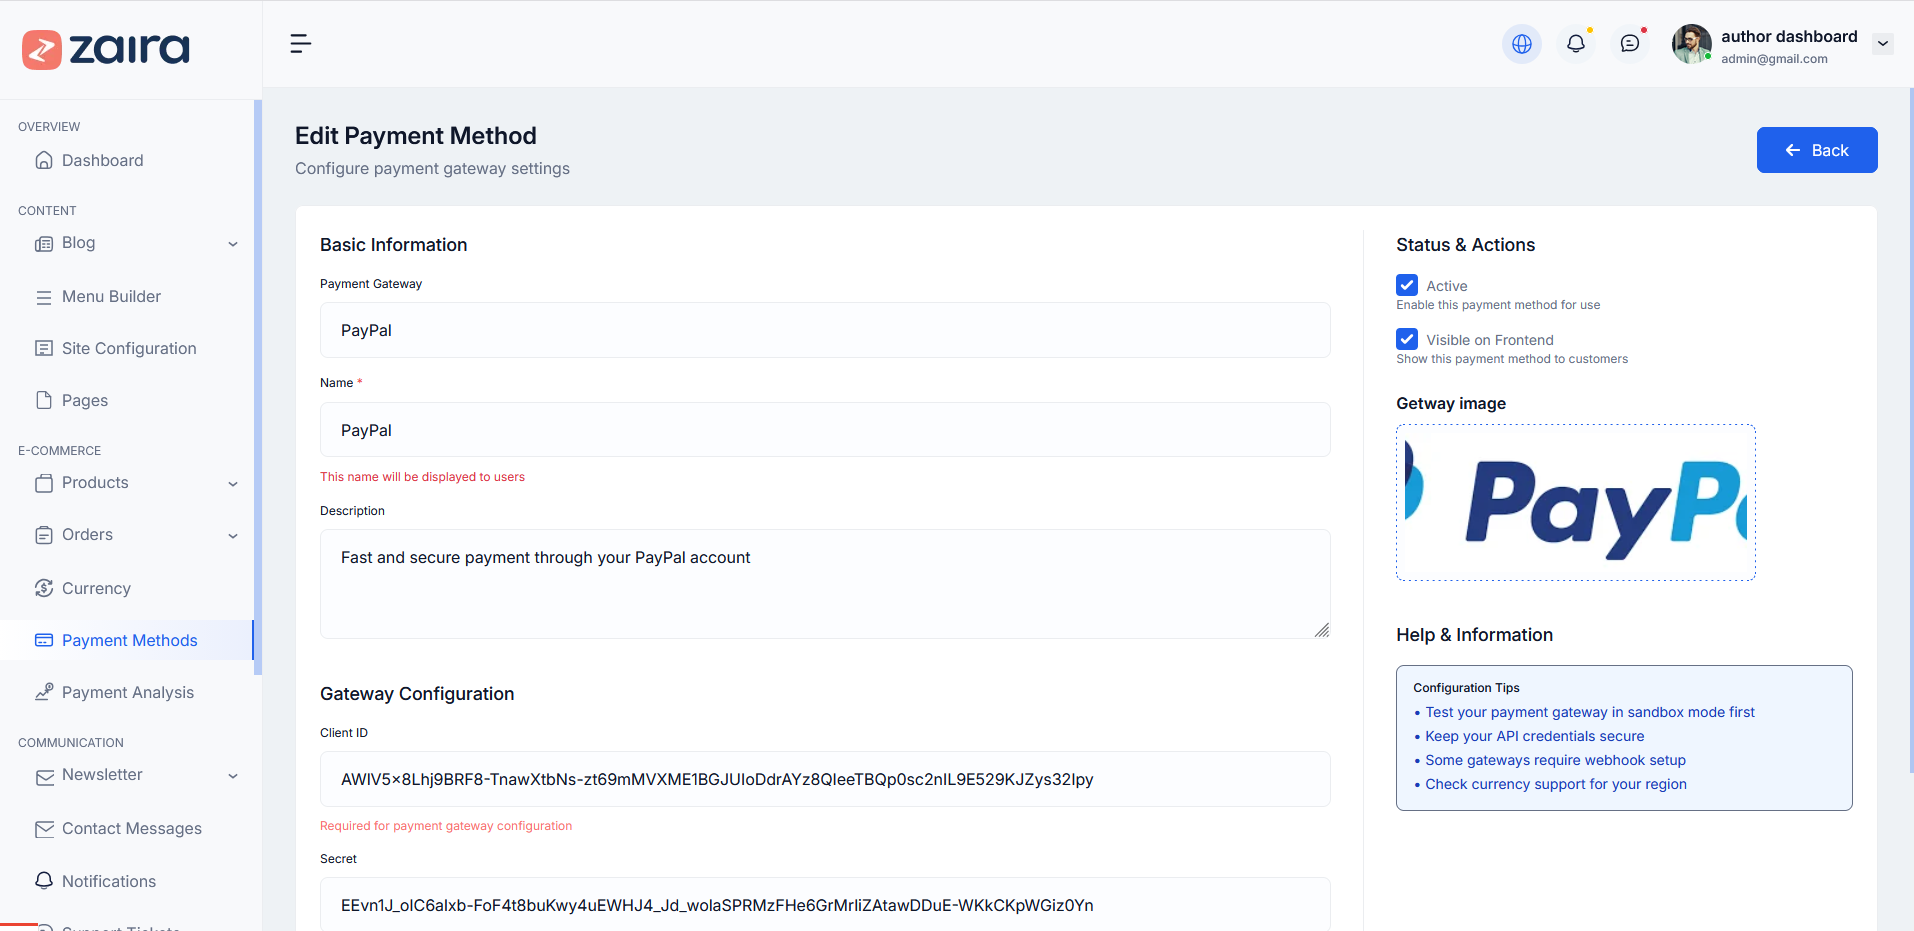
How to Edit a Payment Method
Step 1: Navigate to Dashboard > Payment Methods
Step 2: Click the edit icon next to the payment method you want to modify.
Step 3: Update the following details:
- Payment Gateway
- Name
- Description
- Gateway Image
- Active status
- Frontend visibility
Step 4: Configure gateway credentials (Client ID, Secret Key, etc) as needed.
Step 5: Click Update Payment Method to save changes.
Here is the screenshot:
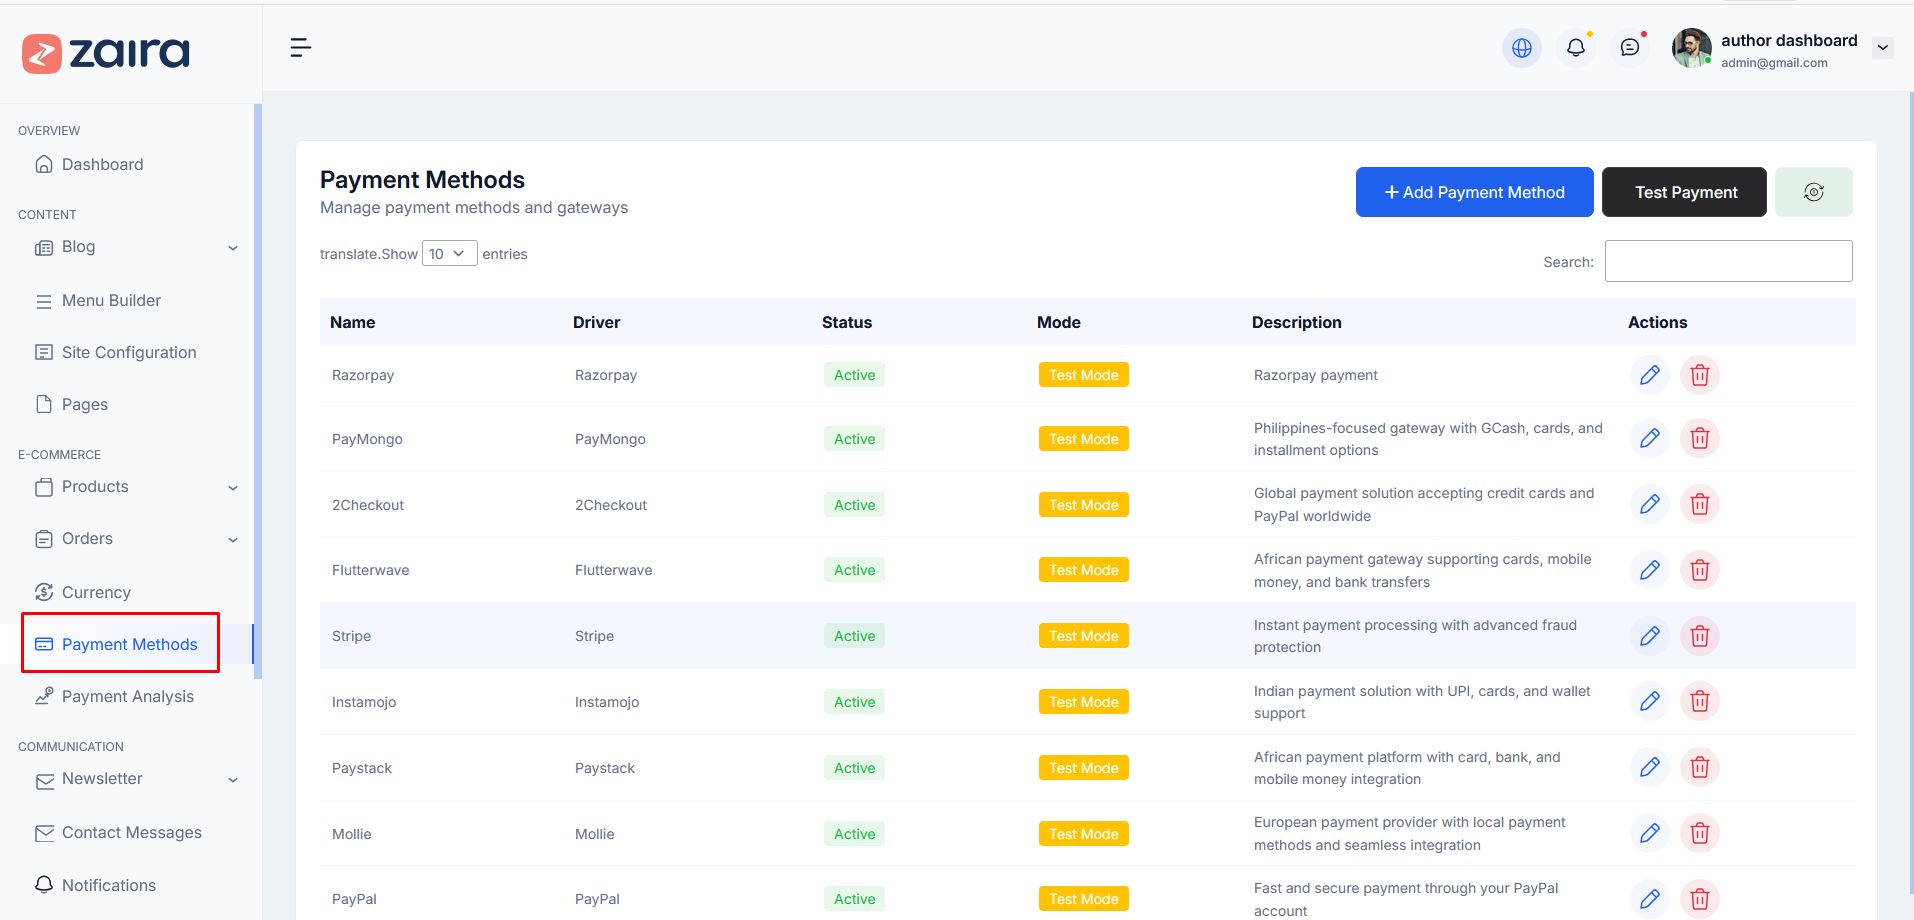
How to Manage Payment Methods
Step 1: Navigate to Dashboard > Payment Methods
Step 2: You will see a list of all available payment methods with Name, Driver, Status, Mode, and Description.
Step 3: You can add, edit or delete any payment method from the Actions column.
Here is the screenshot:
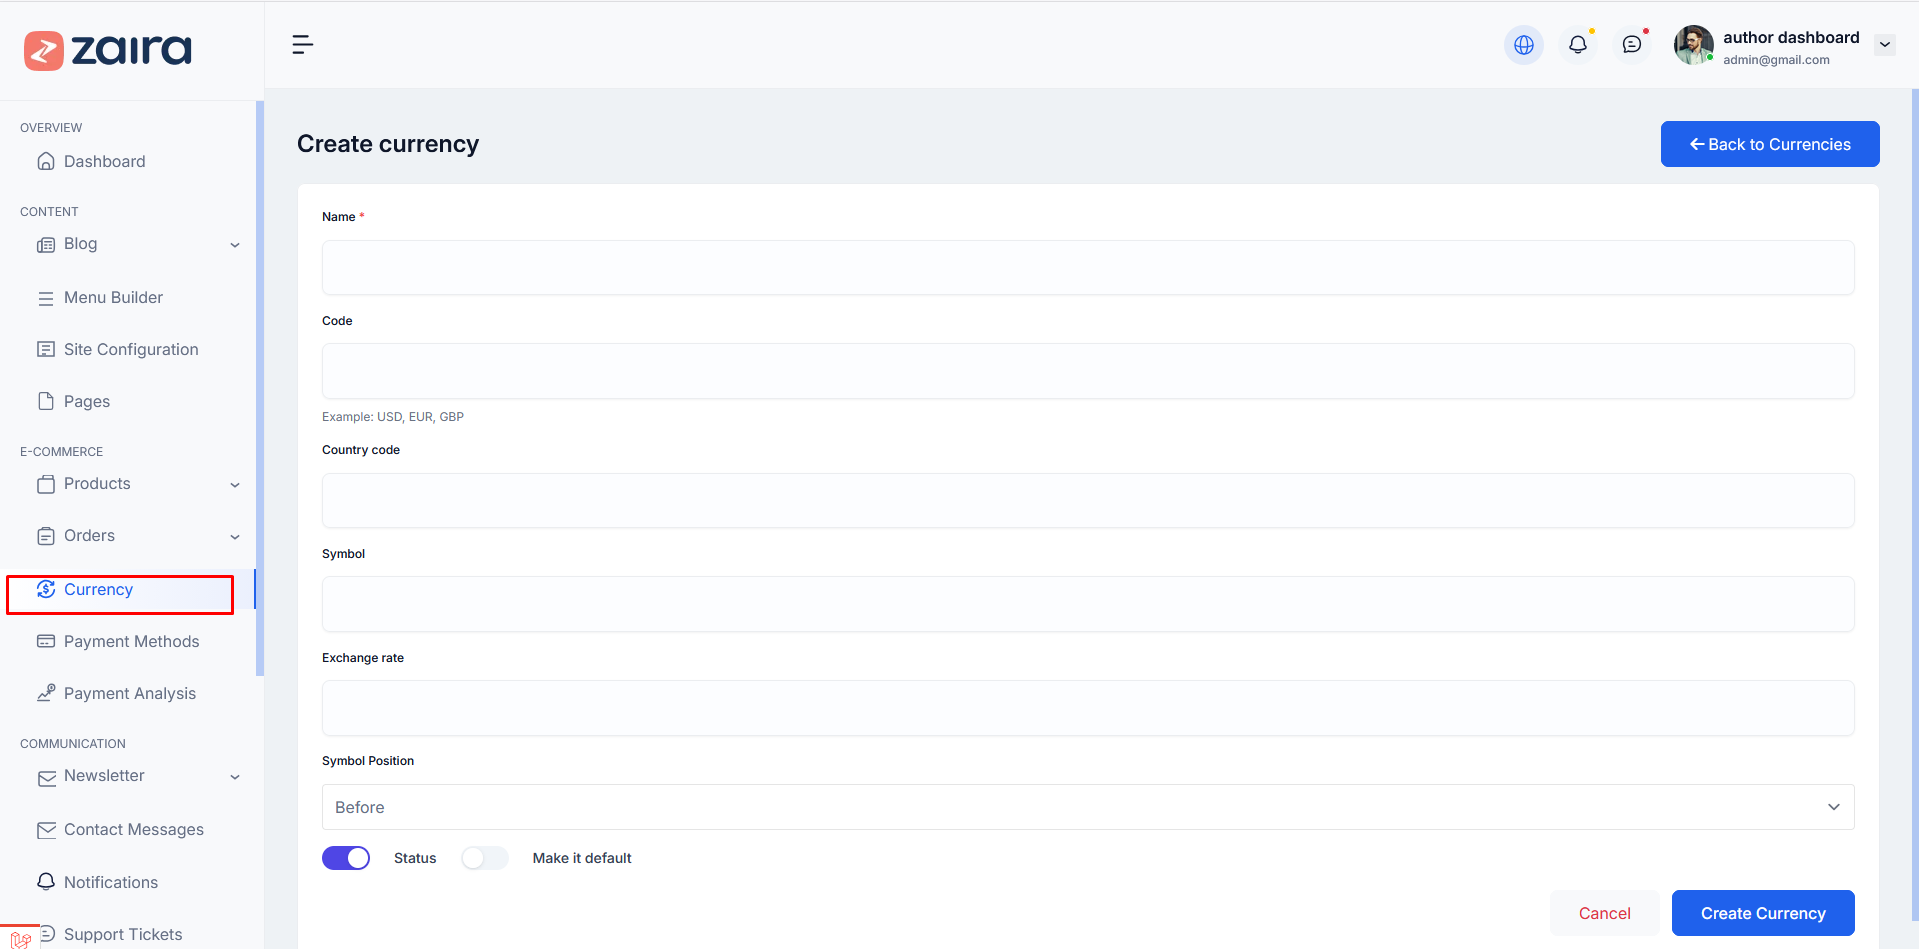
How to Create a New Currency
Step 1: Navigate to Dashboard > Currency > Add New Currency
Step 2: Fill in the following details:
- Name (e.g., US Dollar)
- Code (e.g., USD, EUR, GBP)
- Country code (e.g., USA, BD)
- Symbol (e.g., $, €, ₹)
- Exchange rate
- Symbol Position (Before or After)
Step 3: Check the status options:
- Status (enable this currency)
- Make it default (set as default currency)
Step 4: Click Create Currency to save.
Here is the screenshot:
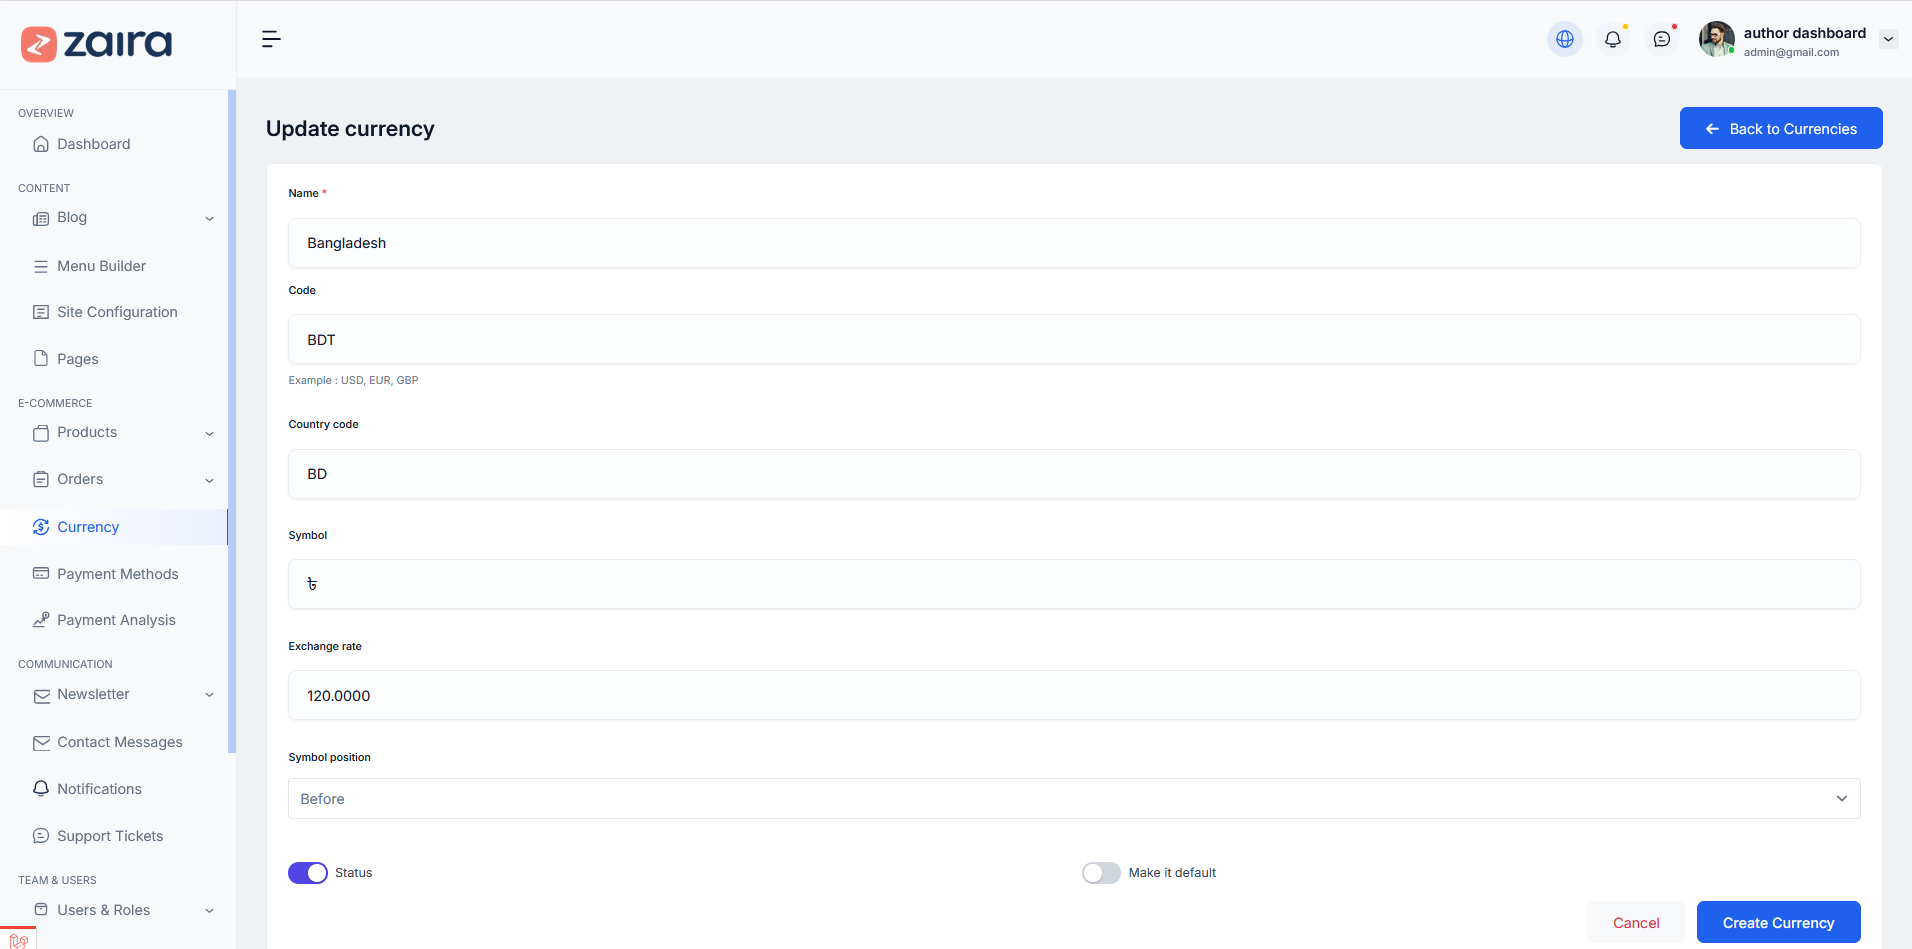
How to Edit a Currency
Step 1: Navigate to Dashboard > Currency
Step 2: Click the edit icon next to the currency you want to modify.
Step 3: Update the following details:
- Name
- Code
- Country code
- Symbol
- Exchange rate
- Symbol Position
- Status
- Default currency setting
Step 4: Click Create Currency to save changes.
Here is the screenshot:
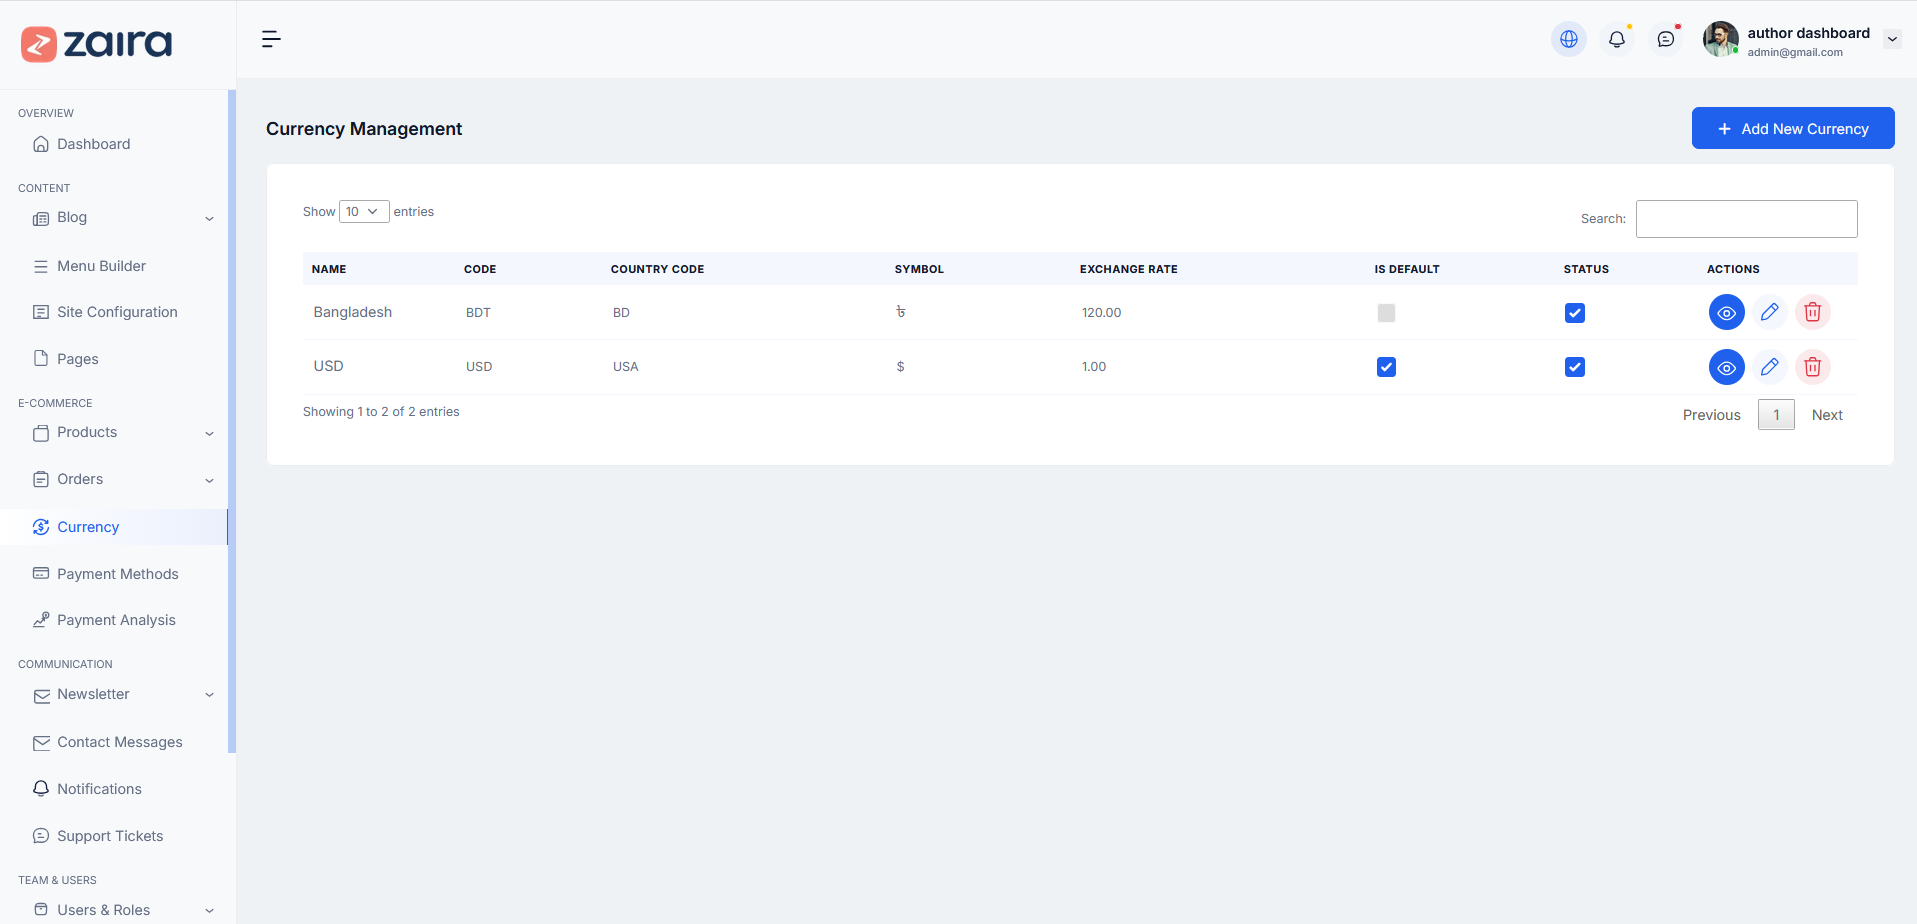
How to Manage Currencies
Step 1: Navigate to Dashboard > Currency
Step 2: You will see a list of all available currencies with Name, Code, Country Code, Symbol, Exchange Rate, Is Default, and Status.
Step 3: You can add, edit or delete any currency from the Actions column.
Here is the screenshot:
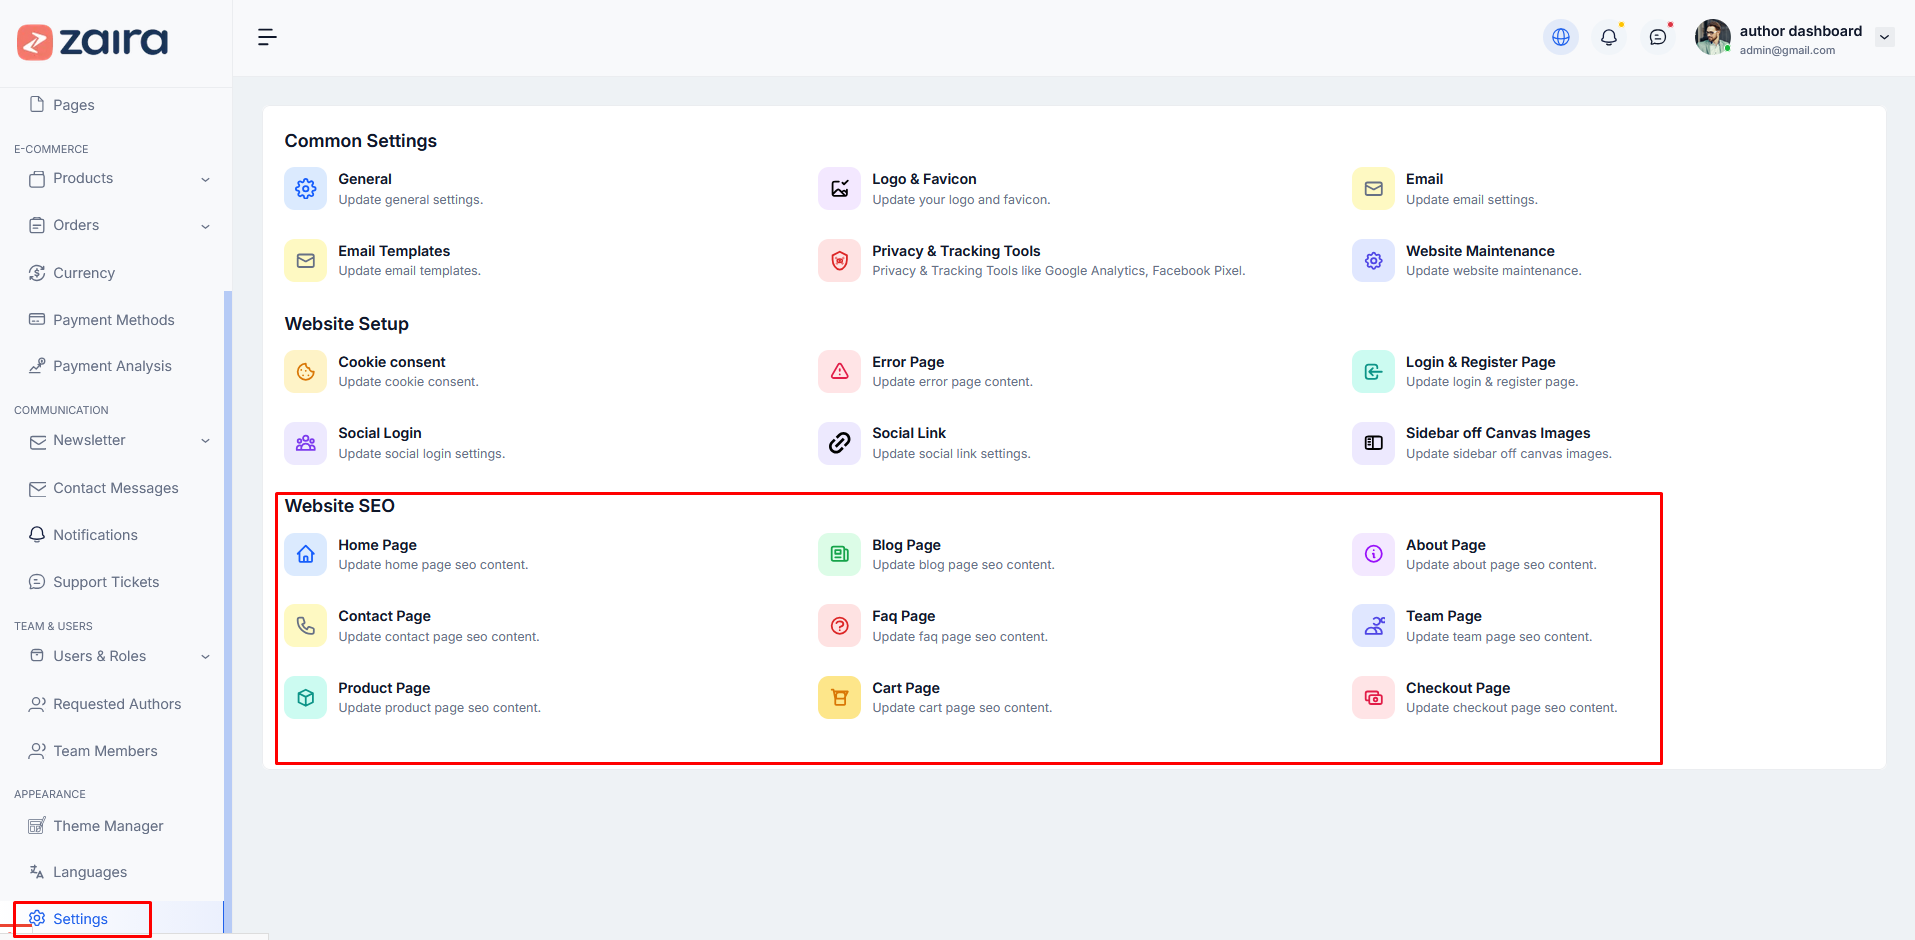
How to Configure Website SEO
Step 1: Navigate to Dashboard > Settings > Website SEO
Step 2: You will see different pages listed: Home Page, Blog Page, About Page, Contact Page, Product Page, Team Page, Faq Page, Cart Page, Checkout Page.
Step 3: Click on any page to update its SEO content.
How to Update Home Page SEO
Step 1: Navigate to Dashboard > Settings > Website SEO > Home Page
Step 2: Fill in the following details:
- Title (Page title for search engines)
- Description (Meta description)
- Keywords (Separated by commas)
Step 3: Click Save changes to save.
Here is the screenshot:

How to Update Blog Page SEO
Step 1: Navigate to Dashboard > Settings > Website SEO > Blog Page
Step 2: Fill in the following details:
- Title (Page title for search engines)
- Description (Meta description)
- Keywords (Separated by commas)
Step 3: Click Save changes to save.
Here is the screenshot:

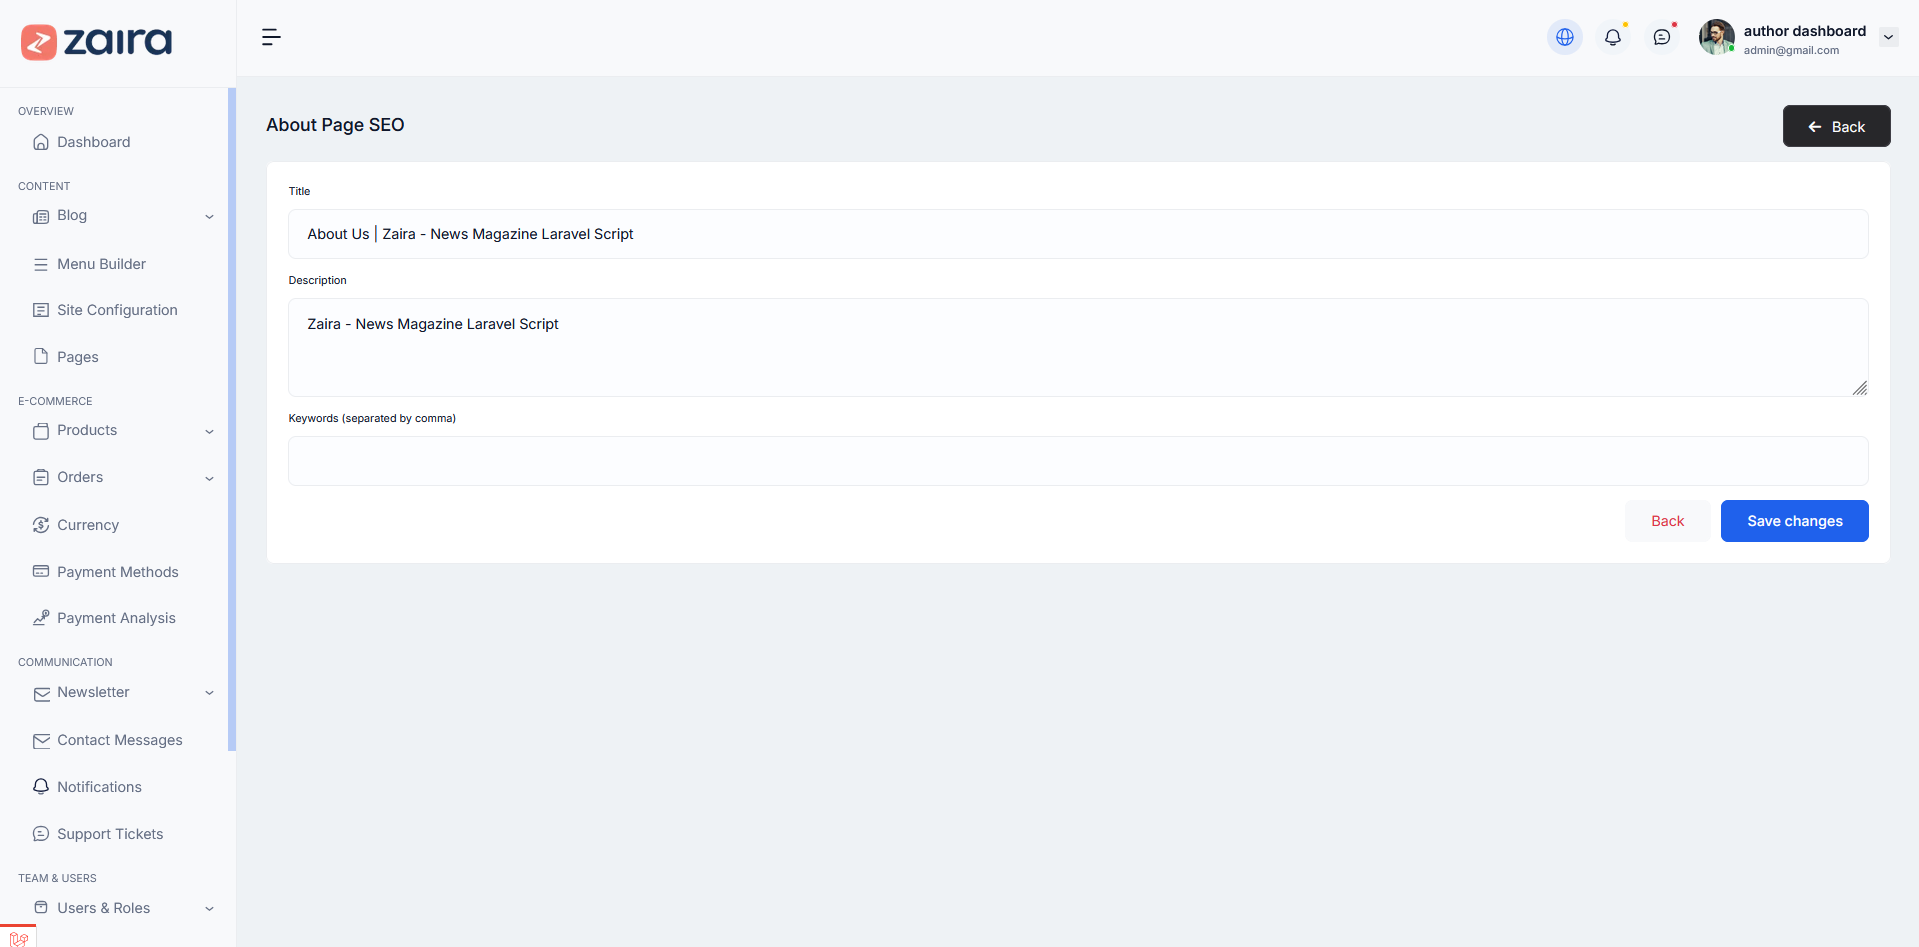
How to Update About Page SEO
Step 1: Navigate to Dashboard > Settings > Website SEO > About Page
Step 2: Fill in the following details:
- Title (Page title for search engines)
- Description (Meta description)
- Keywords (Separated by commas)
Step 3: Click Save changes to save.
Here is the screenshot:
How to Update Other Page SEO
Similar to Home Page, Blog Page, and About Page, you can update SEO for the following pages in the same way:
- Contact Page
- Product Page
- Team Page
- Faq Page
- Cart Page
- Checkout Page
For each page:
Step 1: Navigate to Dashboard > Settings > Website SEO > Select Page
Step 2: Add Title, Description, and Keywords for SEO optimization.
Step 3: Click Save changes to save.
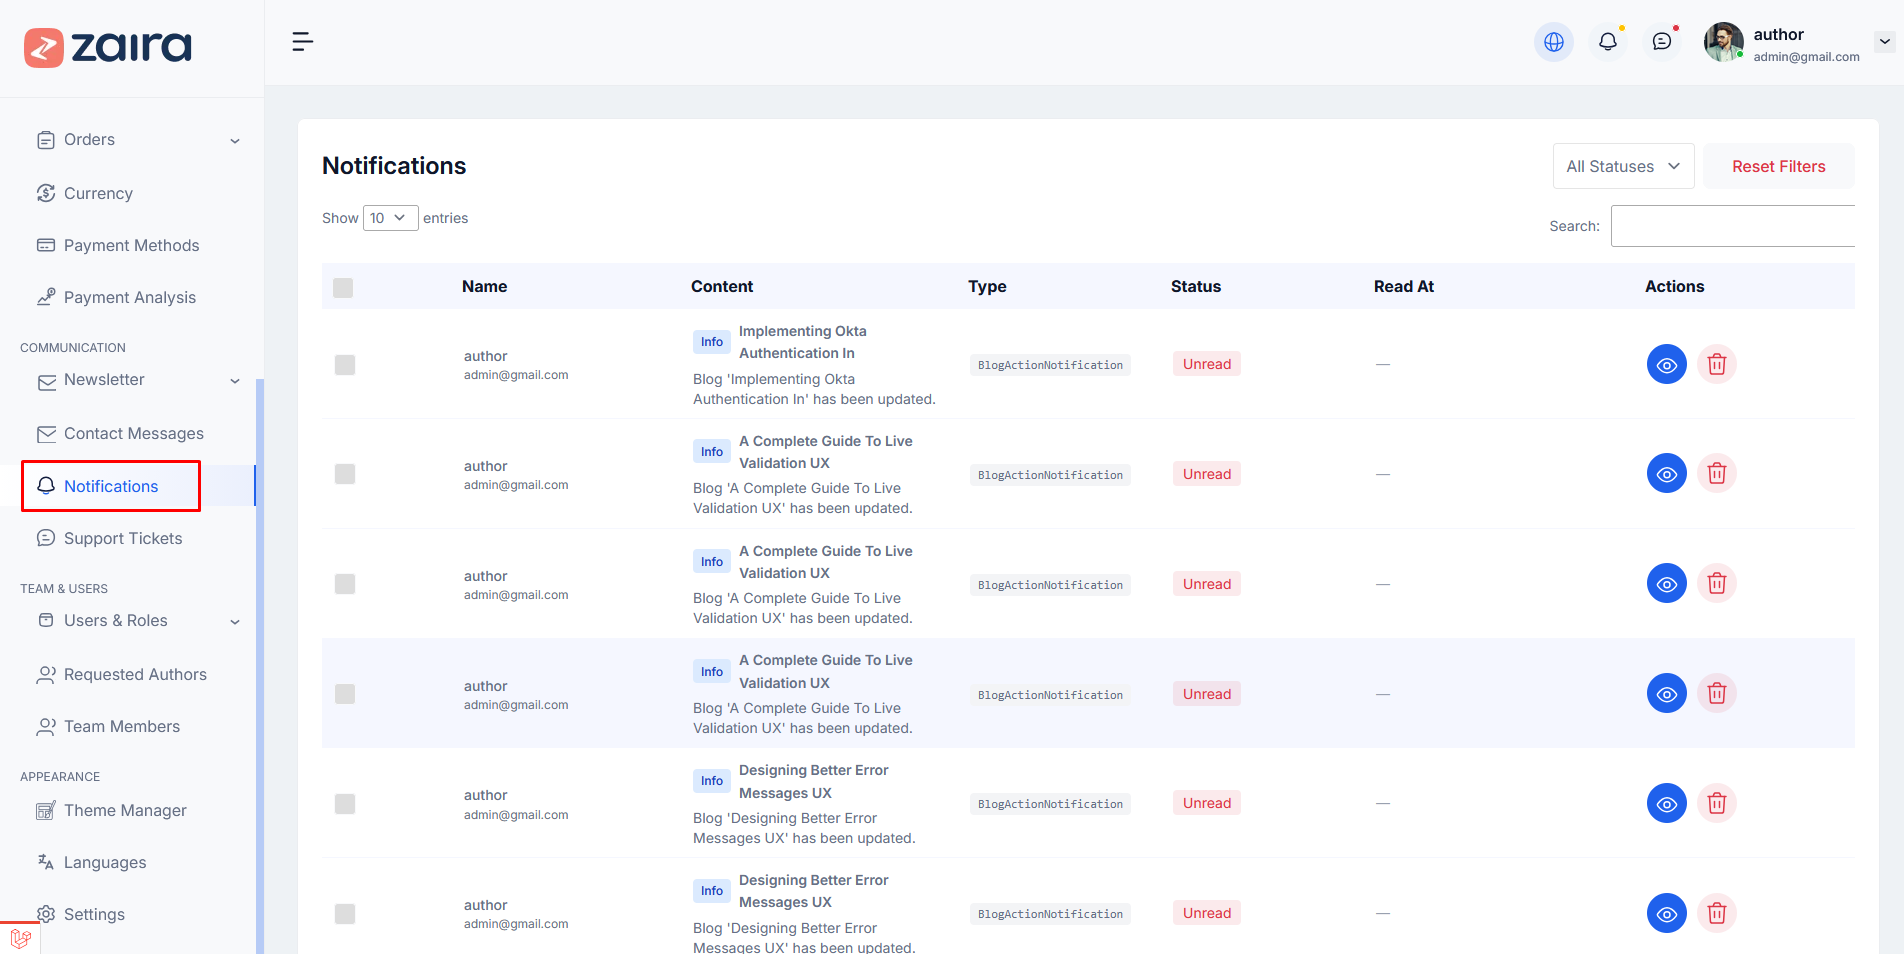
How to Manage Notifications
Step 1: Navigate to Dashboard > Notifications
Step 2: You will see a list of all notifications with Name, Content, Type, Status, and Read At information.
Step 3: Filter notifications by status: All Statuses, Read, Unread.
Step 4: You can view, delete, or manage notifications as needed.
Here is the screenshot:
How to View Notification Details
Step 1: Click the eye icon to view the full notification content.
Step 2: You can see:
- Notification sender/Name
- Notification content/message
- Notification type (Info, Alert, Update, etc)
- Current status (Read/Unread)
- When it was received
Step 3: Click the delete icon to remove notifications.
Types of Notifications
You may receive notifications for:
- Blog posts updated or published
- Action notifications (BlogActionNotification)
- System updates
- New orders or customer messages
- Other system events
Each notification will show the type, content, and relevant information to keep you informed about your website activities.
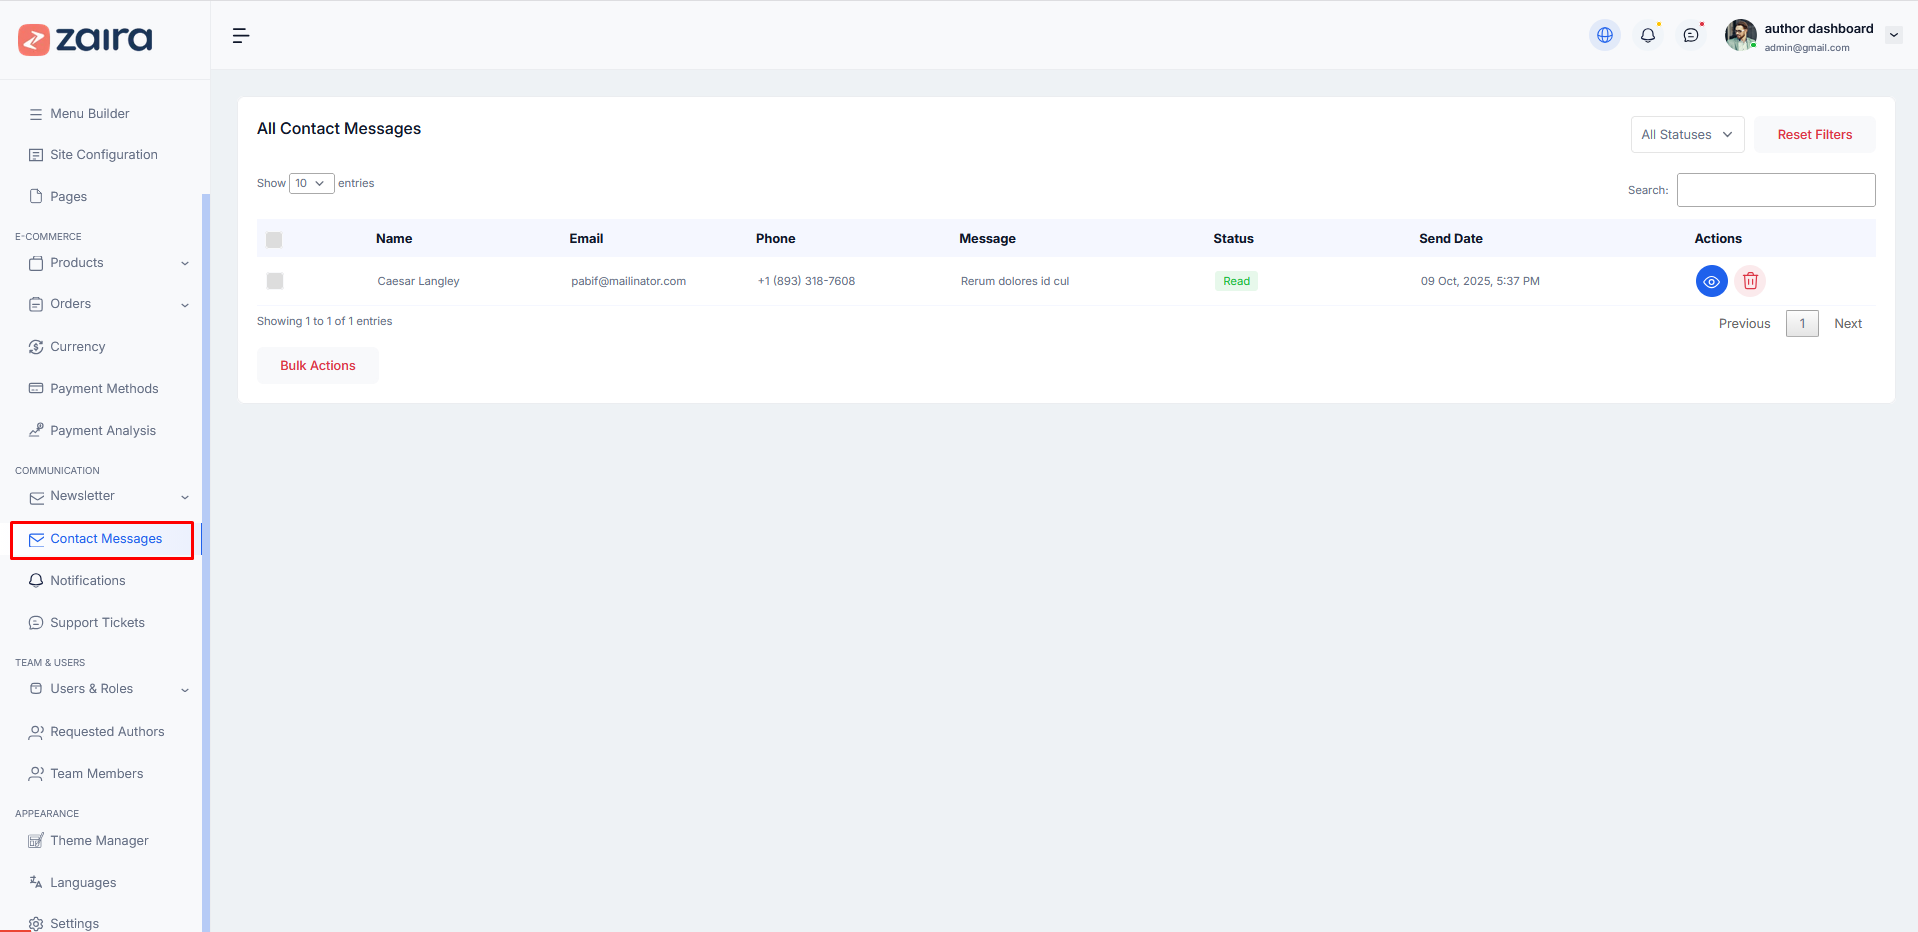
How to Manage Contact Messages
Step 1: Navigate to Dashboard > Contact Messages
Step 2: You will see a list of all contact messages with Name, Email, Phone, Message, Status, and Send Date.
Step 3: Click the eye icon to view message details or delete icon to remove messages.
Step 4: Use filters to manage messages by status (Read, Unread, Replied).
Here is the screenshot:
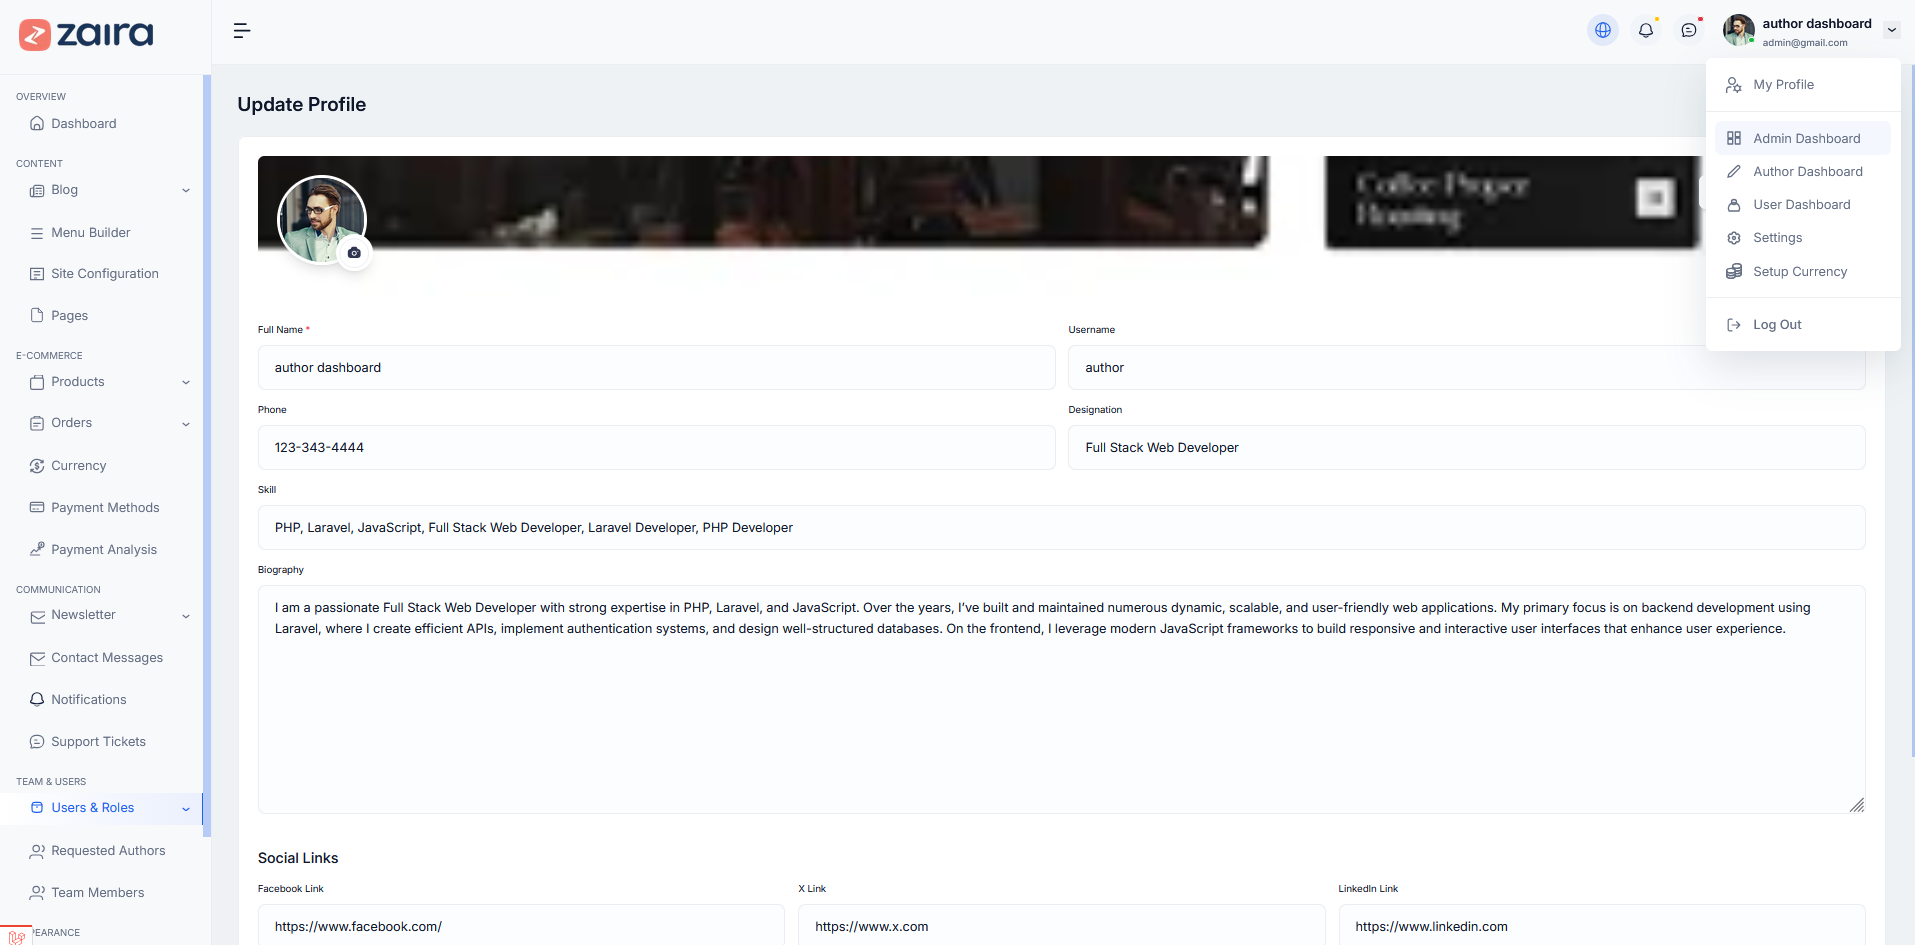
How to Update Admin Profile
Step 1: Navigate to Dashboard > Click on your profile icon at the top right > My Profile
Step 2: You can update the following information:
- Profile Picture/Avatar
- Full Name
- Username
- Phone
- Designation
- Skills
- Biography
Step 3: Add your social media links:
- Facebook Link
- X (Twitter) Link
- LinkedIn Link
Step 4: Click Save to save all changes.
Here is the screenshot:
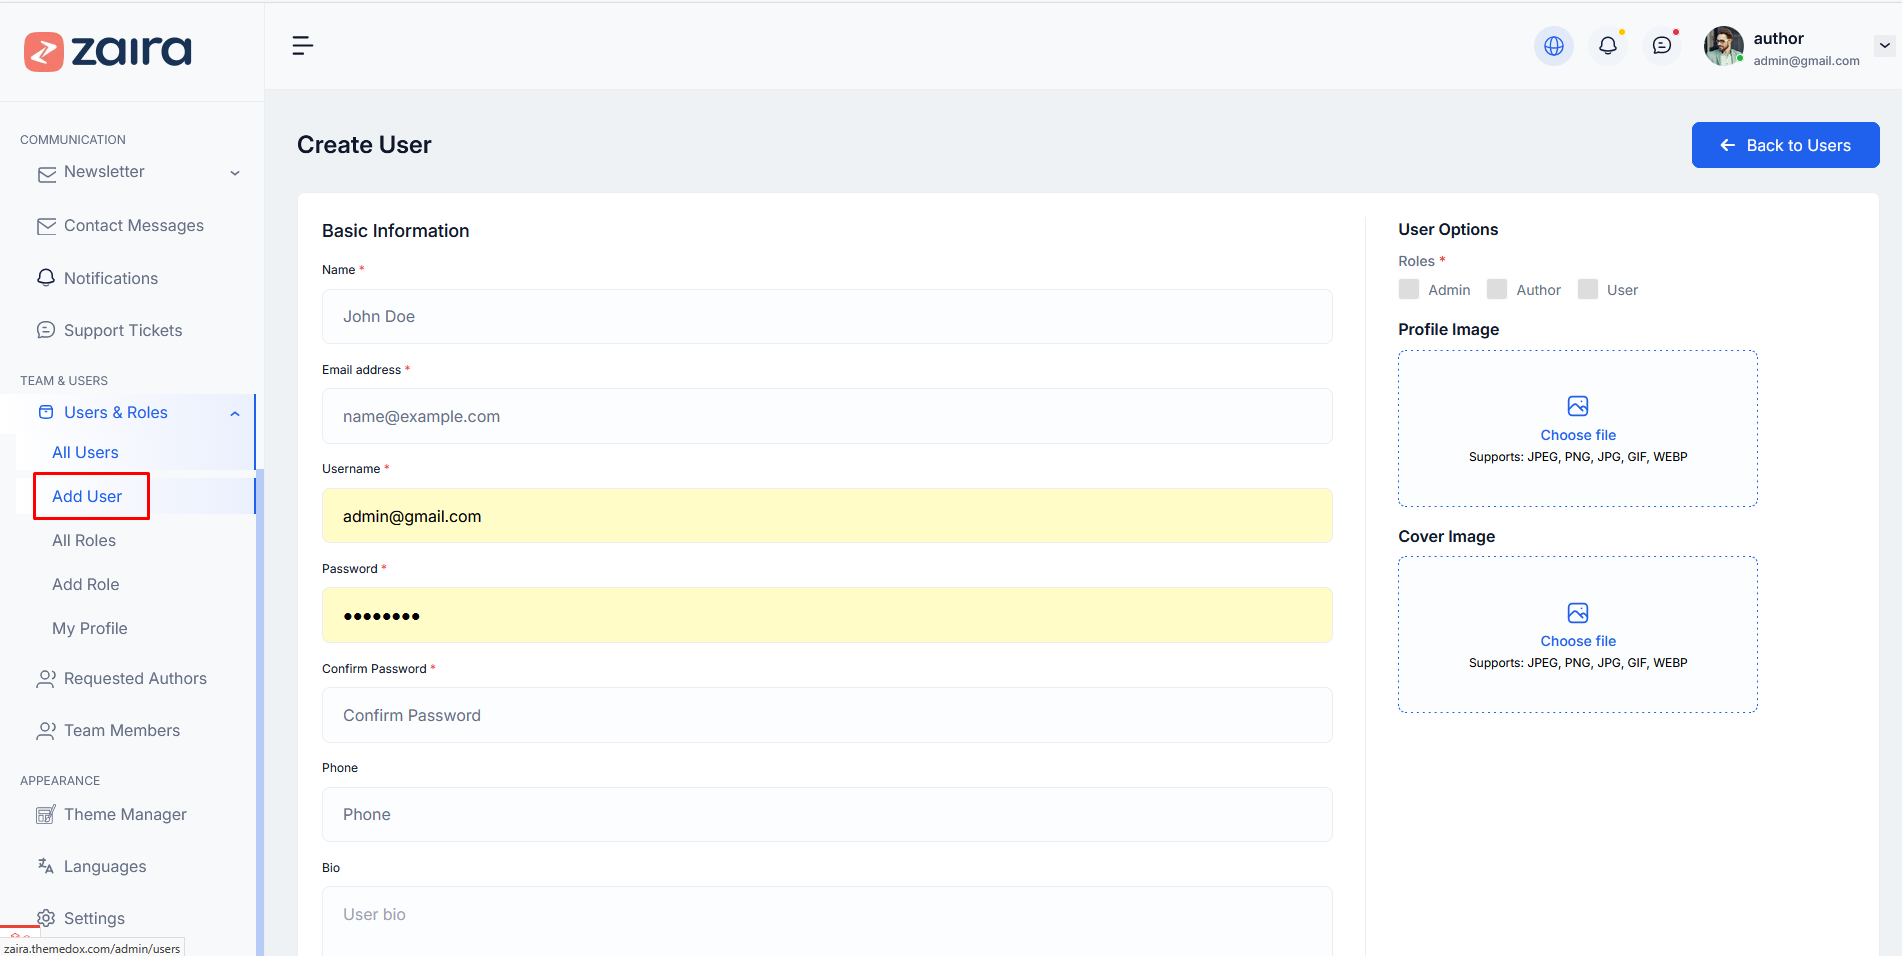
How to Create a New User
Step 1: Navigate to Dashboard > Users & Roles > Add User
Step 2: Fill in the following information:
- Name
- Email address
- Username
- Password
- Confirm Password
- Phone
- Bio
Step 3: Assign Roles (Admin, Author, User) to the user.
Step 4: Upload Profile Image and Cover Image.
Step 5: Click Create User to save.
Here is the screenshot:
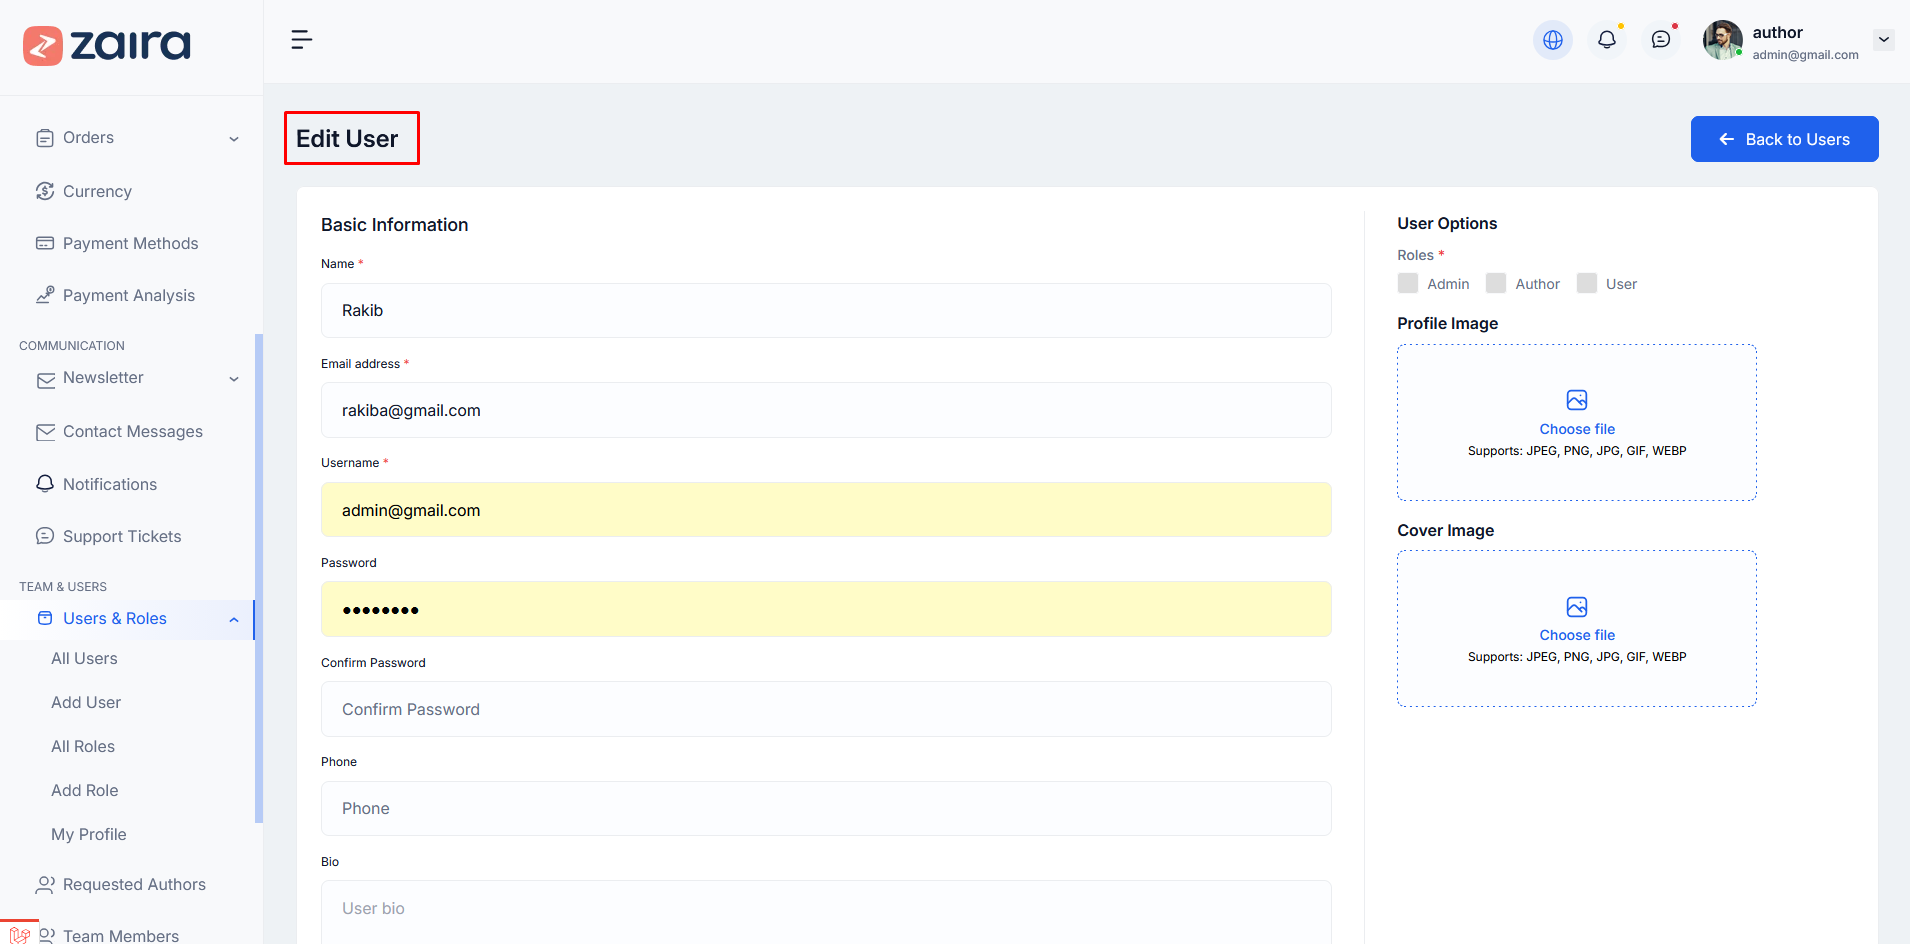
How to Edit a User
Step 1: Navigate to Dashboard > Users & Roles > All Users
Step 2: Click the edit icon next to the user you want to modify.
Step 3: Update Basic Information:
- Name
- Email address
- Username
- Password (optional - leave empty to keep current password)
- Confirm Password
- Phone
- Bio
Step 4: Update User Options:
- Assign Roles: Select Admin, Author, or User
- Upload Profile Image
- Upload Cover Image
Step 5: Click Update User to save all changes.
Here is the screenshot:
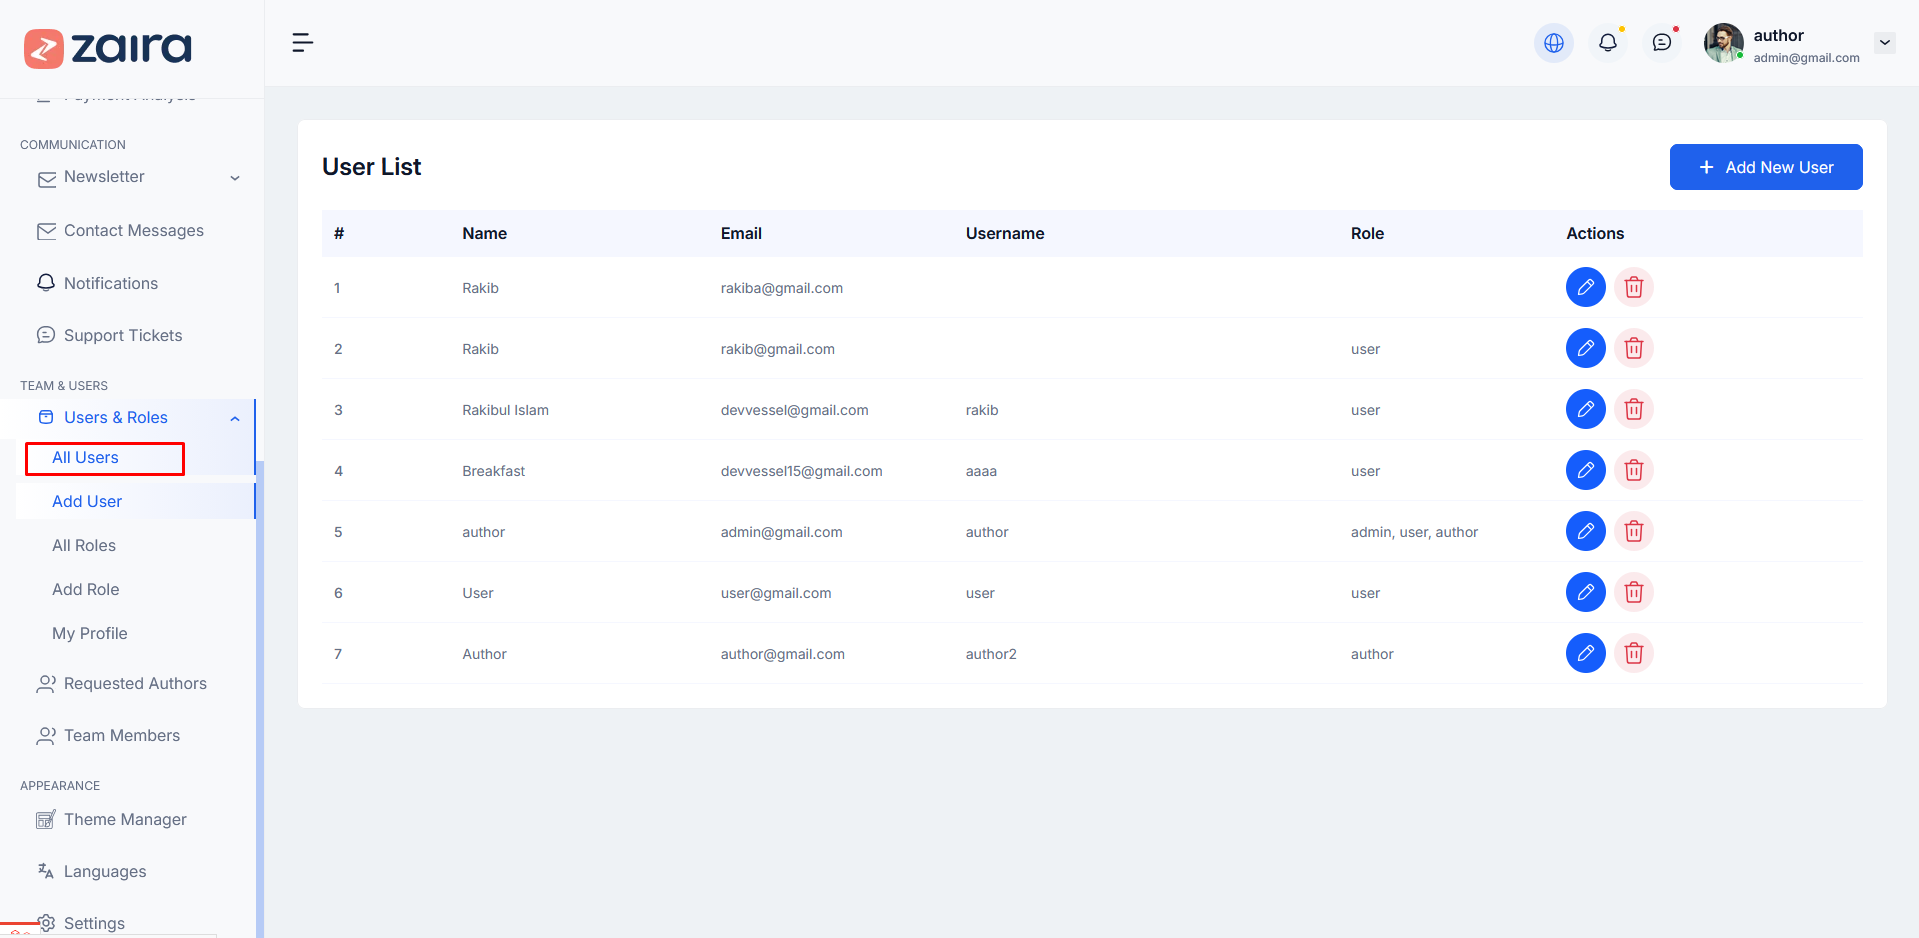
How to Manage Users
Step 1: Navigate to Dashboard > Users & Roles > All Users
Step 2: You will see a list of all users with Name, Email, Username, Role, and Actions.
Step 3: Click the edit icon to modify user details or delete icon to remove users.
Here is the screenshot:
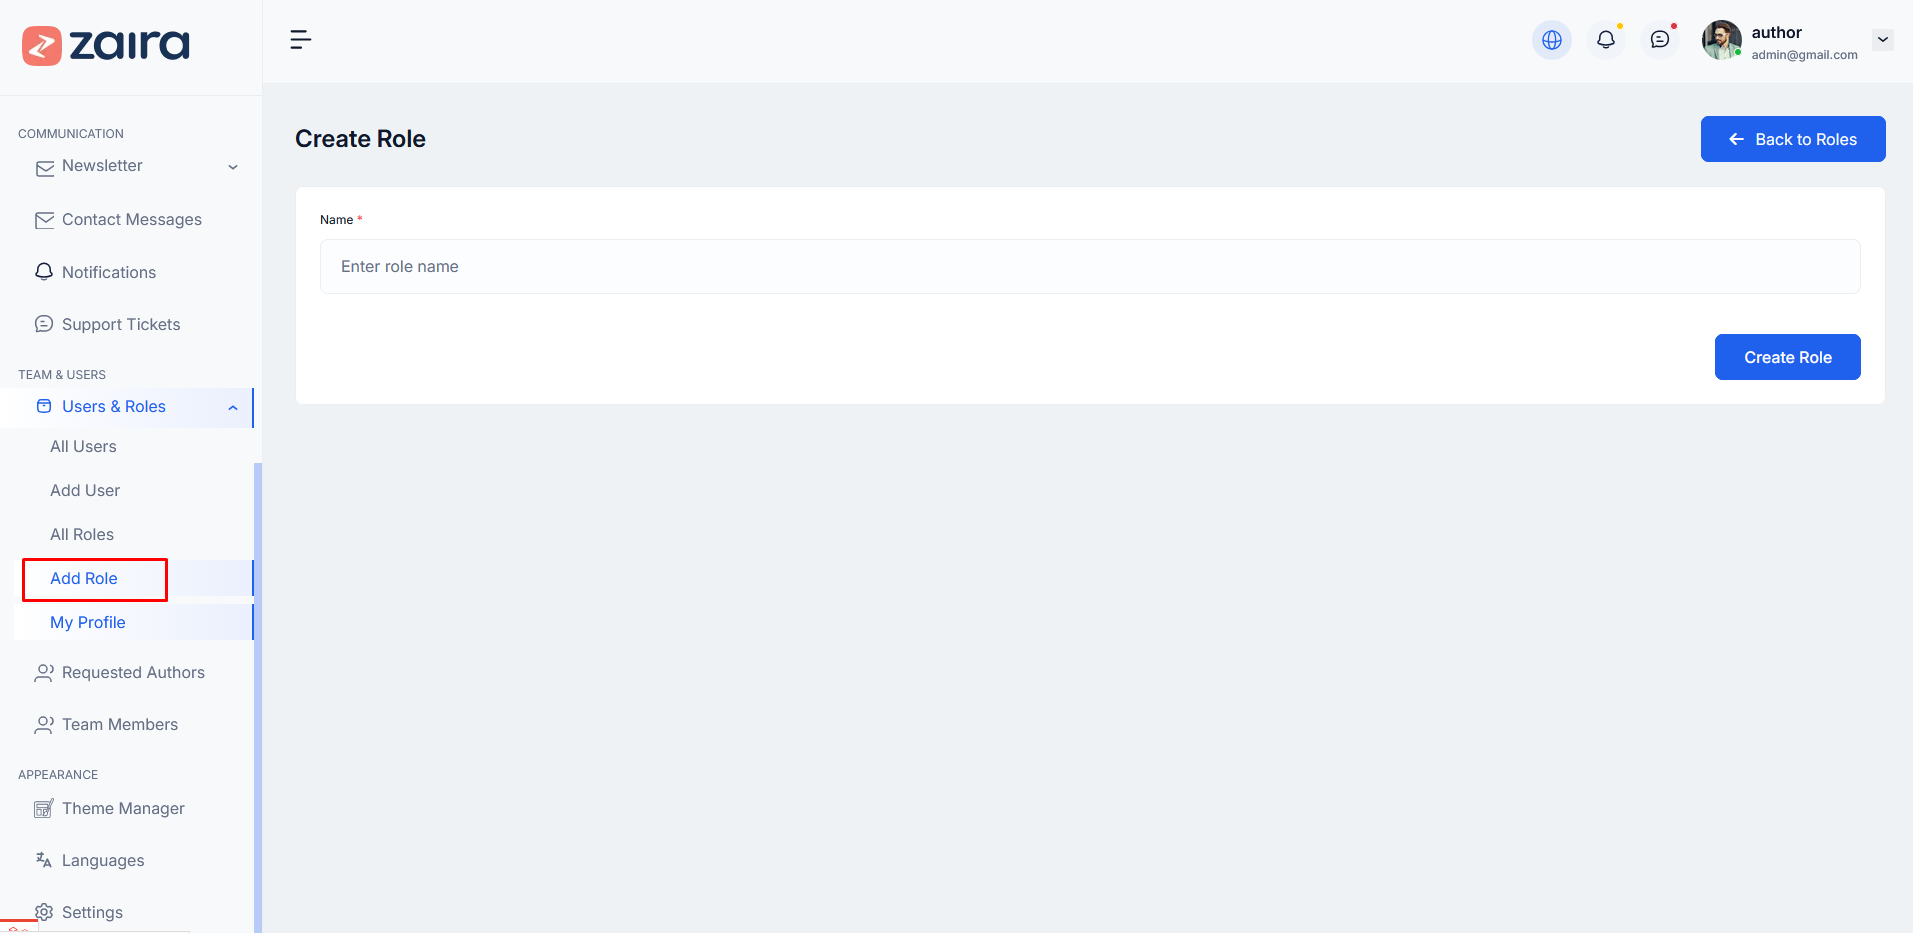
How to Create a New Role
Step 1: Navigate to Dashboard > Users & Roles > Add Role
Step 2: Add a role name and description.
Step 3: Assign permissions to this role for different features and content types.
Step 4: Click Create Role to save.
How to Edit Role
Here is the screenshot:
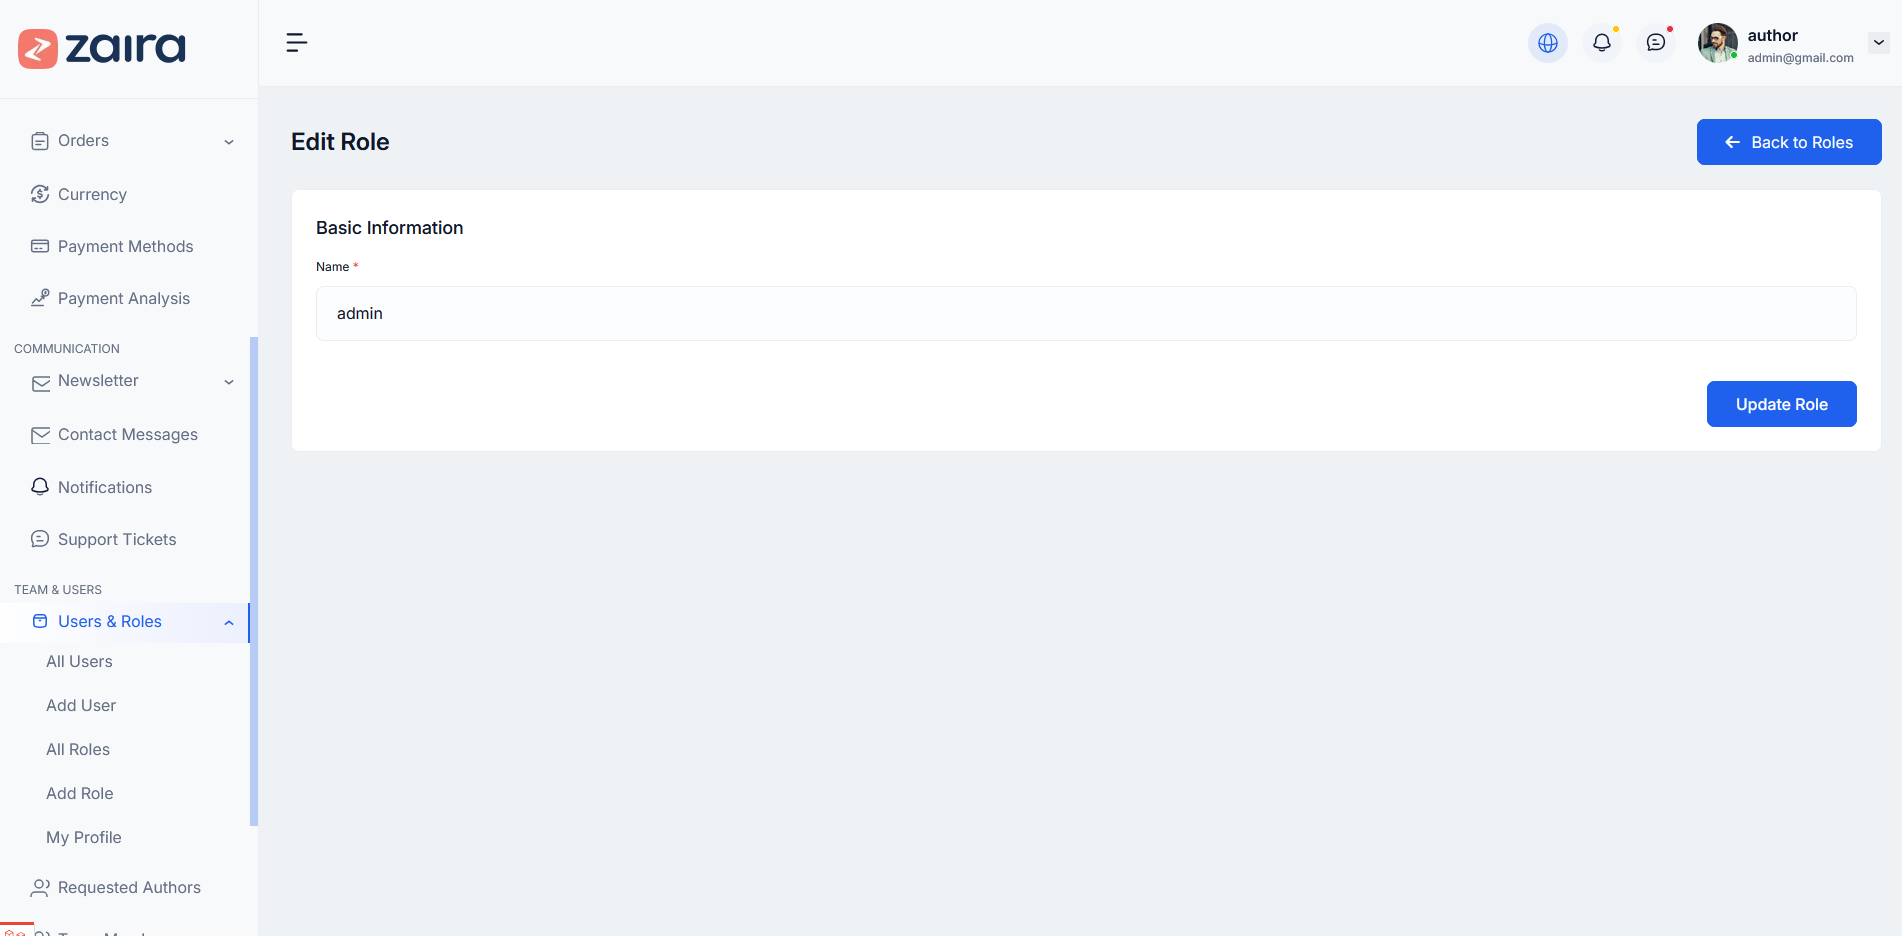
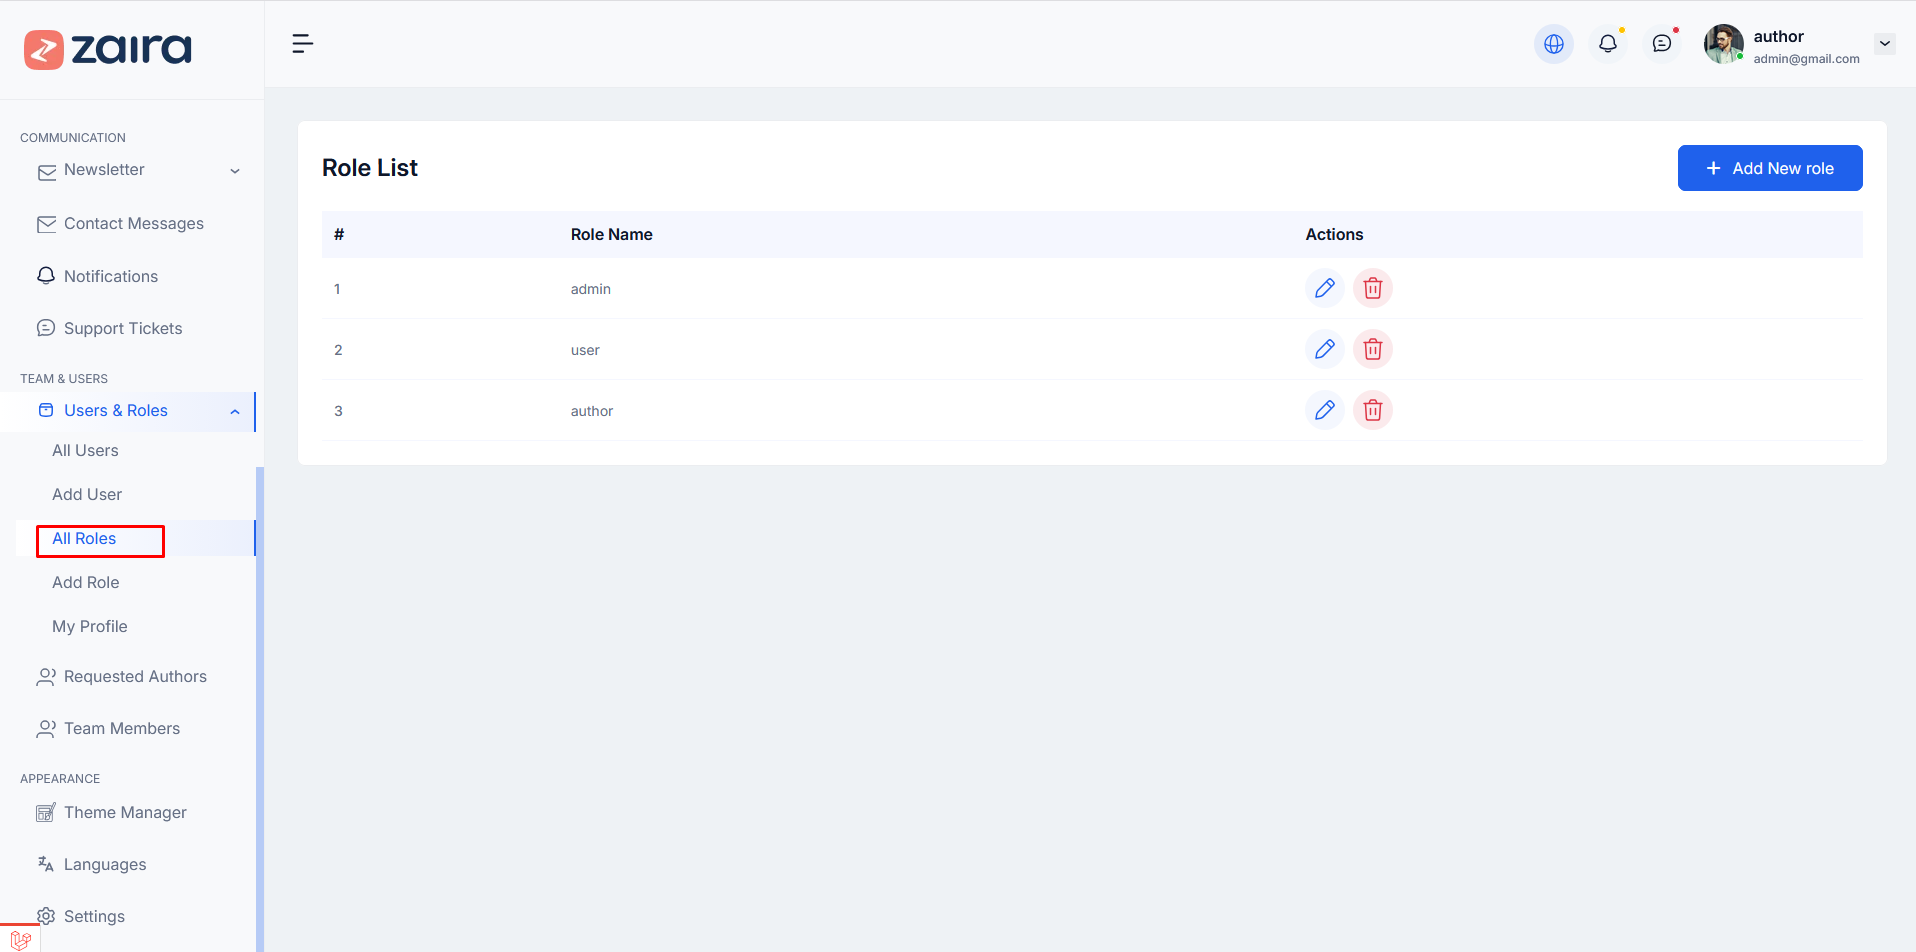
How to Manage Roles
Step 1: Navigate to Dashboard > Users & Roles > All Roles
Step 2: You will see all available roles like Admin, Author, User.
Step 3: Each role has different permissions for managing content.
Step 4: Click on a role to view or edit its permissions.
Support System
If you face any issues or need assistance regarding Zaira - Laravel
CMS,
you can reach out to our support team via the following email:
support@themedox.com
Our dedicated support team will respond to your queries within 24–48 hours (except weekends and public holidays). Please make sure to include detailed information about your issue, including screenshots or error messages if applicable, to help us assist you faster.
Support Includes
- Guidance on how to install and use Zaira - Laravel CMS
- Answering technical questions related to the CMS
- Fixing any bugs or issues within the core CMS
- Free updates to maintain compatibility and security
Support Does Not Include
- Custom feature development or advanced code modifications
- Server configuration or hosting-related issues
- Installation on live servers (unless included in a special package)
- Integration with third-party services or plugins
- Issues caused by modifying core files
Before contacting support, please review the System Requirements and the installation documentation to ensure everything is set up correctly.
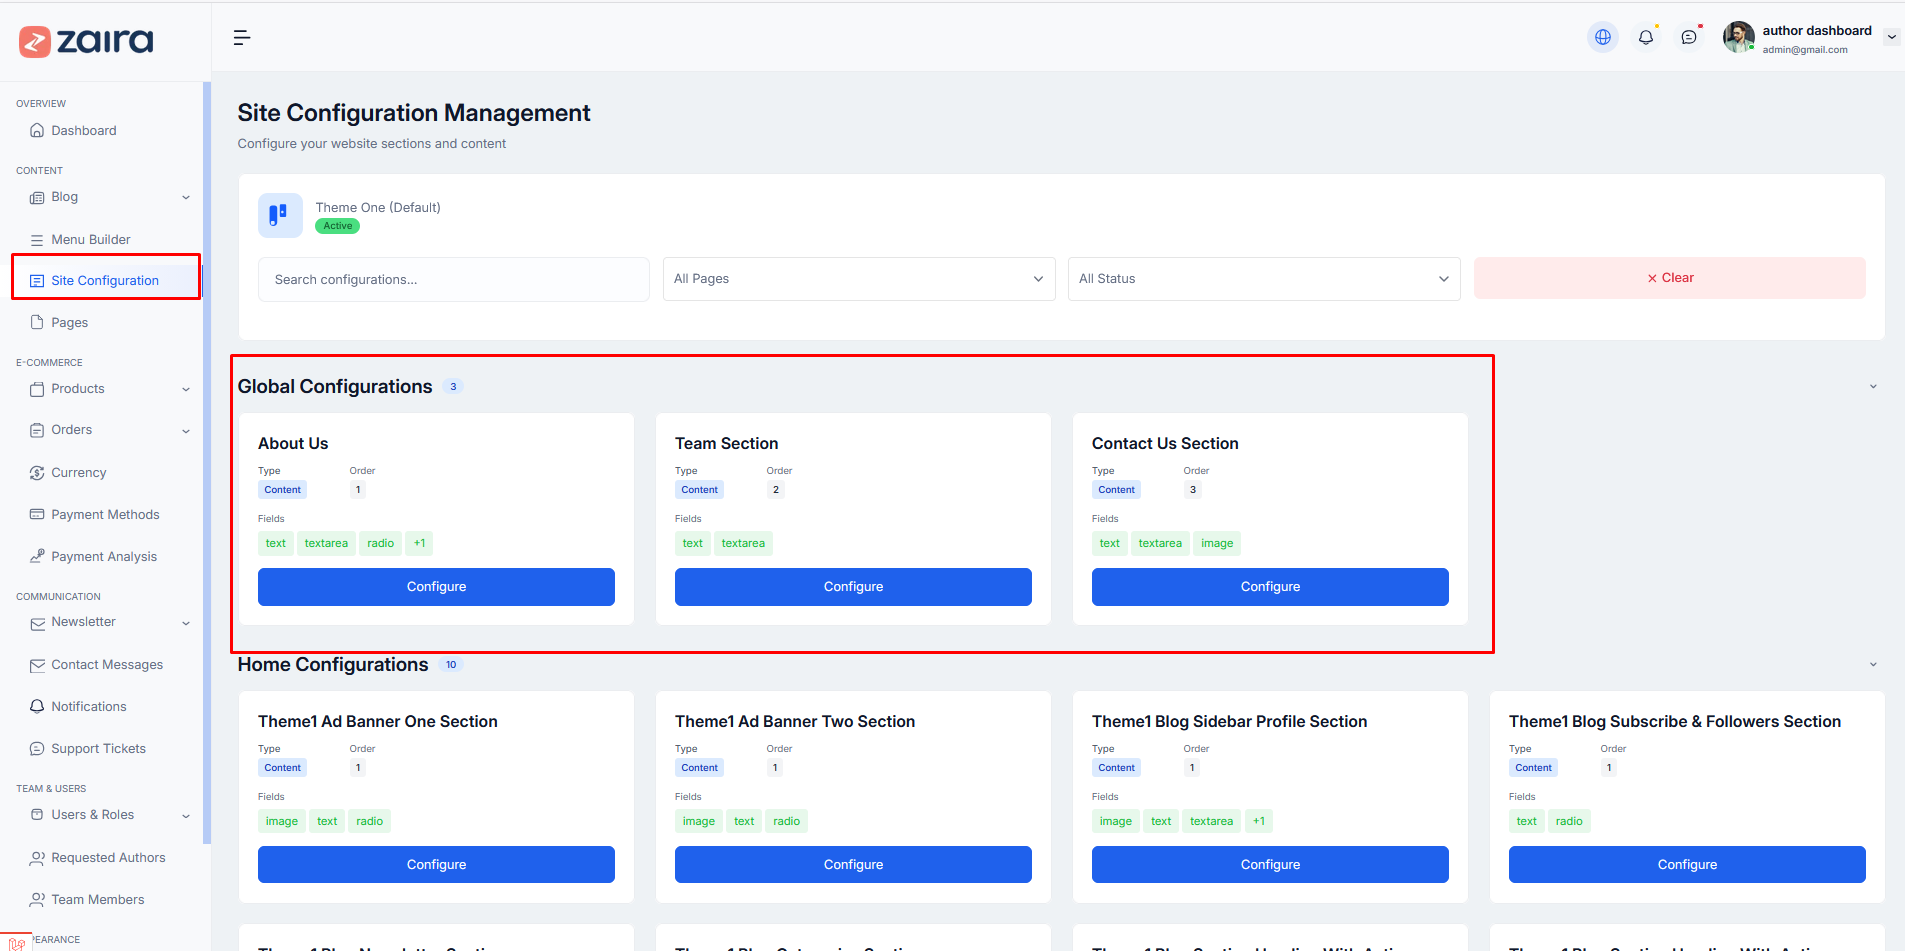
How to Manage Global Configurations
Step 1: Navigate to Dashboard > Site Configuration
Step 2: You will see Global Configurations section with different sections like About Us, Team Section, Contact Us Section
Step 3: Click Configure button on any section to customize it.
Here is the screenshot:
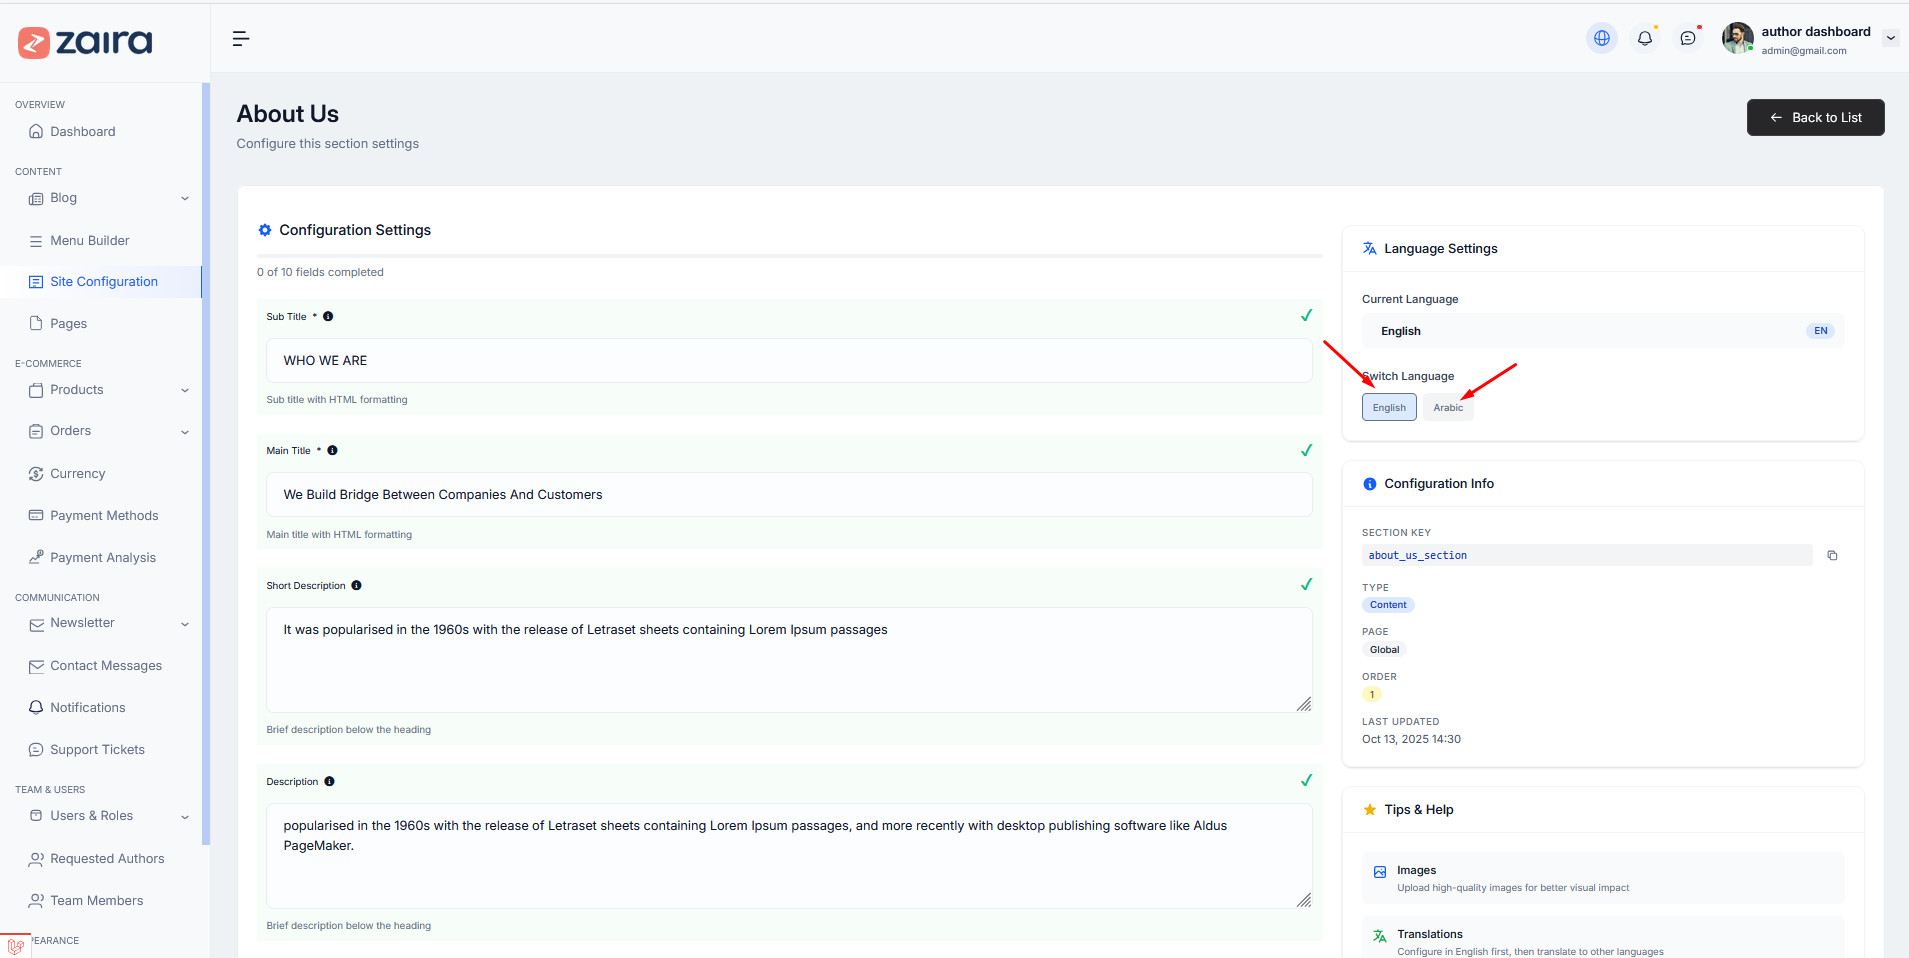
How to Configure About Us
Step 1: Click Configure on the About Us section.
Step 2: Fill in the following fields:
- Sub Title (e.g., "WHO WE ARE")
- Main Title (e.g., "We Build Bridge Between Companies And Customers")
- Short Description
- Description
Step 3: Add Images for the section.
Step 4: Switch Language to add content in other languages (English, Arabic, etc).
Step 5: Click Save Configuration.
Here is the screenshot:
How to Configure Team Section
Step 1: Click Configure on the Team Section.
Step 2: Fill in Sub Title, Main Title, Short Description, and Description.
Step 3: Add Images and switch Language for translations.
Step 4: Click Save Configuration.
Here is the screenshot:

Similar to the About/Team page, you can create the Contact Us section for the following pages in the same way:
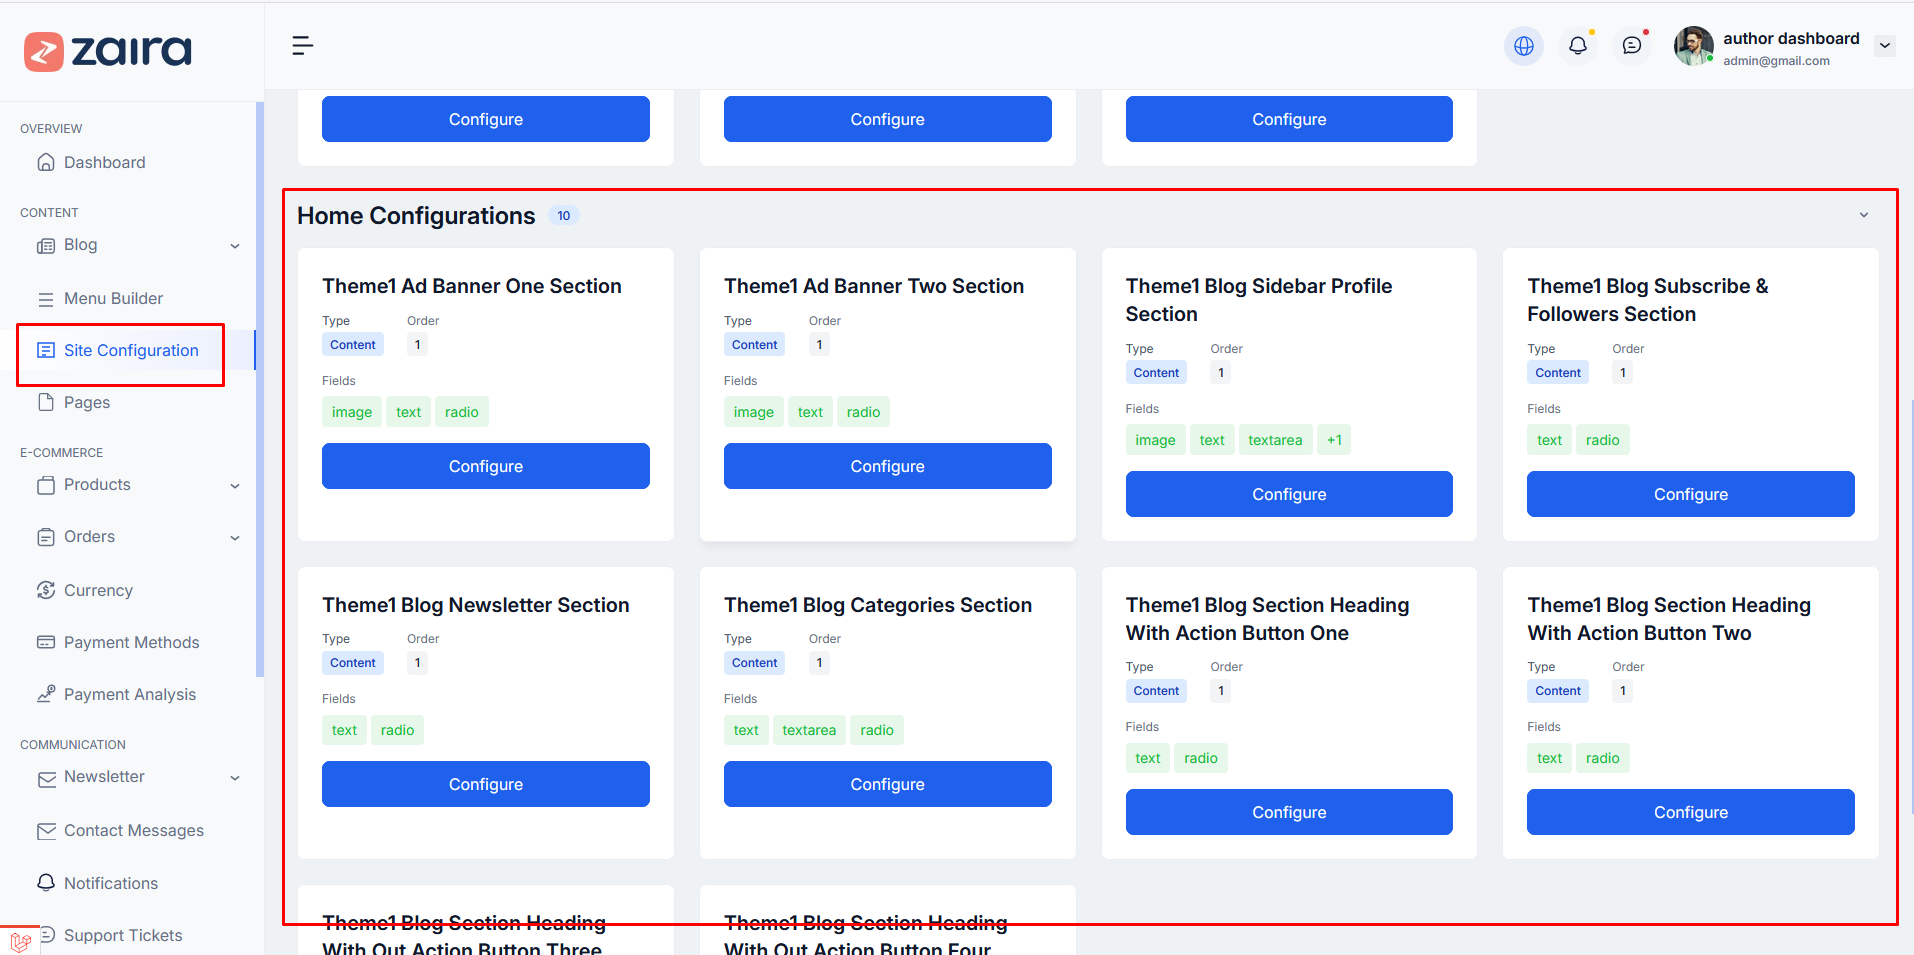
How to Manage Home Configurations
Step 1: Navigate to Dashboard > Site Configuration
Step 2: Scroll down to Home Configurations section.
Step 3: You will see multiple sections like Ad Banner, Blog Sidebar, Newsletter Section, Categories Section, etc.
Step 4: Click Configure button on any section to customize it.
Here is the screenshot:
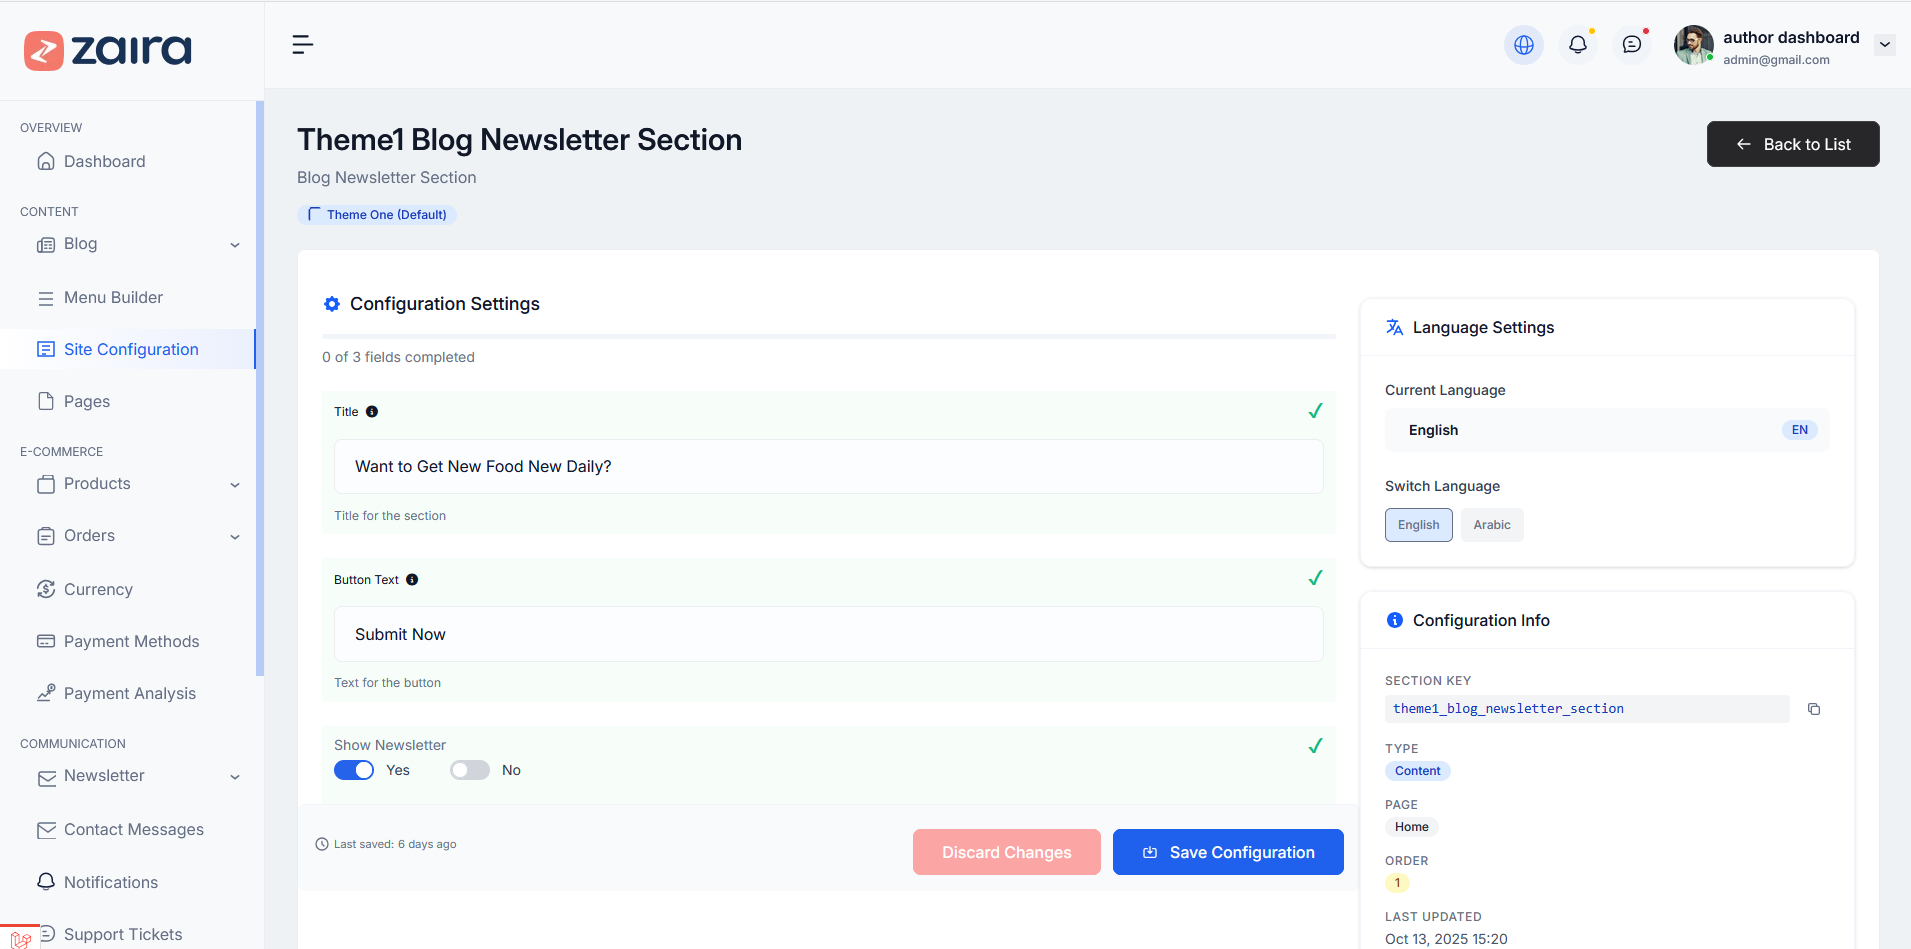
How to Configure Home Newsletter Section
Step 1: Click Configure on the Newsletter Section.
Step 2: Fill in the following fields:
- Title (Section heading)
- Button Text (Call-to-action button text)
- Show Newsletter (Enable/Disable this section)
Step 3: Switch Language to add content in other languages (English, Arabic, etc).
Step 4: Click Save Configuration.
Here is the screenshot:
How to Configure Other Home Sections
Similar to Newsletter and Banner sections, you can configure the following Home sections in the same way:
- Blog Sidebar Profile Section
- Blog Subscribe & Followers Section
- Blog Categories Section
- Blog Section Heading
- And more Theme sections
For each section:
Step 1: Click Configure button.
Step 2: Fill in Title, Description, Images, and other required fields.
Step 3: Switch Language for translations.
Step 4: Click Save Configuration.
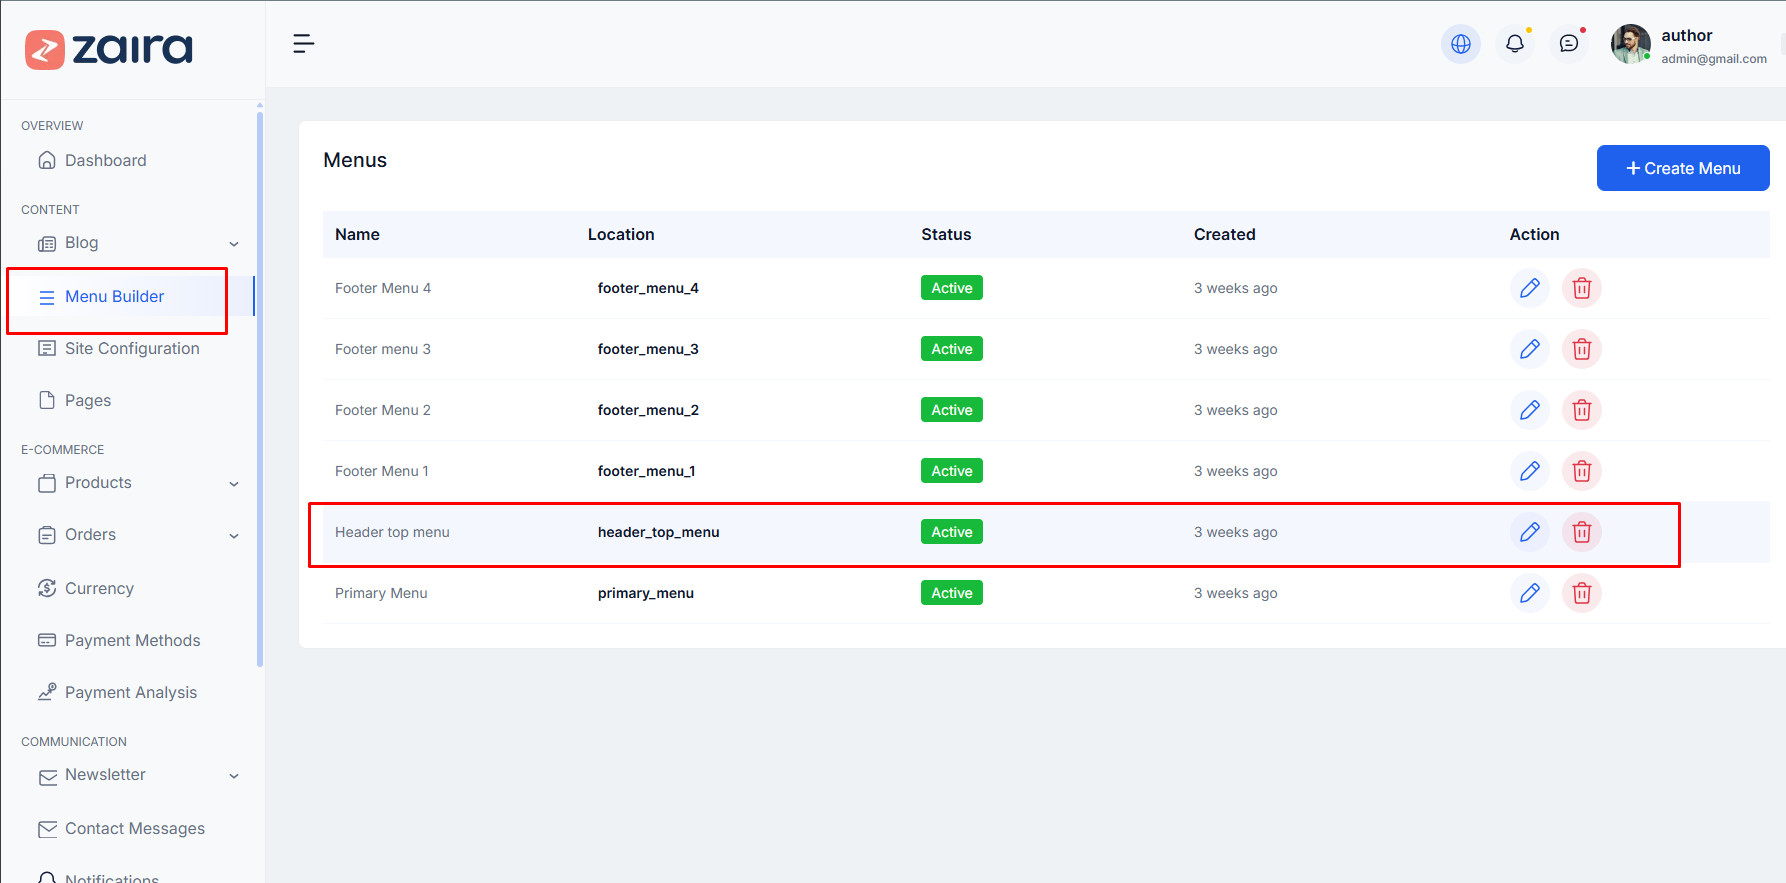
Header
Header Main Menu
Header top Menu
Footer
Footer Menu
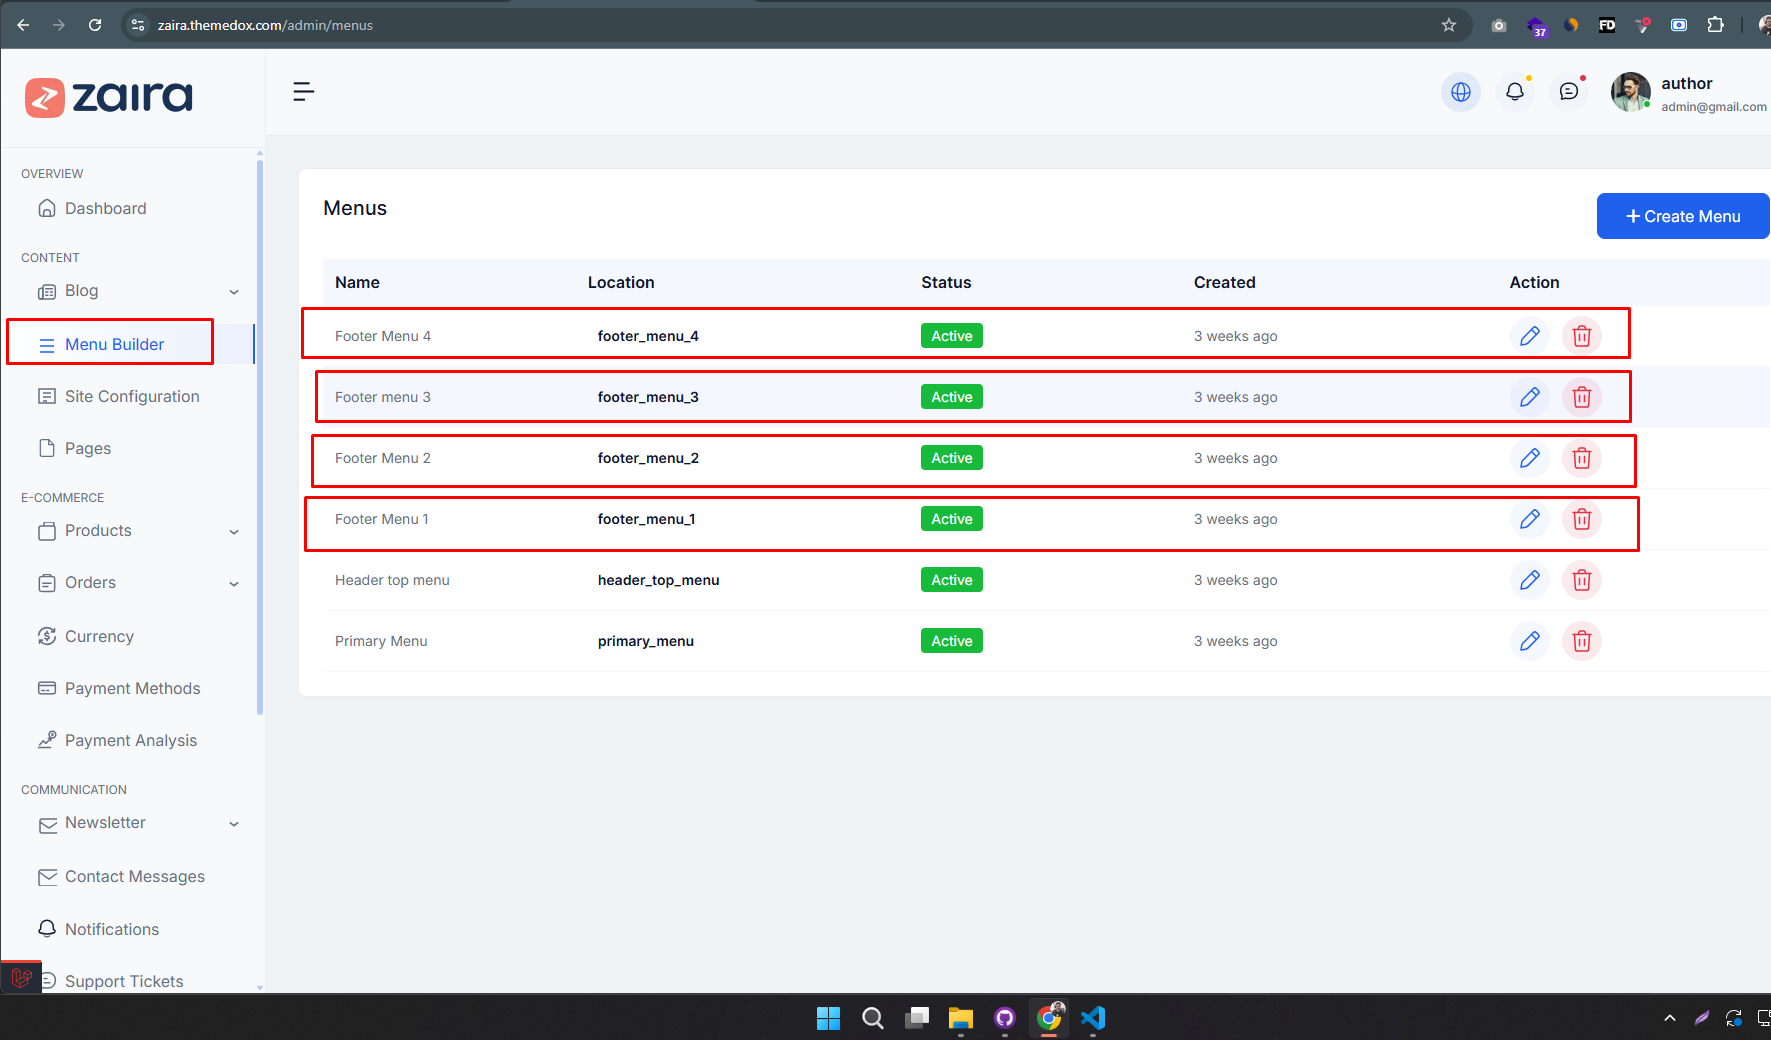
Footer Description & Copy Right Text
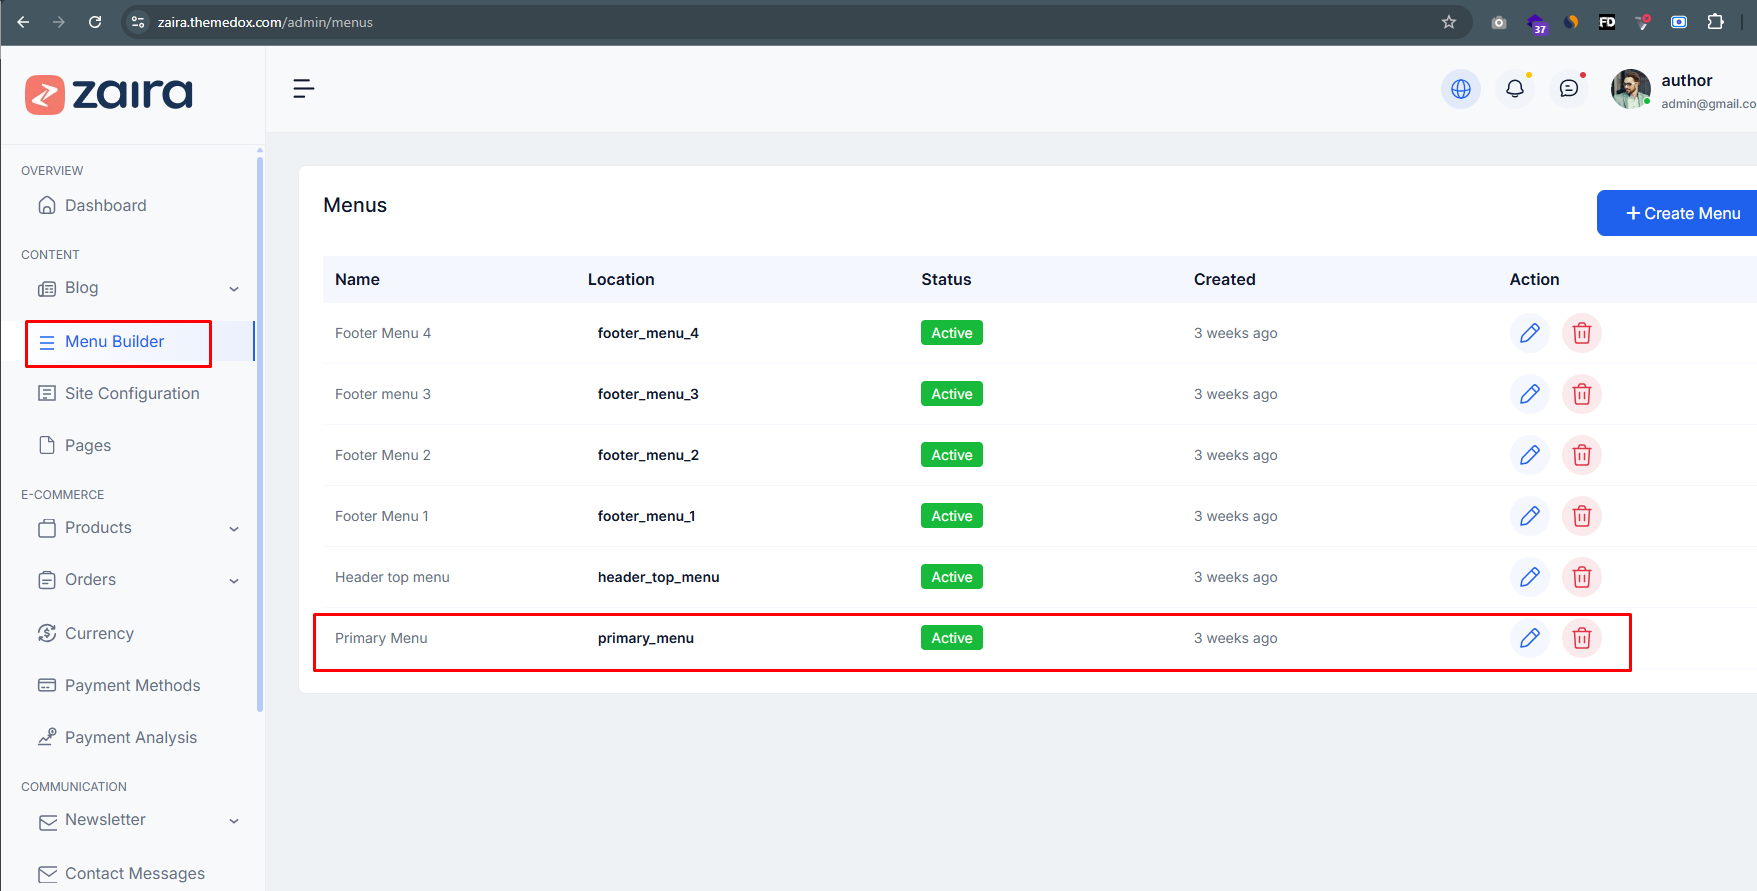
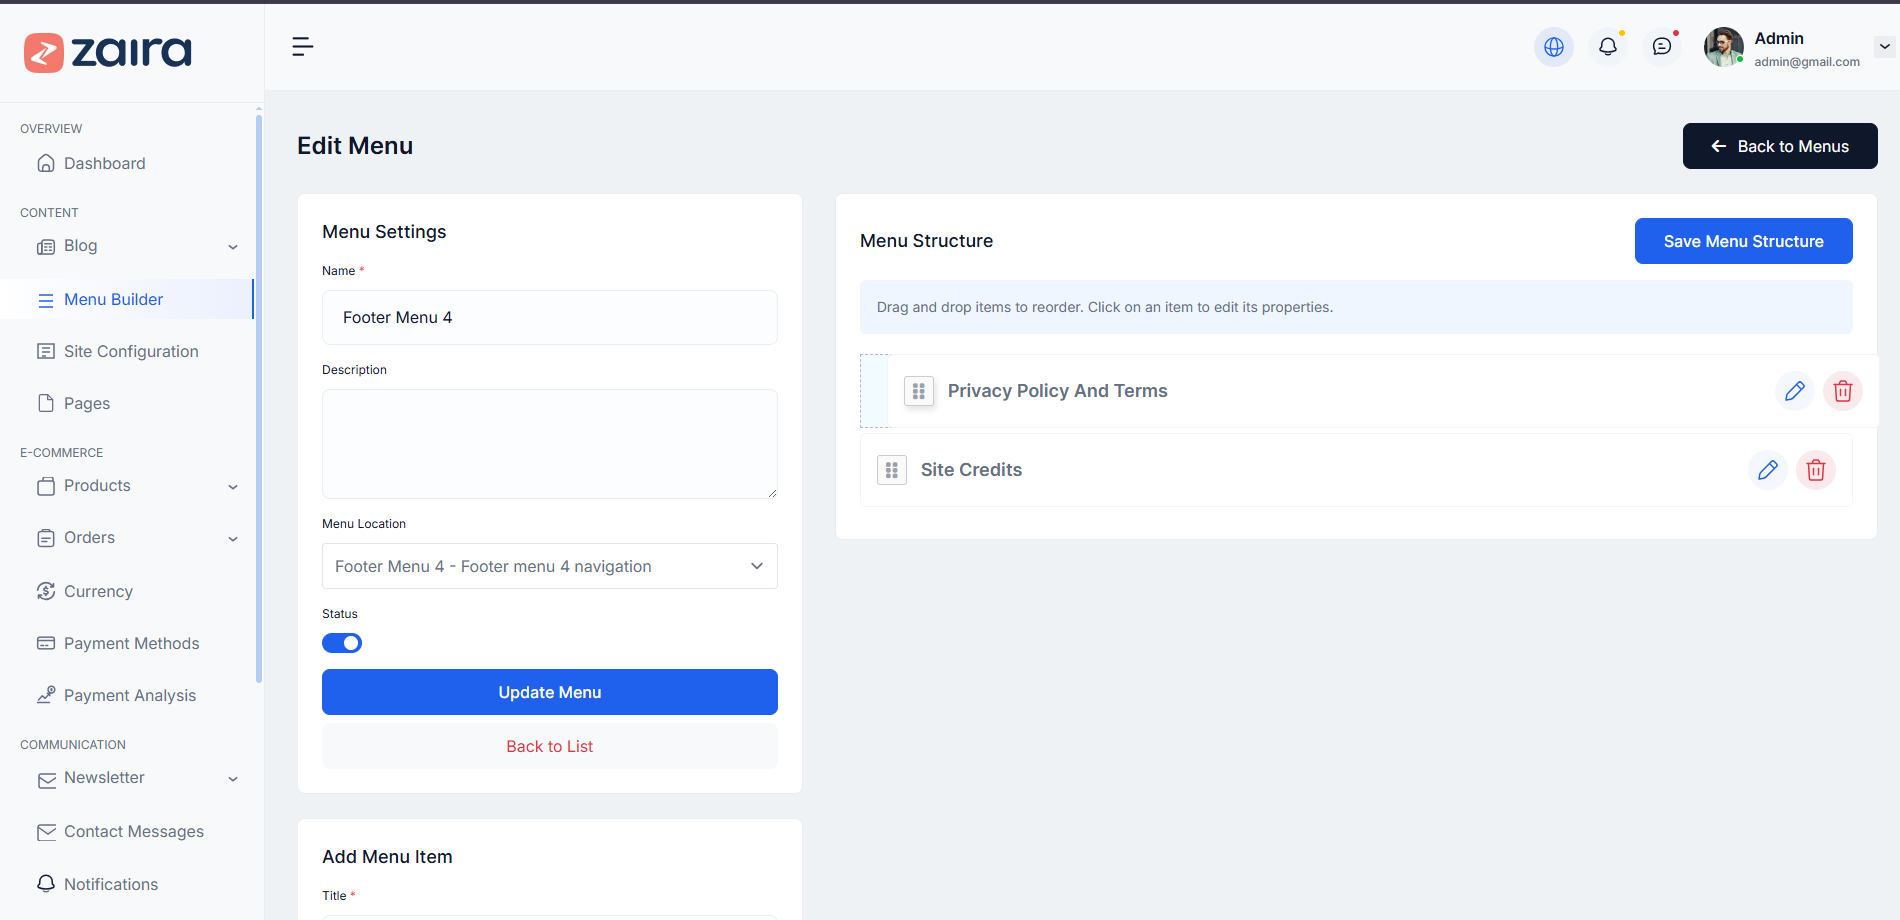
Menu Management Setup And Management
Menu Management Setup And Management
Go to Dashboard → Menu Builder → Menus
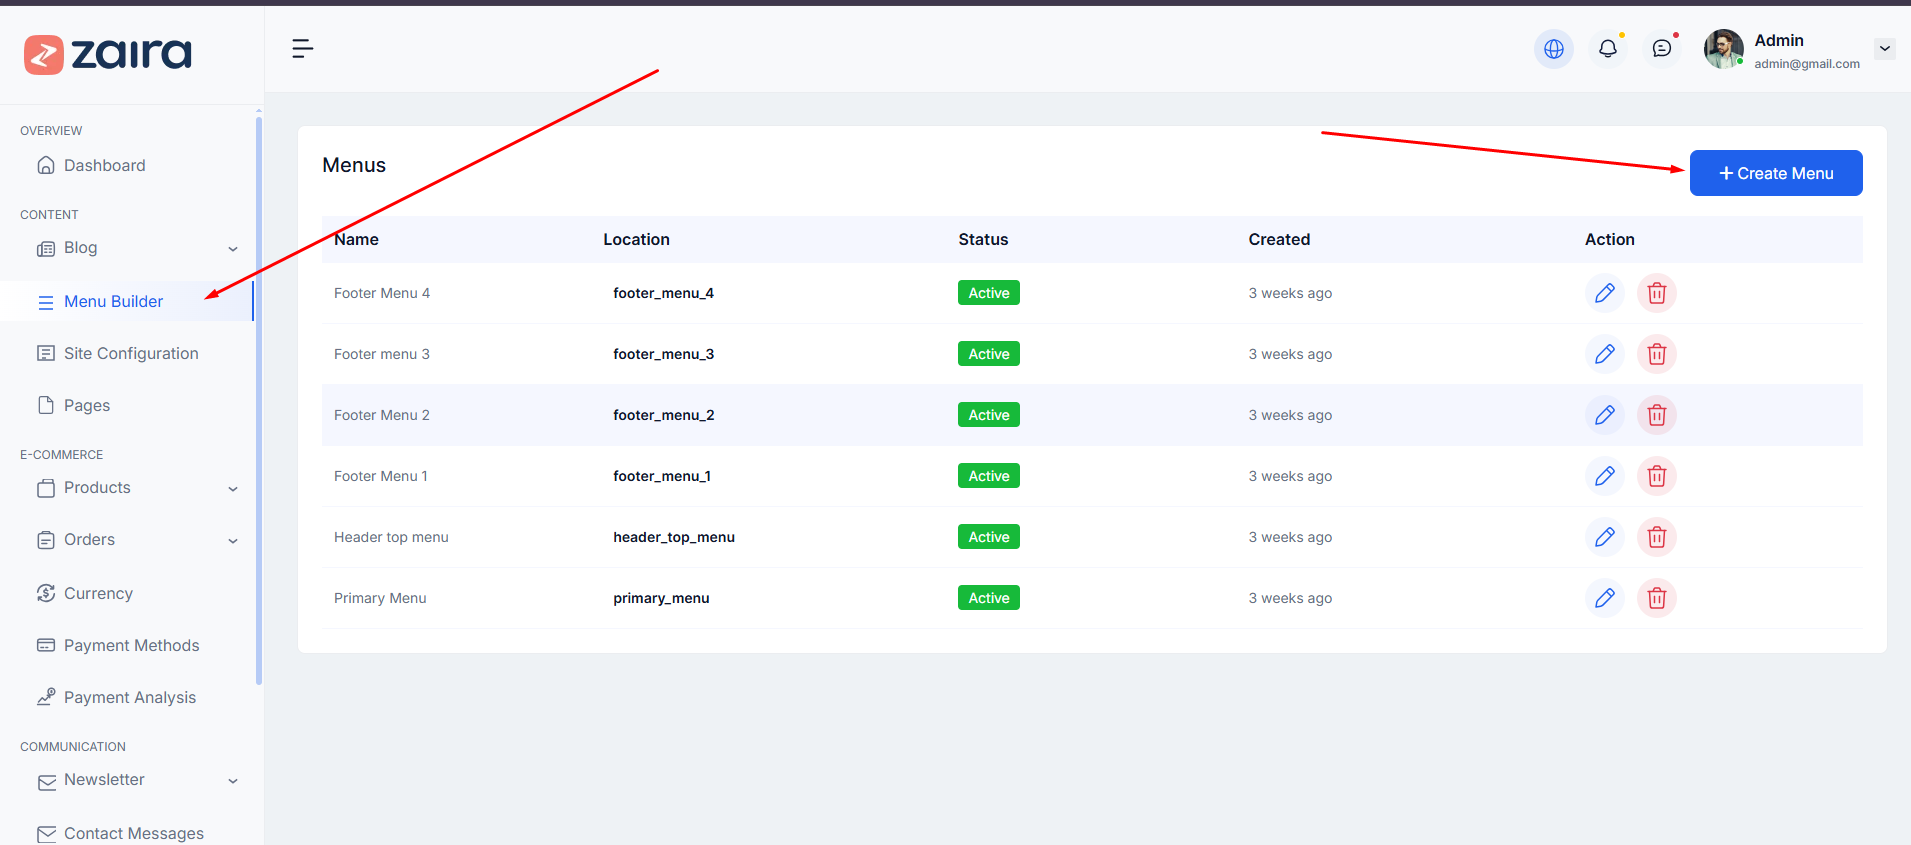
Menu Management Setup And Management Create New Menu
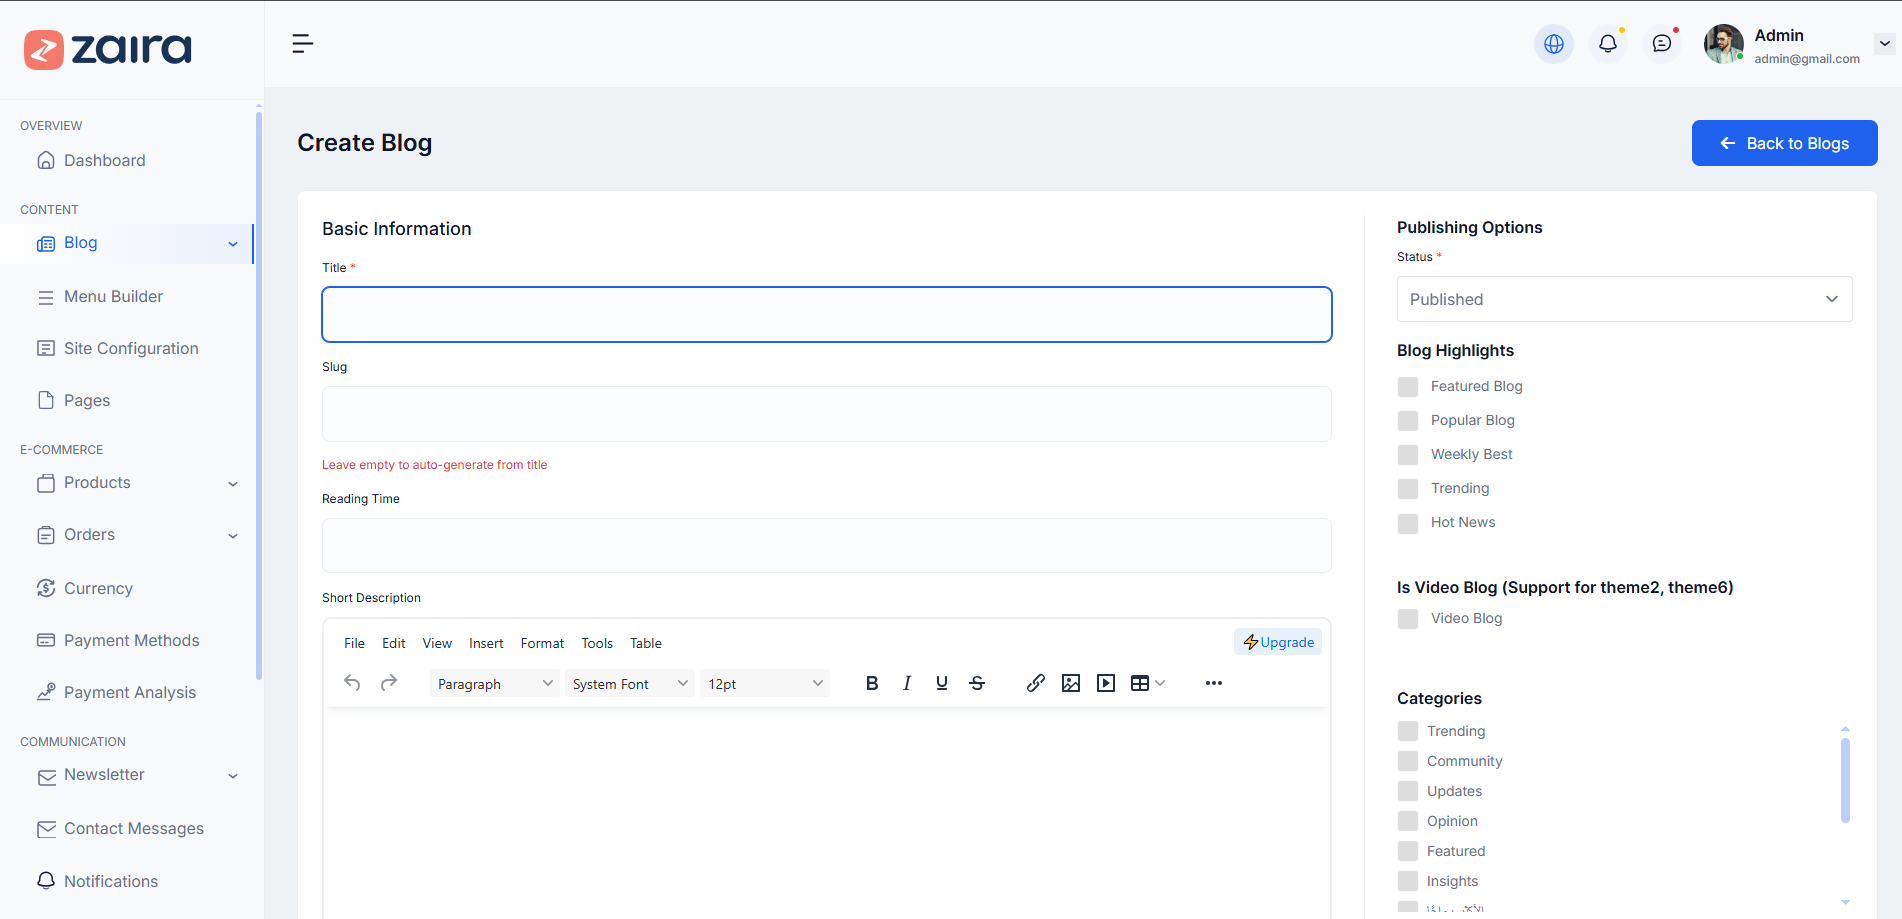
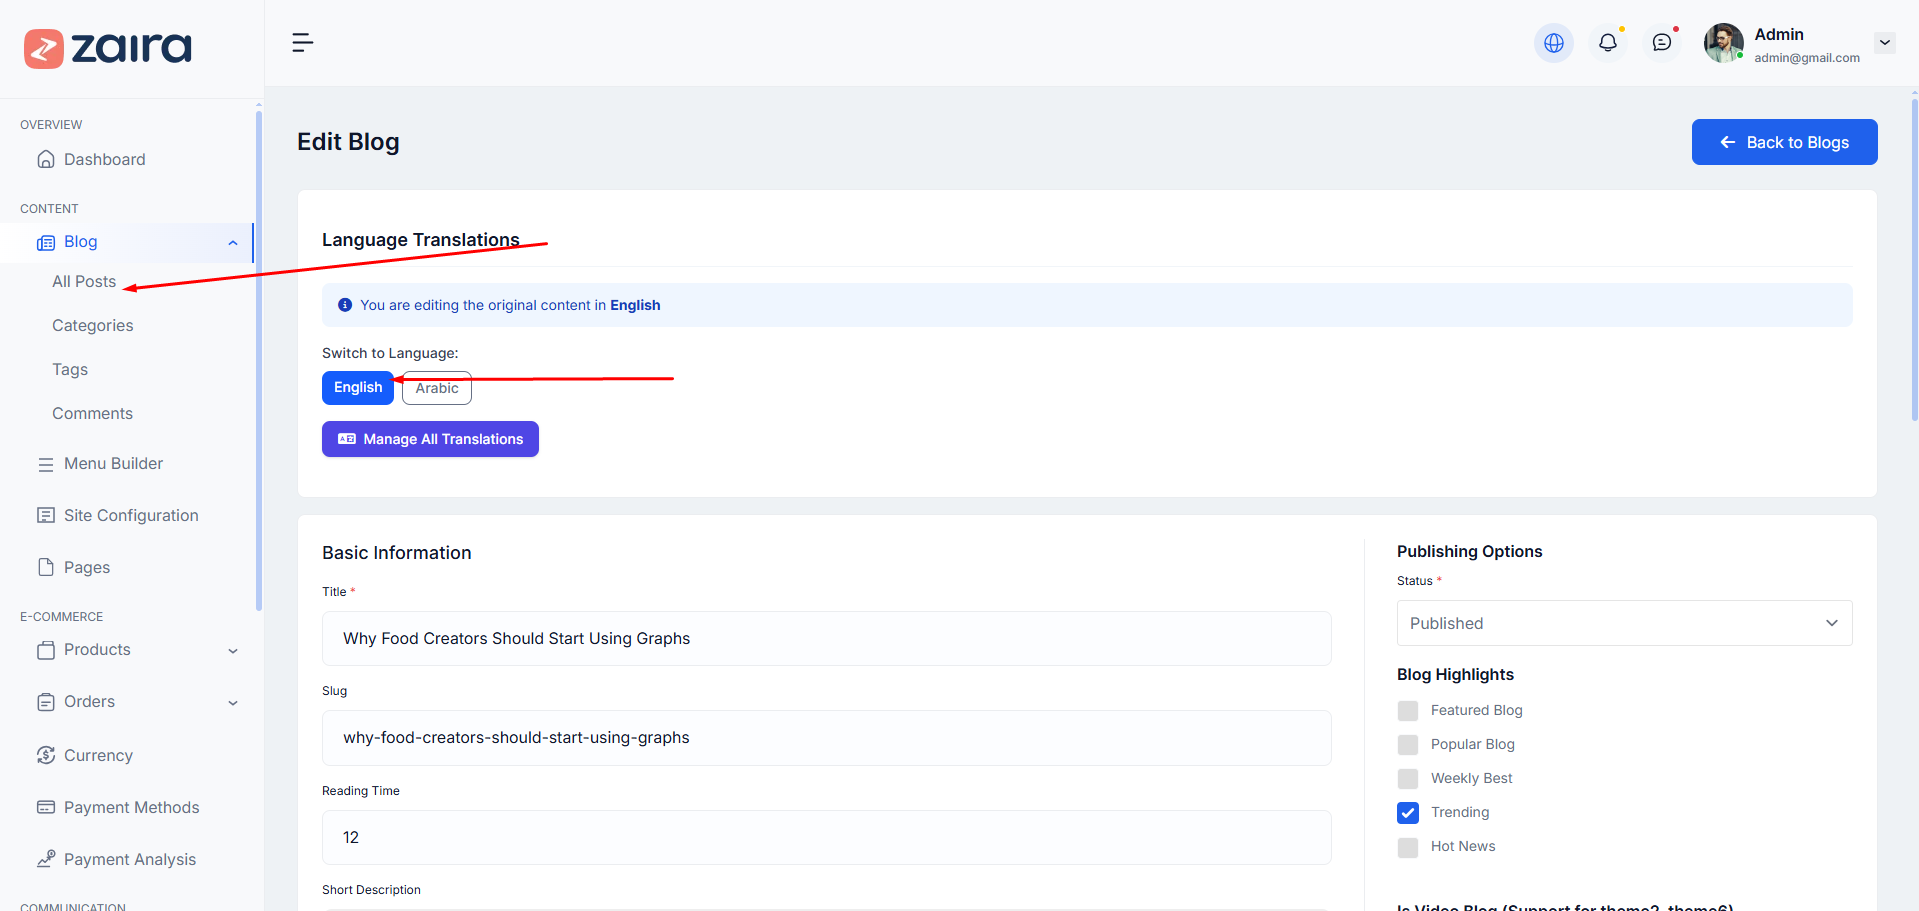
How to Create a New Blogs
Step 1: Navigate to Dashboard > Blog > All Posts > Add New Post in your admin sidebar.
Step 2: Add a title, and add your Blog content in the editing field.
Step 3: Add Categories Before Make any Blog Post, You have to create a Category first. click here to create a Category.
Step 4: Once you are finished, click Publish to save the post.
Here is the screenshot that shows the various areas of the blog post page:
For Edit Page
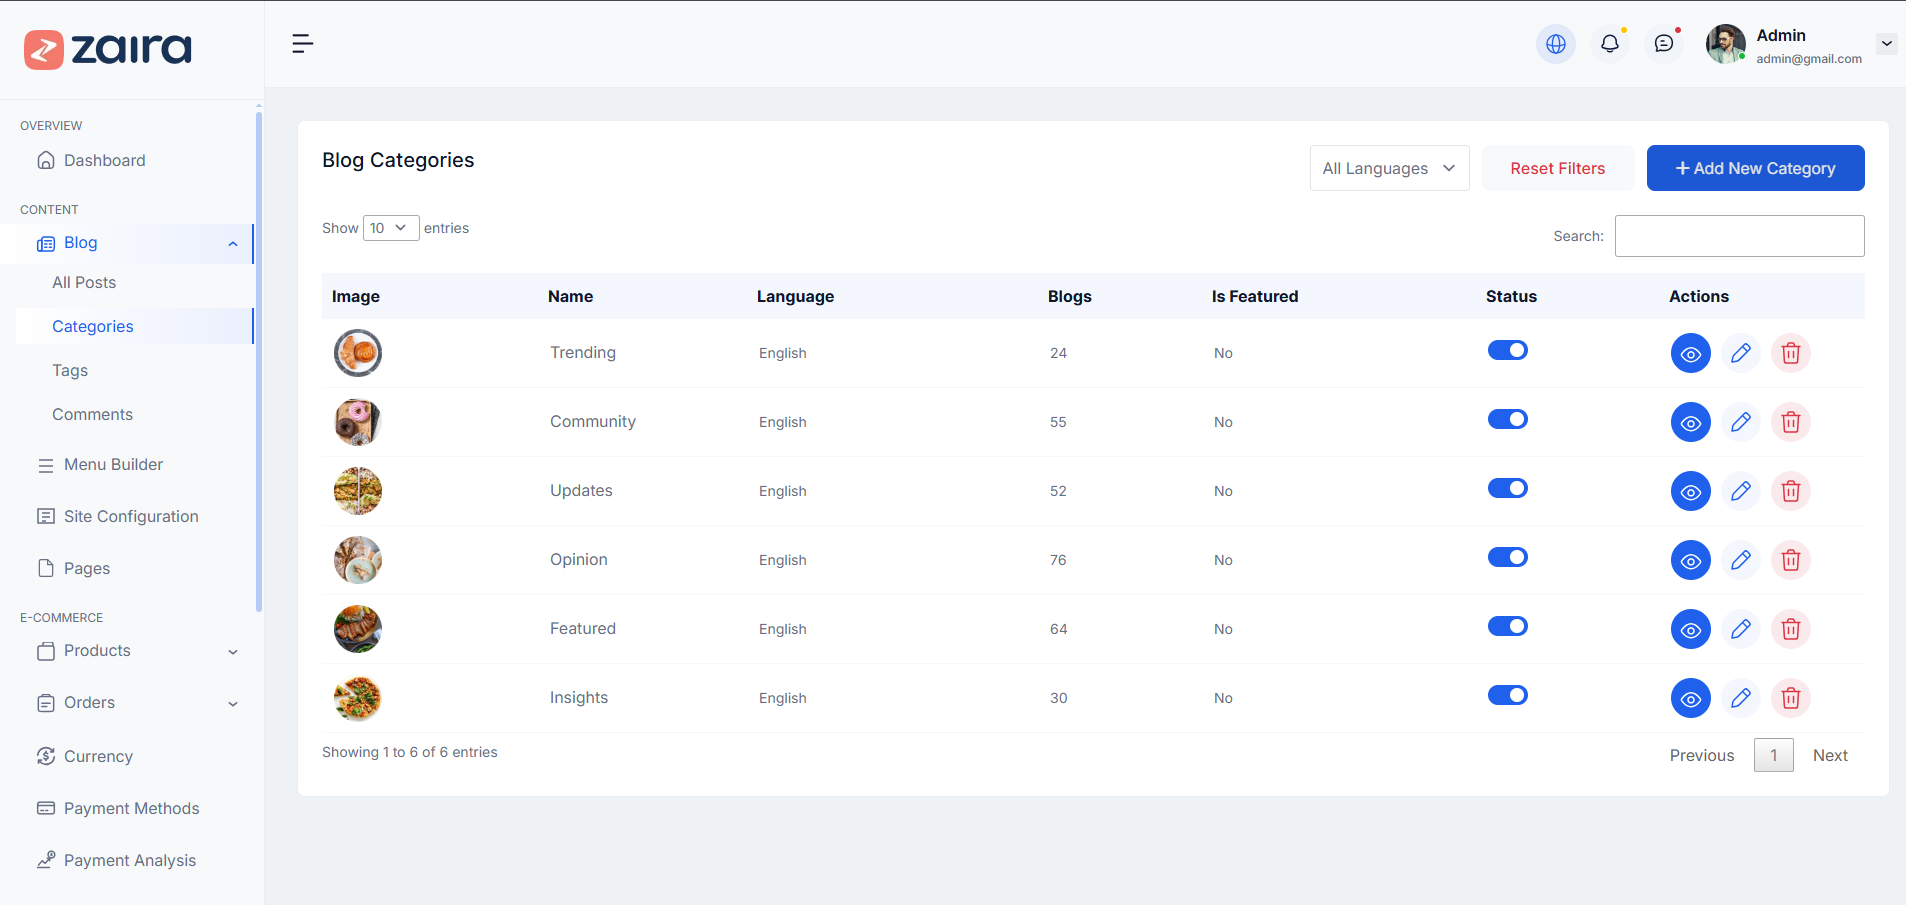
How to Create a Category
Step 1: Dashboard >> Blog >> Categories >> Categories
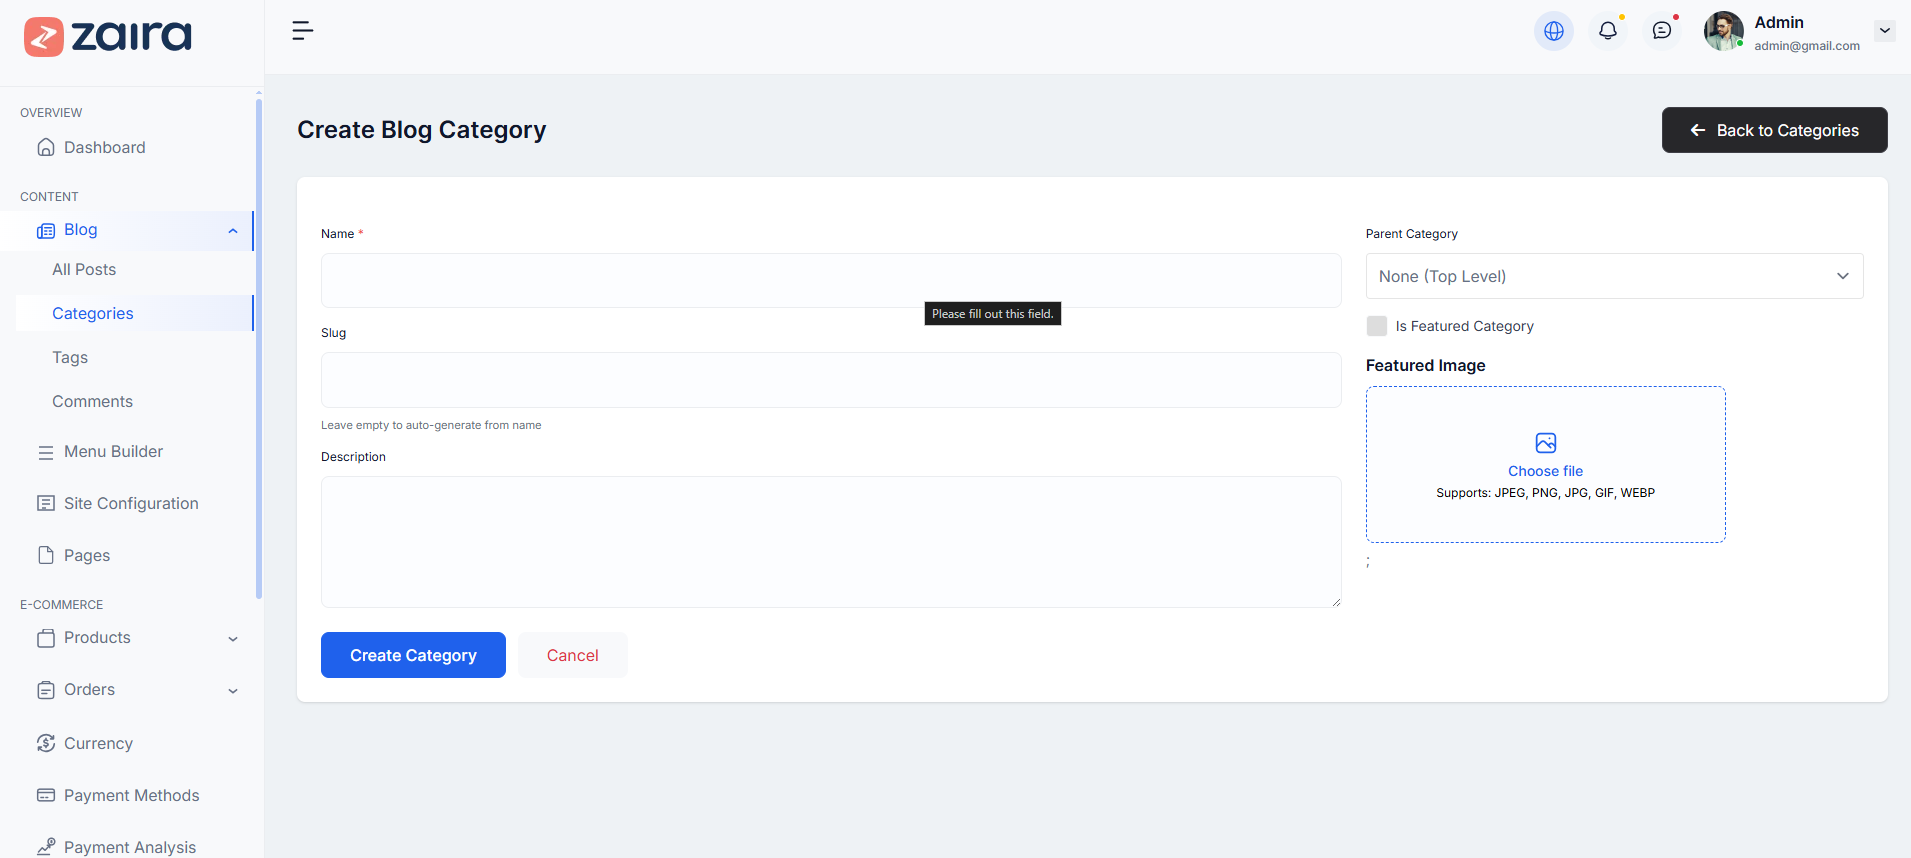
Step 2: Name the category and fill to other section below.
Step 3: Hit Add New Category. Your new Category will aprear in the table of all category immediately.
Category List:
Create New Category:
Edit Category:

Similar to Category, you can create a new Tag in the same way.
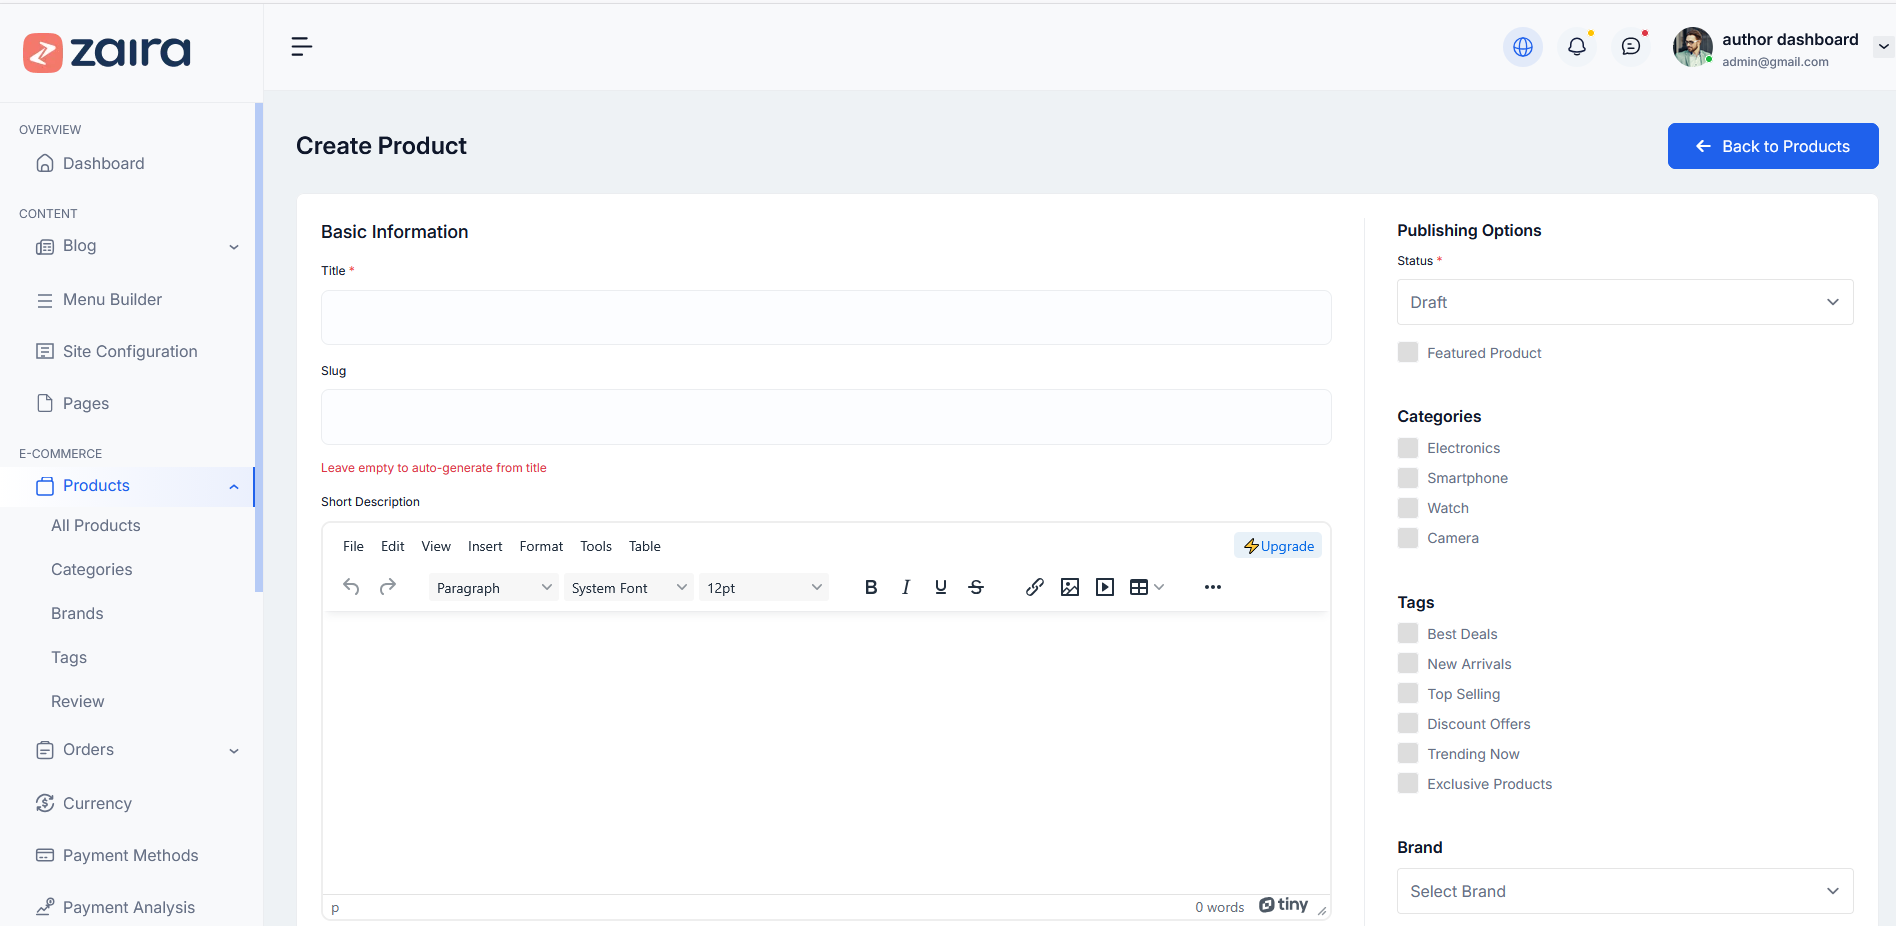
How to Create a New Product
Step 1: Navigate to Dashboard > Products > All Products > Add New Product in your admin sidebar.
Step 2: Add a title, slug, and add your Product content in the editing field.
Step 3: Set Publishing Status Choose between Draft or Published status for your product.
Step 4: Once you are finished, click Publish to save the product.
Here is the screenshot that shows the various areas of the product page:
For Edit Page

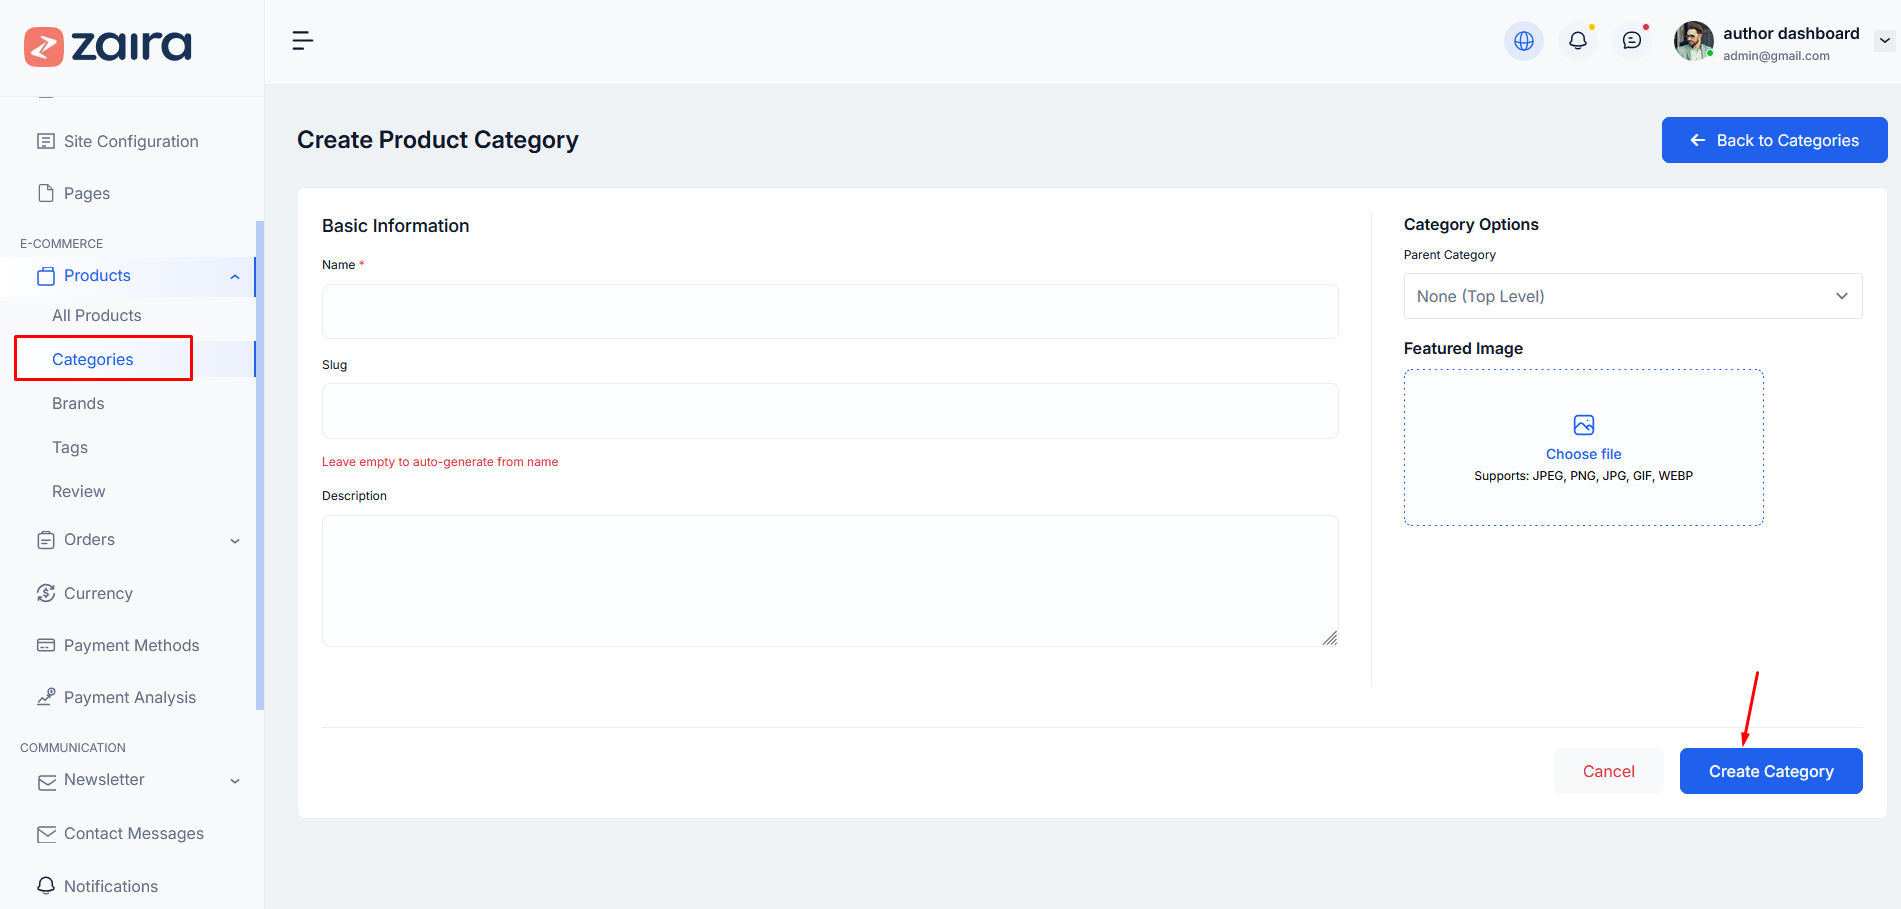
How to Create a Category
Step 1: Dashboard >> Products >> Categories
Step 2: Name the category and fill in the other sections below.
Step 3: Hit Add New Category. Your new Category will appear in the table of all categories immediately.
Create New Category:
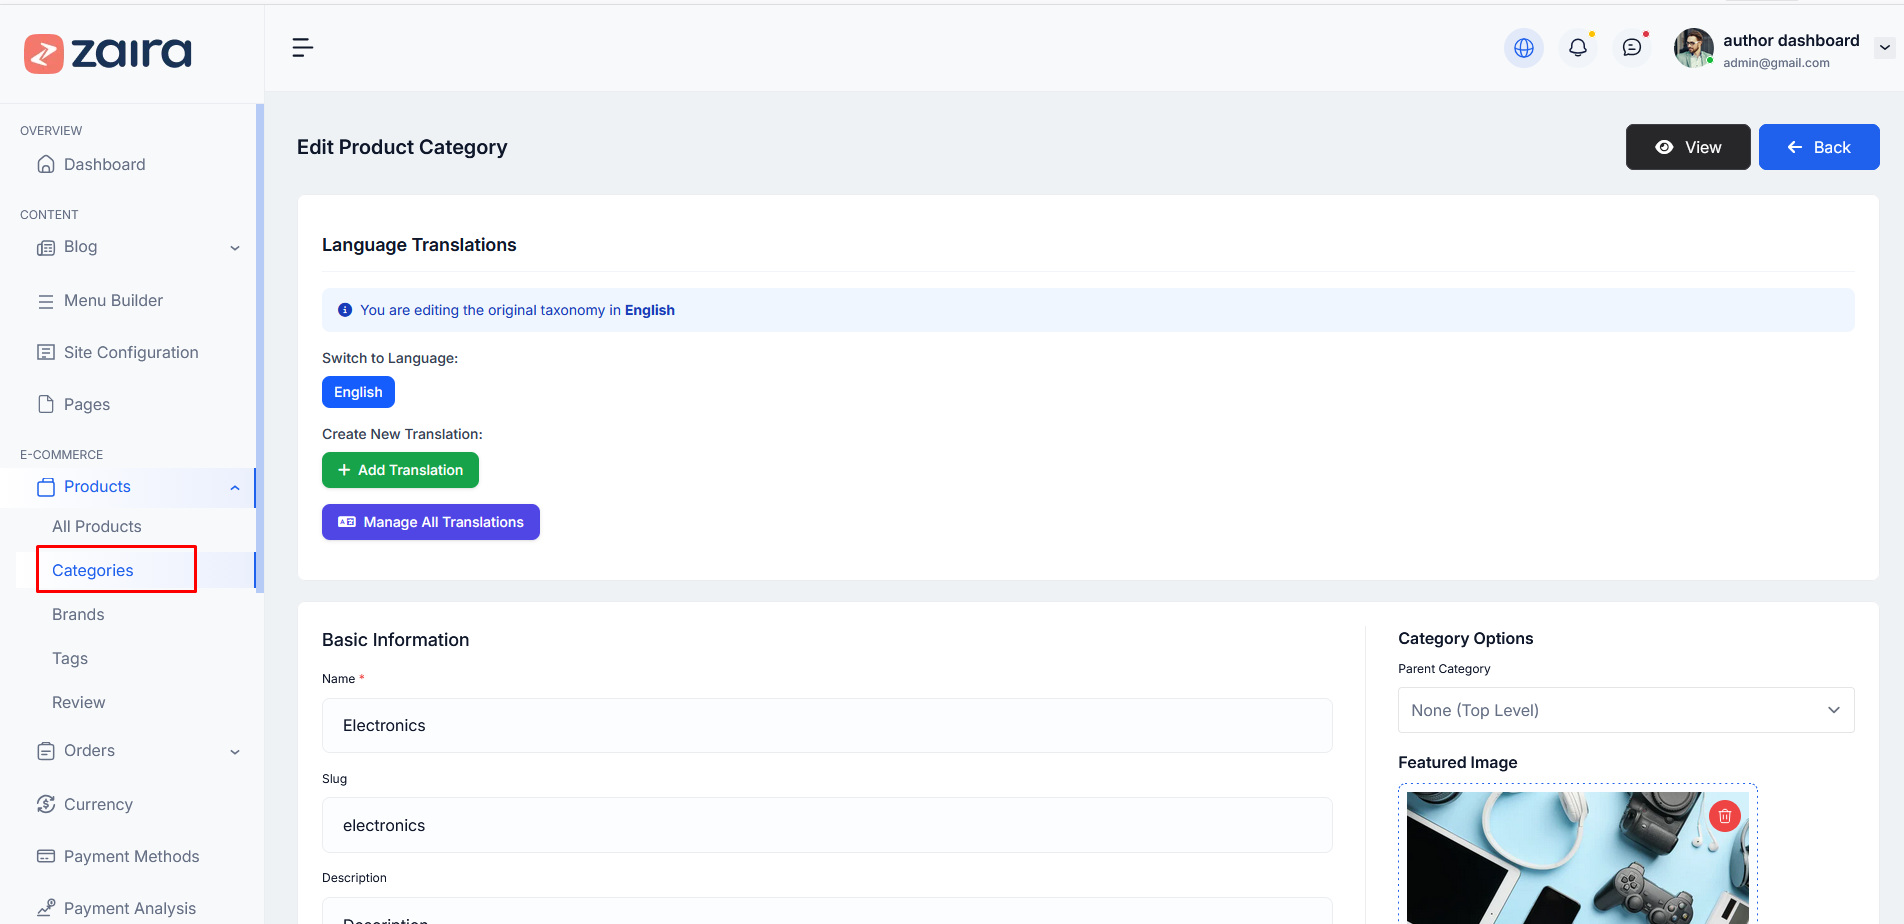
Edit Category:
Just like creating a Category, you can easily create a new Brand and Tag in the same way.
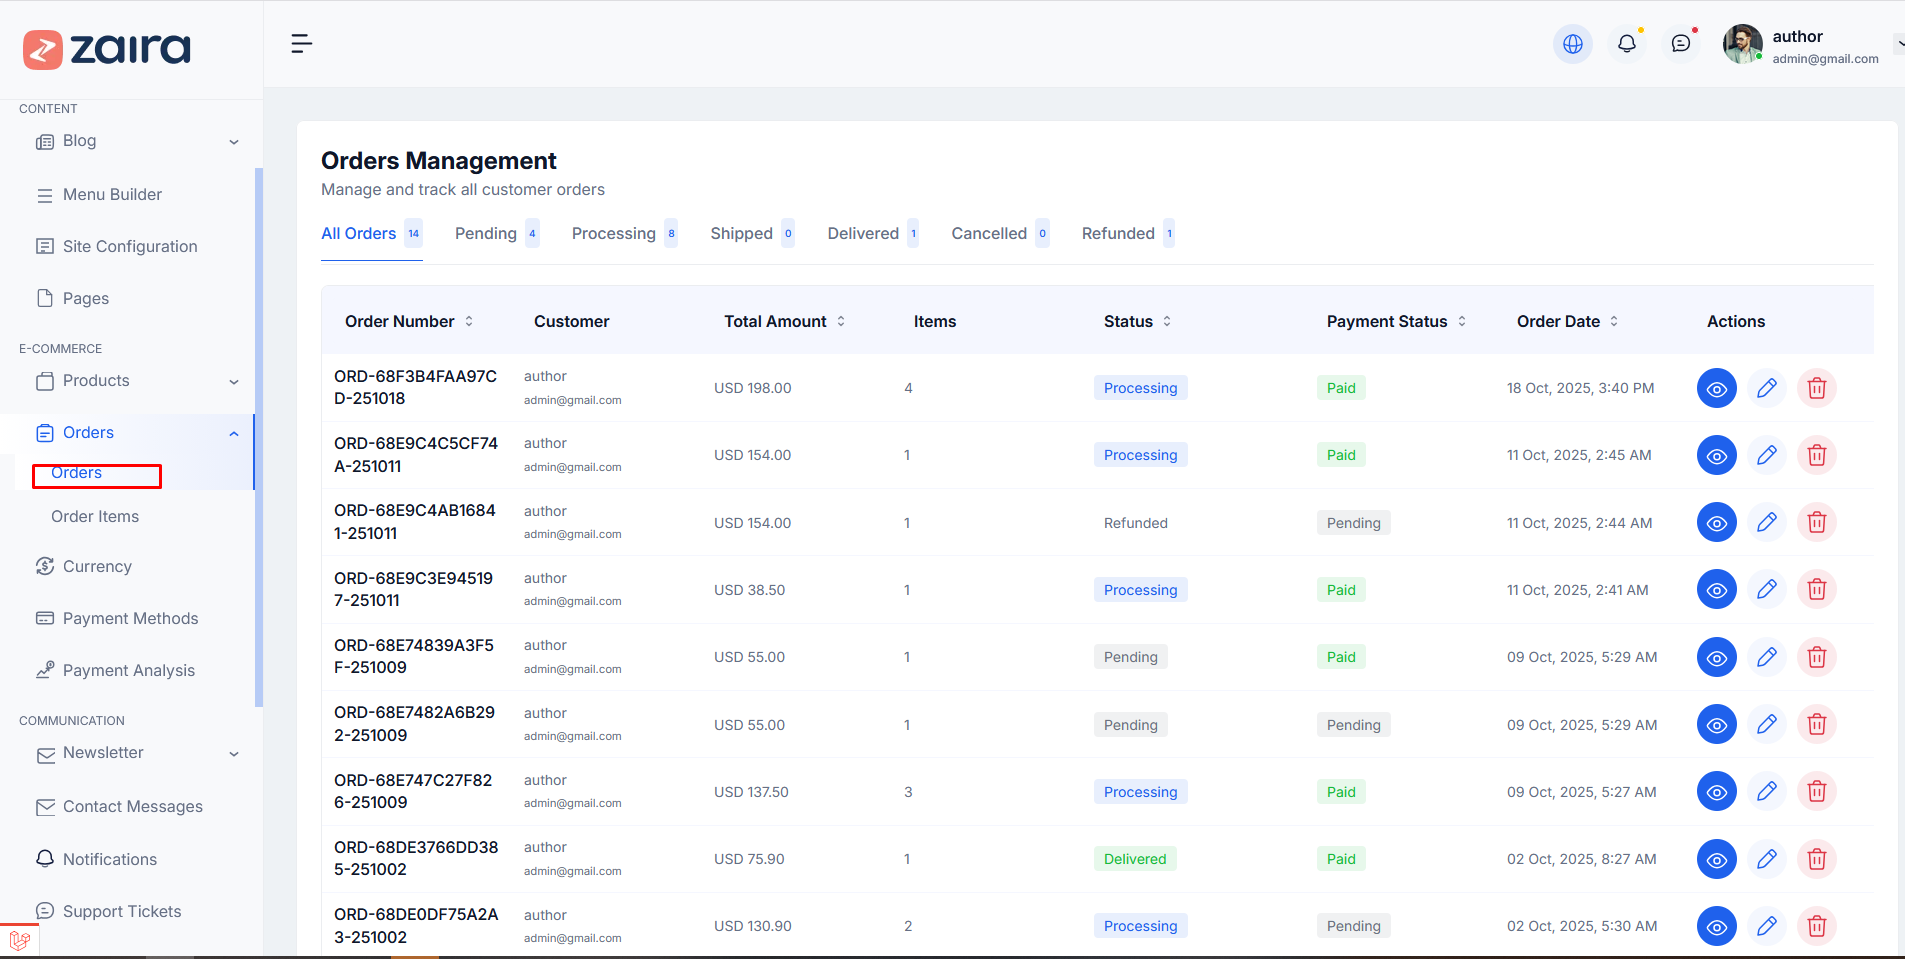
How to Manage Orders
Step 1: Navigate to Dashboard > Orders
Step 2: You will see a list of all customer orders with Order Number, Customer, Total Amount, Items, Status, Payment Status, and Order Date.
Step 3: Filter orders by status: All Orders, Pending, Processing, Shipped, Delivered, Cancelled, Refunded.
Step 4: Click the eye icon to view order details or edit/delete icons for actions.
Here is the screenshot:
How to View Order Details
Step 1: Click the eye icon next to any order to view full details.
Step 2: You can see:
- Order Number and Customer information
- Order Date and Status
- Shipping Address and Billing Address
- Order Items with quantity and price
- Payment information
- Total Amount
Step 3: You can update order status from this page.
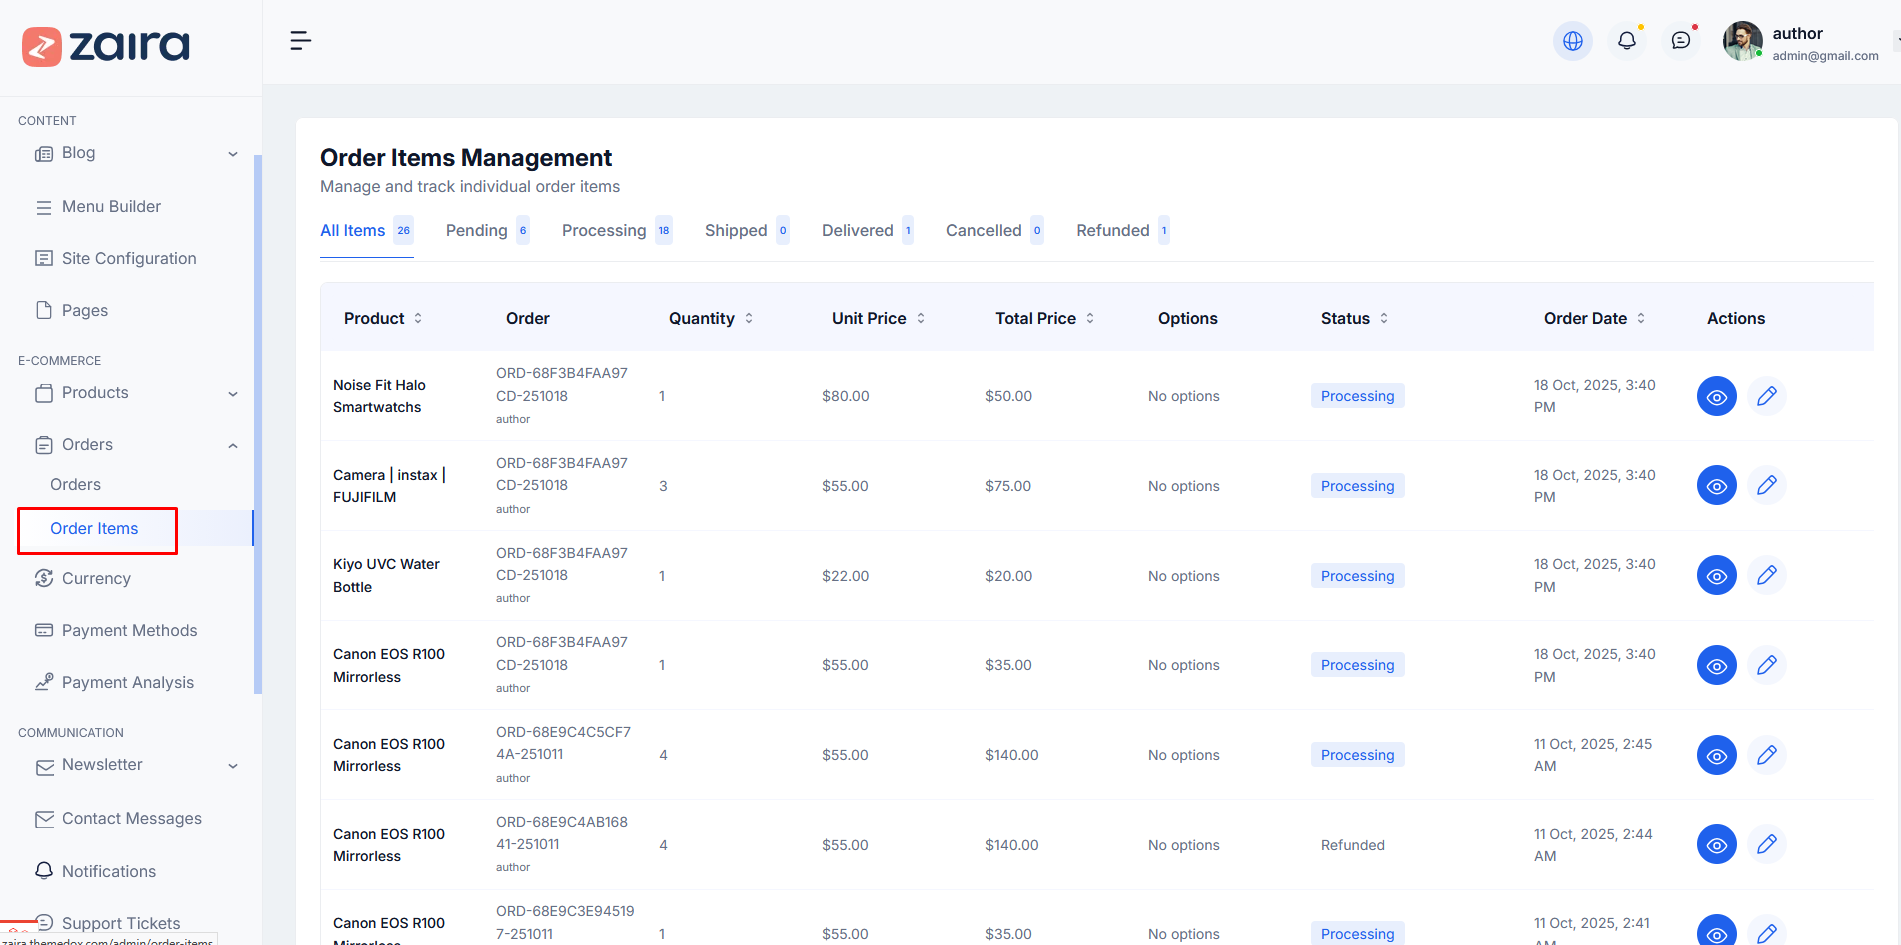
How to Manage Order Items
Step 1: Navigate to Dashboard > Orders > Order Items
Step 2: You will see a list of all individual order items with Product, Order Number, Quantity, Unit Price, Total Price, Status, and Order Date.
Step 3: Filter items by status: All Items, Pending, Processing, Shipped, Delivered, Cancelled, Refunded.
Step 4: Click icons to view or edit individual items.
Here is the screenshot:
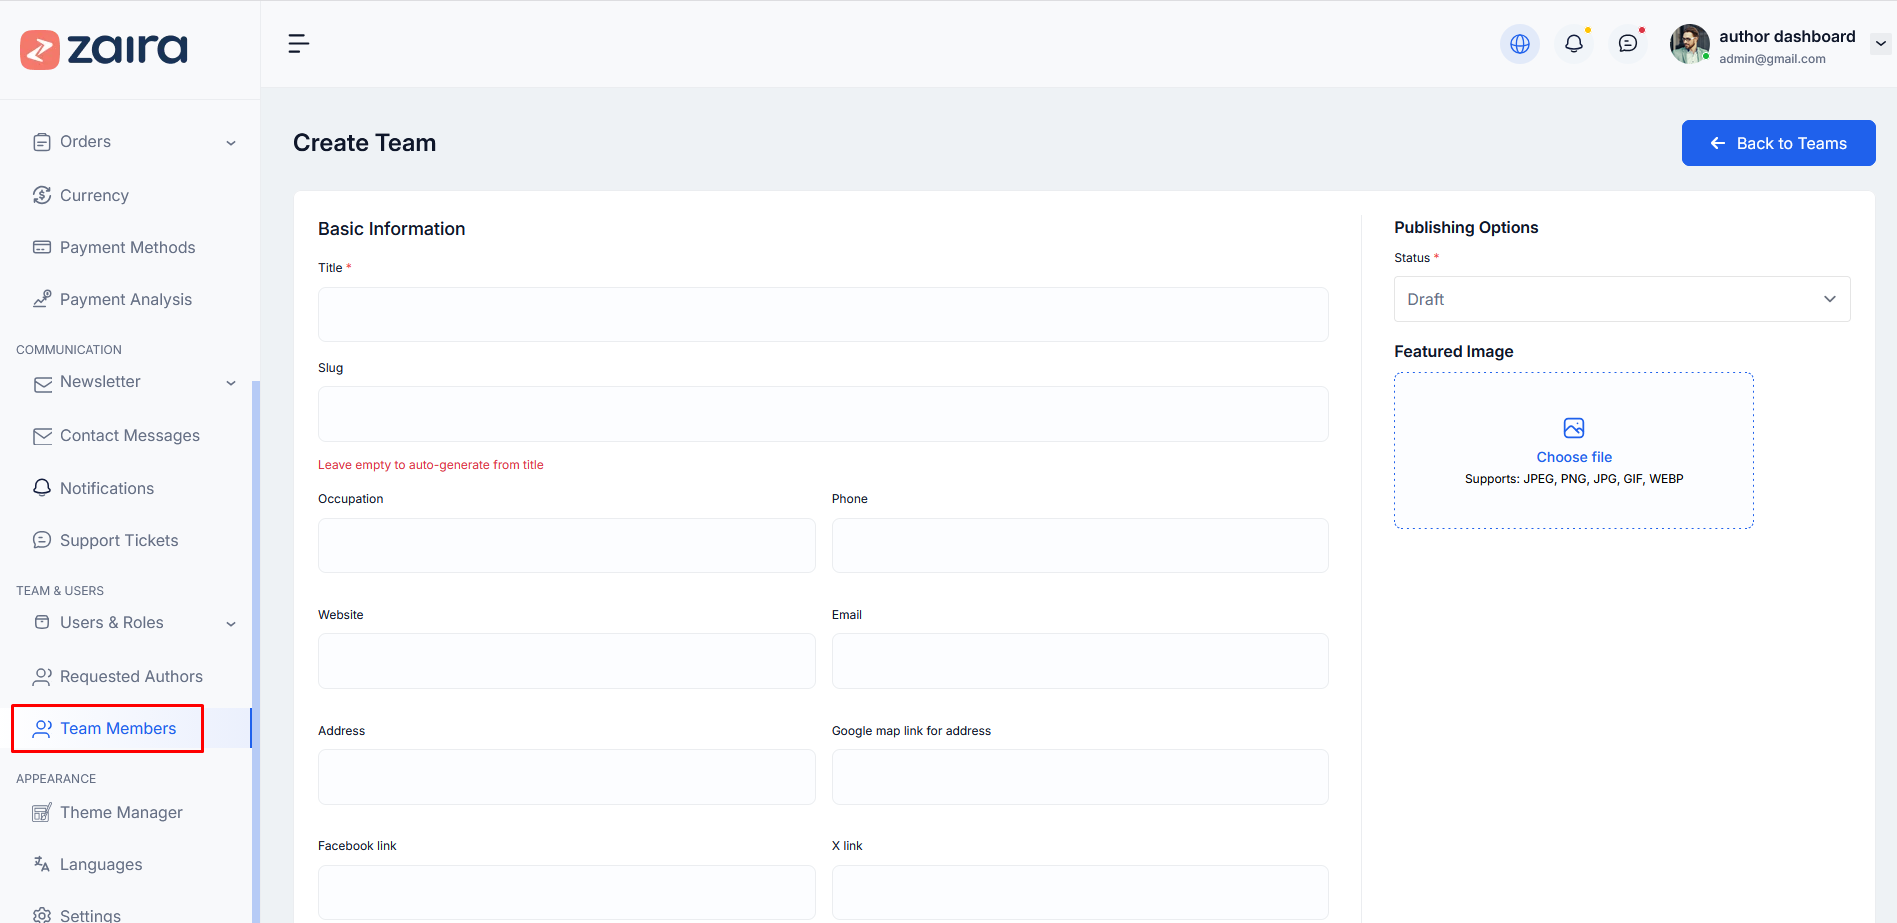
How to Create a New Team
Step 1: Navigate to Dashboard > Team Members > Add New Team
Step 2: Add a title, slug, and fill in the basic information (Occupation, Phone, Email, Address, Website, Social links).
Step 3: Upload a featured image for the team member profile.
Step 4: Set the publishing status (Draft or Published).
Step 5: Click Publish to save.
Here is the screenshot:
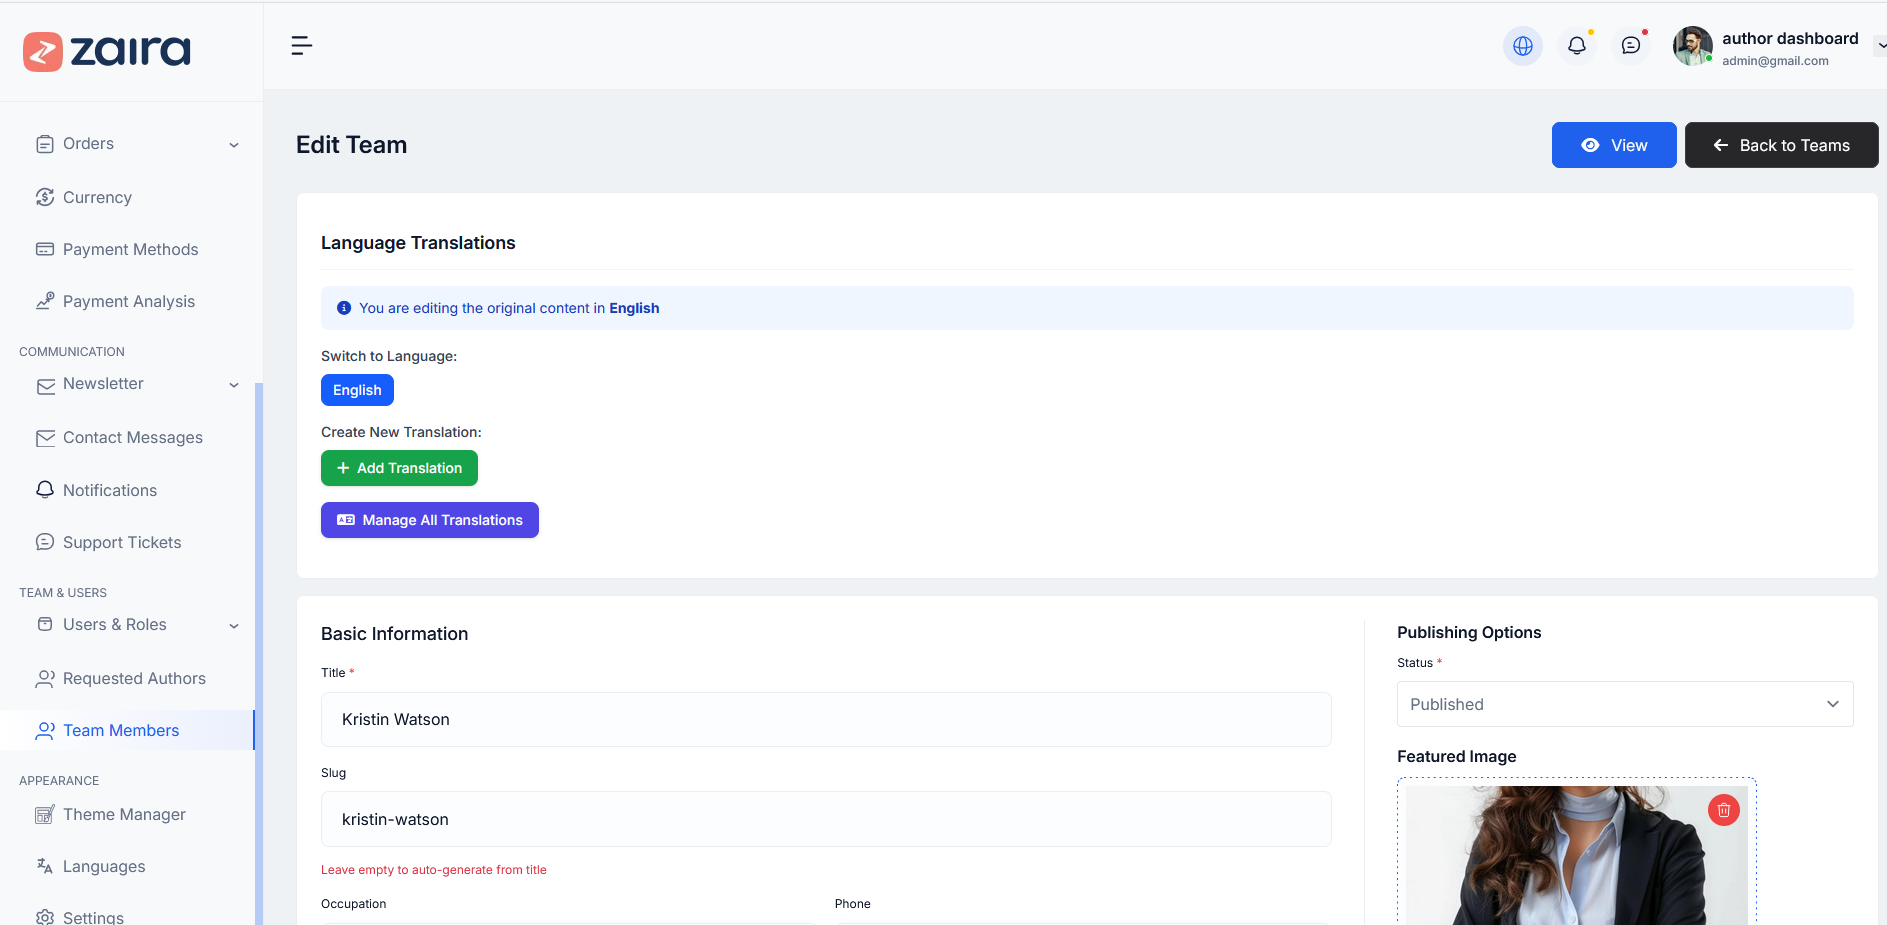
For Edit Page
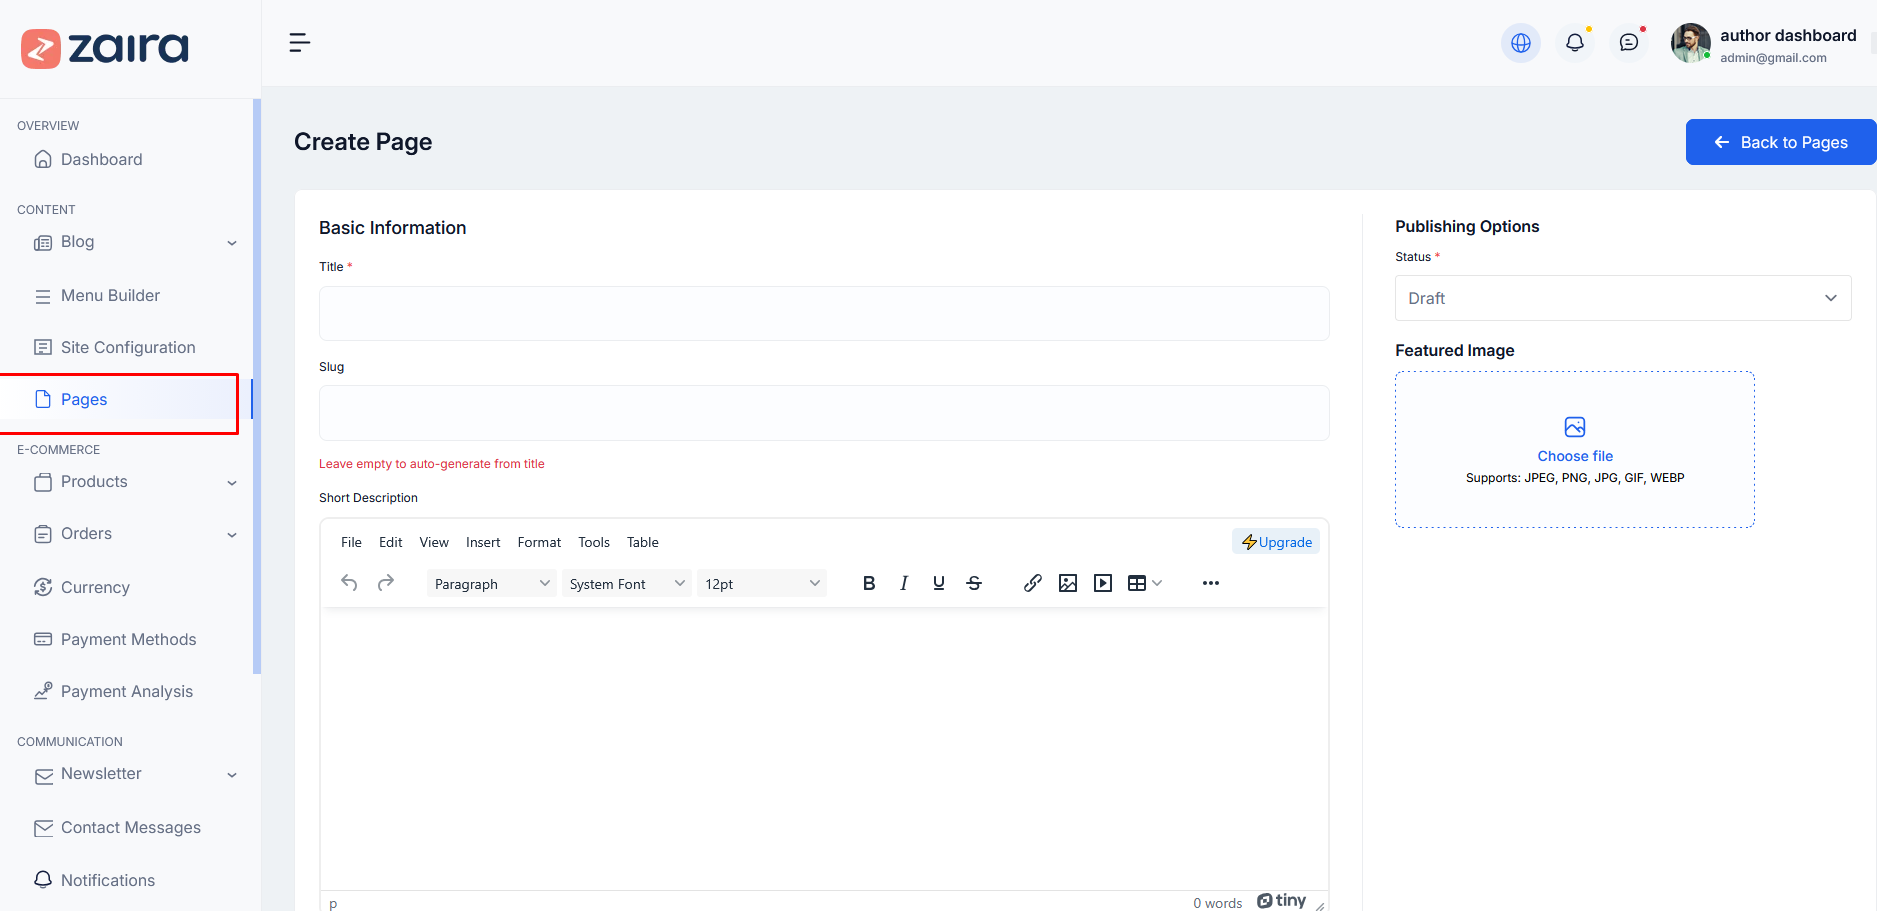
How to Create a New Page
Step 1: Navigate to Dashboard > Pages > Add New Page
Step 2: Add a title, slug, and fill in the page content in the editing field.
Step 3: Upload a featured image for the page.
Step 4: Set the publishing status (Draft or Published).
Step 5: Click Publish to save.
Here is the screenshot:
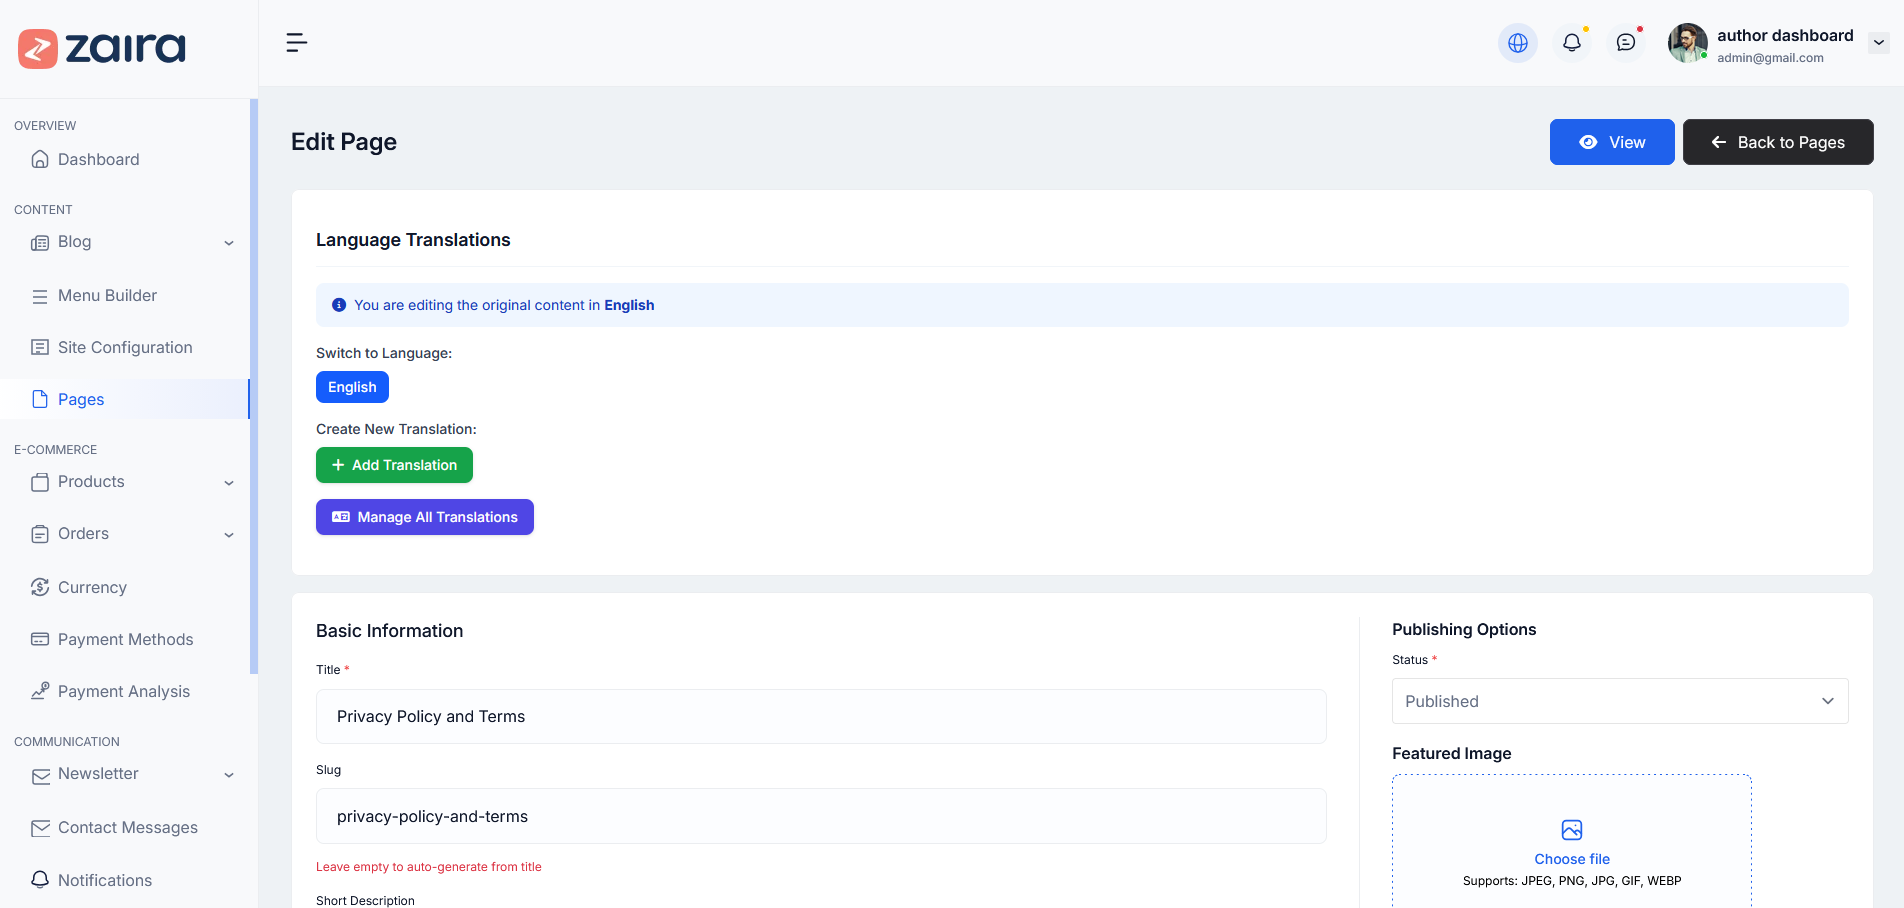
For Edit Page
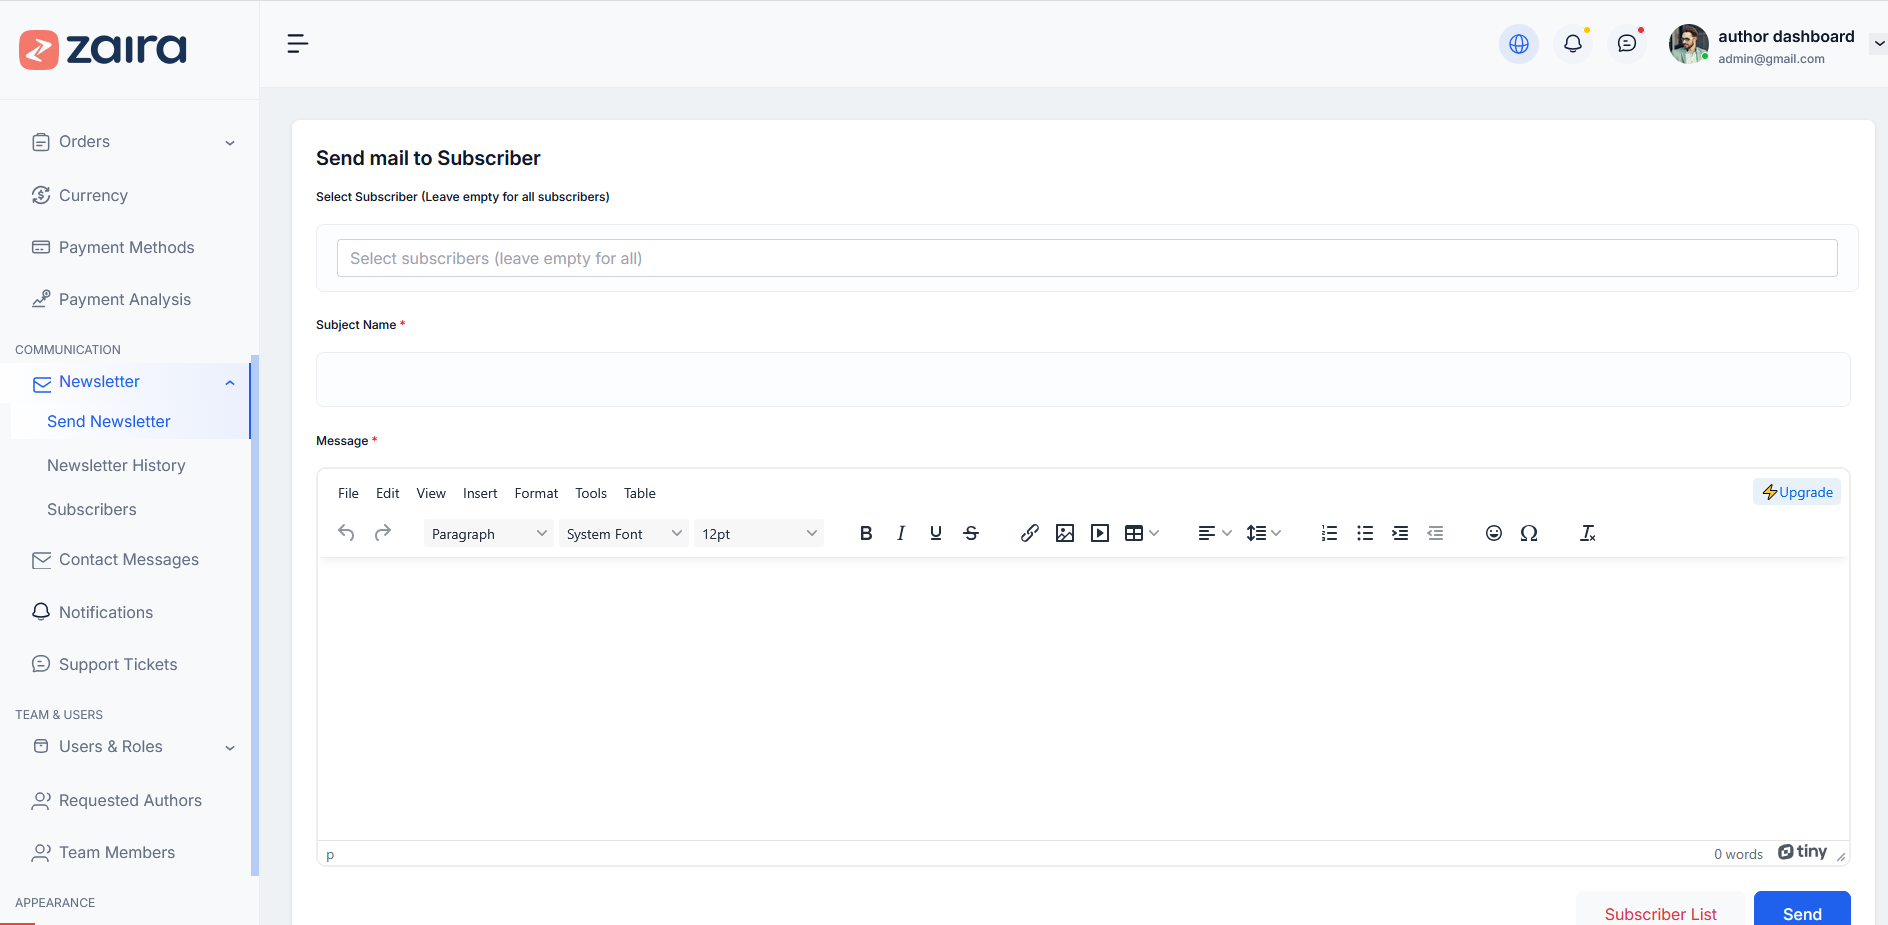
How to Send Newsletter
Step 1: Navigate to Dashboard > Newsletter > Send Newsletter
Step 2: Select Subscriber (leave empty to send to all subscribers).
Step 3: Add a subject name for the newsletter.
Step 4: Write your message in the message editor field with formatting options.
Step 5: Click Send to send the newsletter to subscribers.
Here is the screenshot:
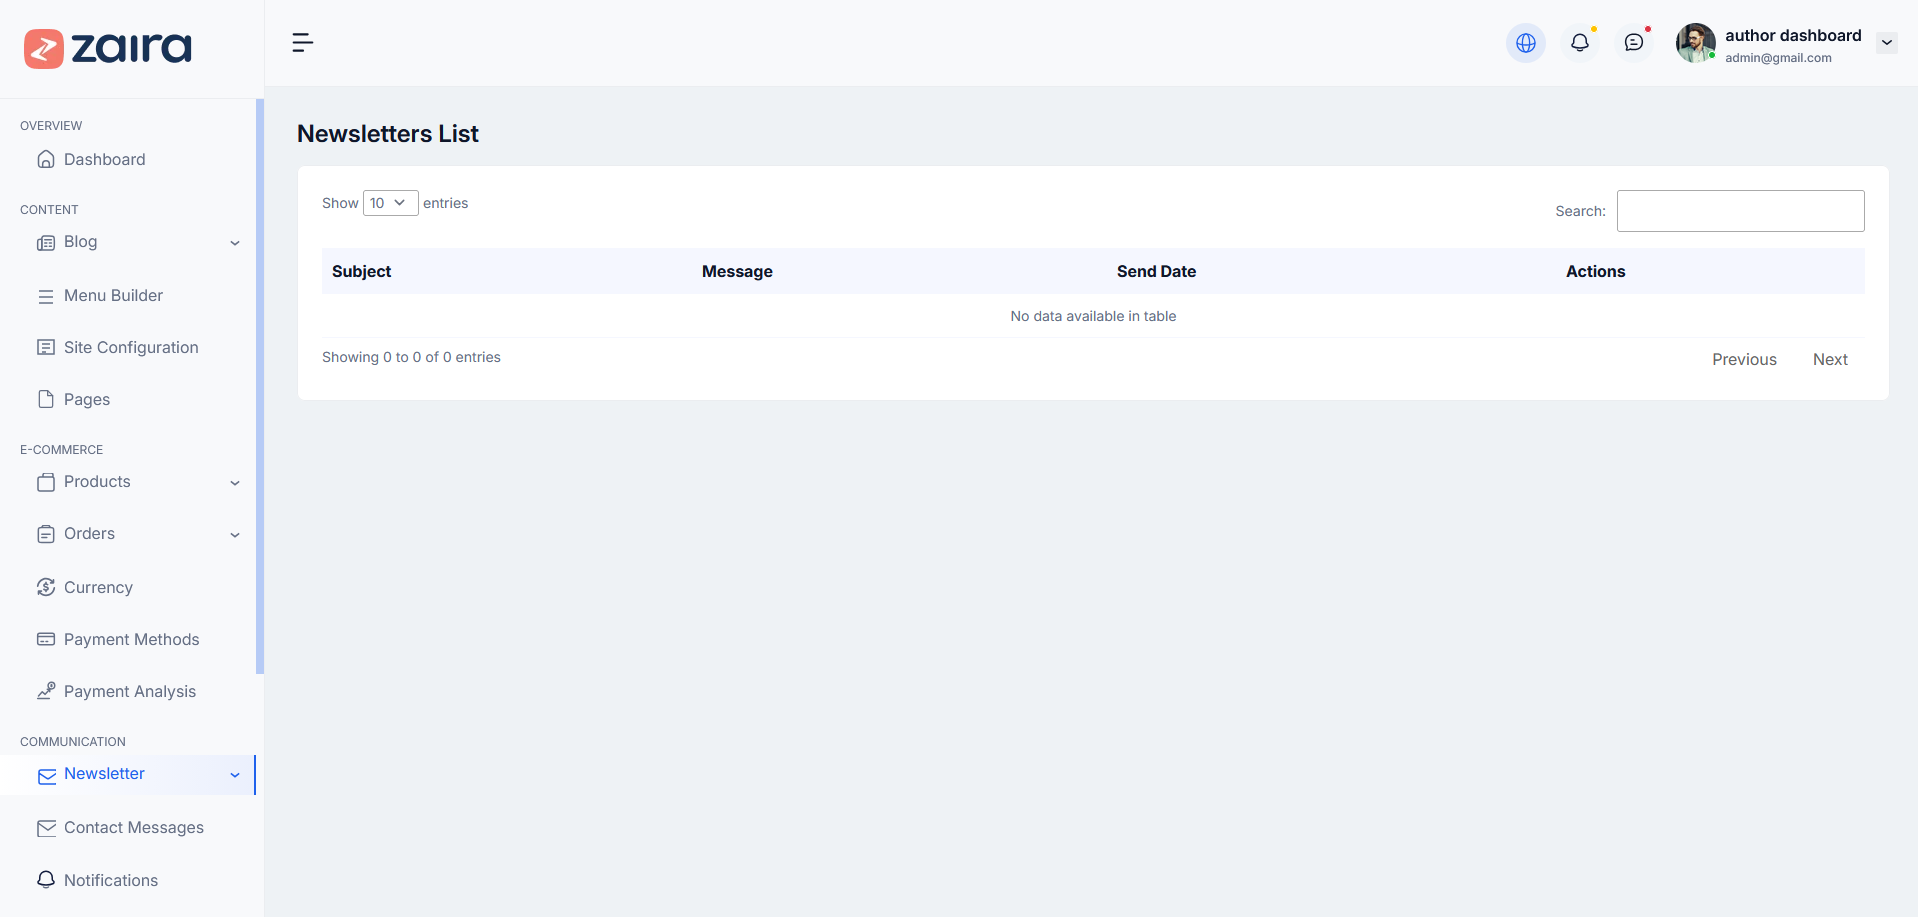
How to View Newsletter History
Step 1: Navigate to Dashboard > Newsletter > Newsletter History
Step 2: You will see a list of all sent newsletters with Subject, Message, and Send Date.
Step 3: You can search or filter the newsletters as needed.
Here is the screenshot:
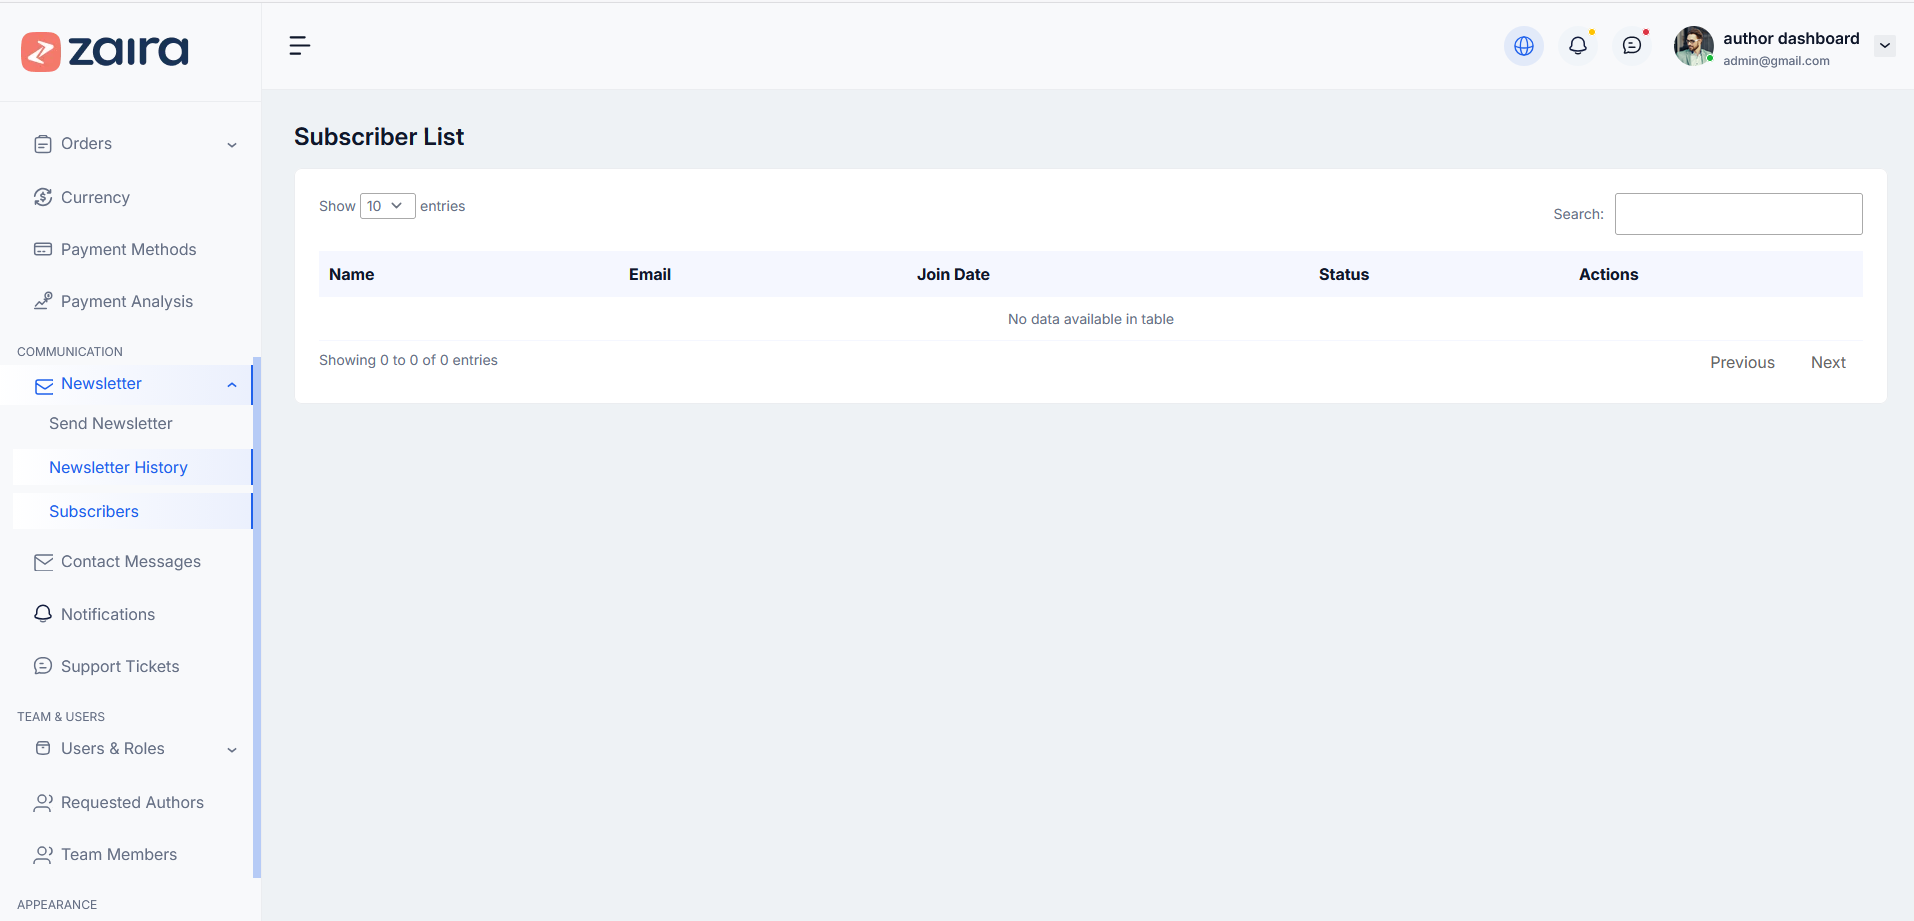
How to Manage Subscribers
Step 1: Navigate to Dashboard > Newsletter > Subscribers
Step 2: You will see a list of all subscribers with Name, Email, Join Date, and Status.
Step 3: You can search or manage subscribers as needed.
Here is the screenshot:
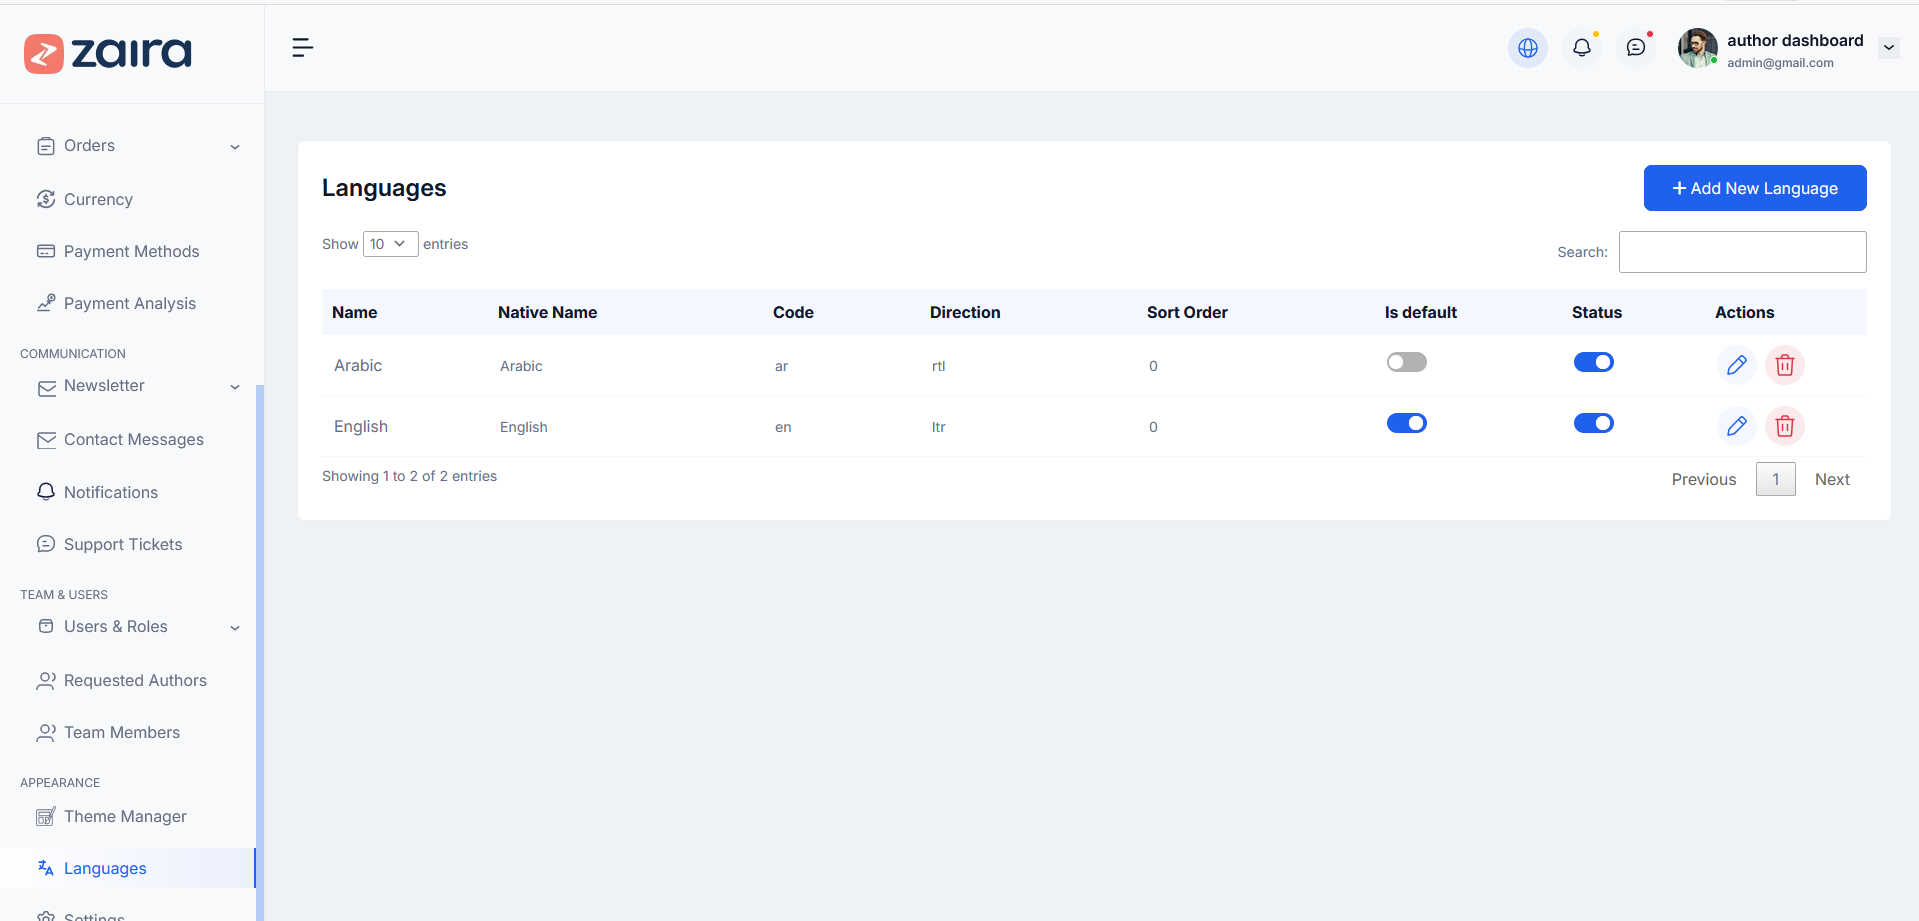
How to Manage Languages
Step 1: Navigate to Dashboard > Appearance > Languages
Step 2: You will see a list of all available languages with Name, Native Name, Code, Direction, Sort Order, Is default, and Status.
Step 3: You can edit or delete any language from the Actions column.
Here is the screenshot:
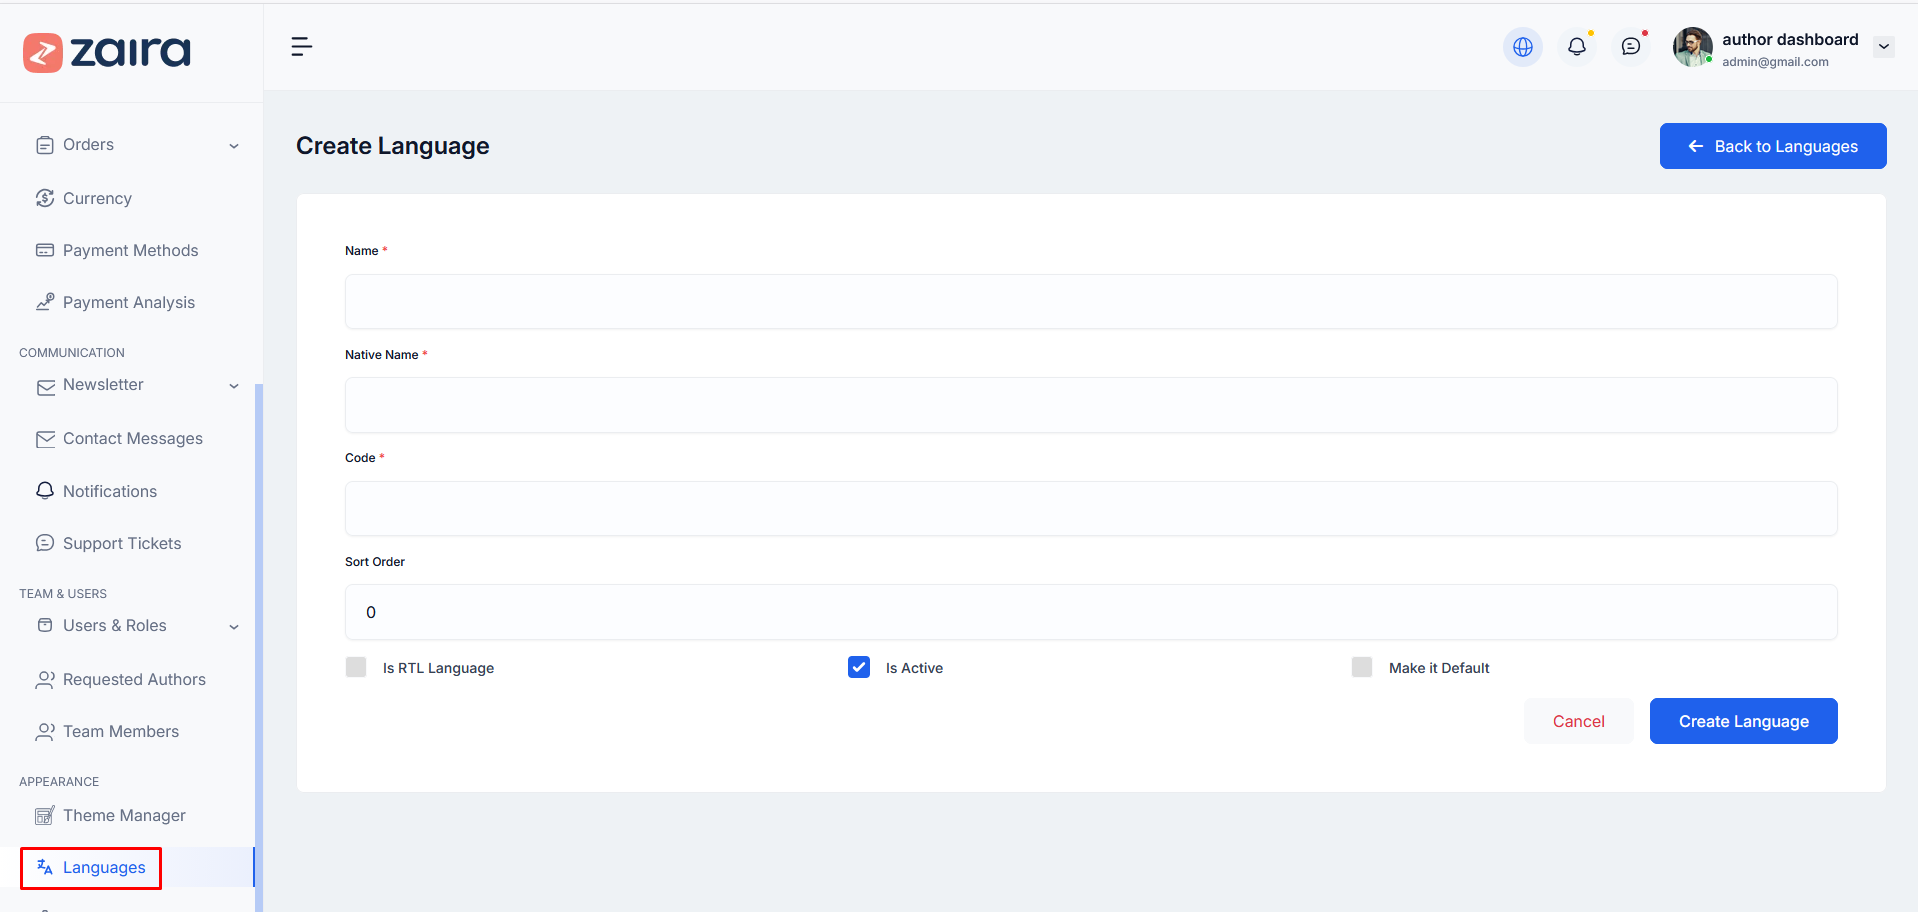
How to Create a New Language
Step 1: Navigate to Dashboard > Appearance > Languages > Add New Language
Step 2: Fill in the following details:
- Name (e.g., English)
- Native Name (e.g., English)
- Code (e.g., en)
- Sort Order
Step 3: Check the following options as needed:
- Is RTL Language (for right-to-left languages like Arabic)
- Is Active (to activate the language)
- Make it Default (to set as default language)
Step 4: Click Create Language to save.
Here is the screenshot:
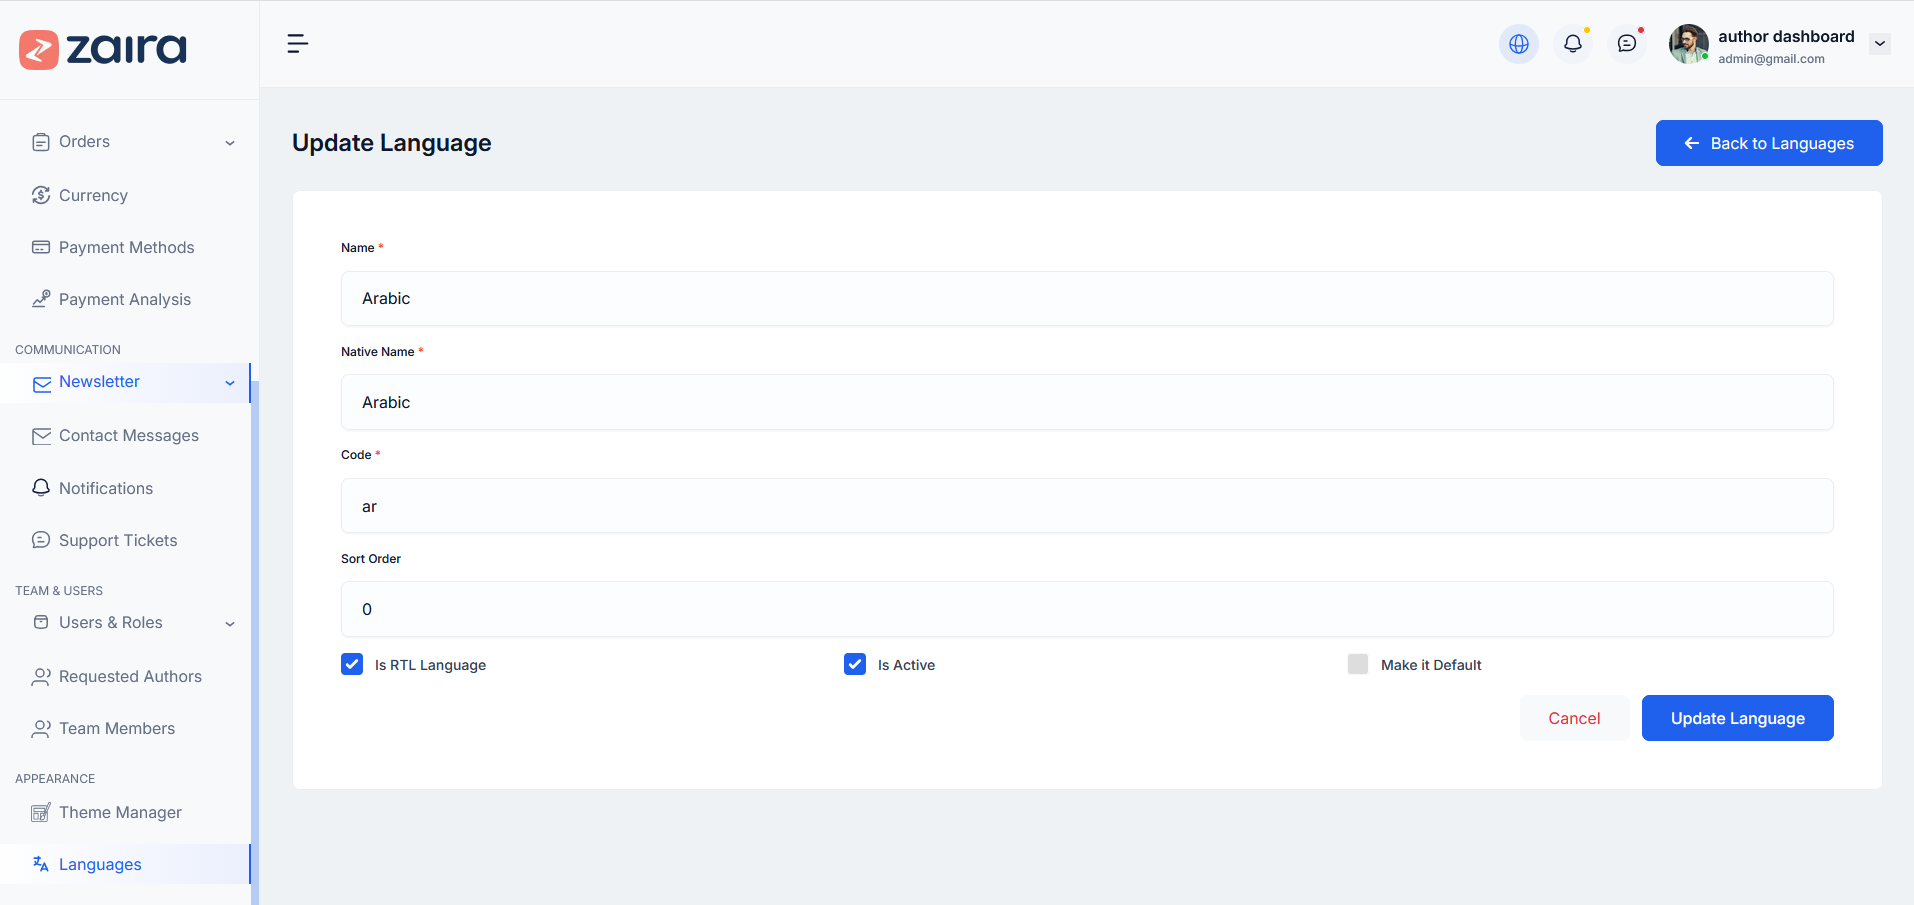
How to Edit a Language
Step 1: Navigate to Dashboard > Appearance > Languages
Step 2: Click the edit icon next to the language you want to modify.
Step 3: Update any of the language details:
- Name
- Native Name
- Code
- Sort Order
- RTL Language status
- Active status
- Default language setting
Step 4: Click Update Language to save changes.
Here is the screenshot:
Our Support
If you need any help from us, you can contact via our support email:
support@themedox.com
Our support will reply within 24-48 hours.
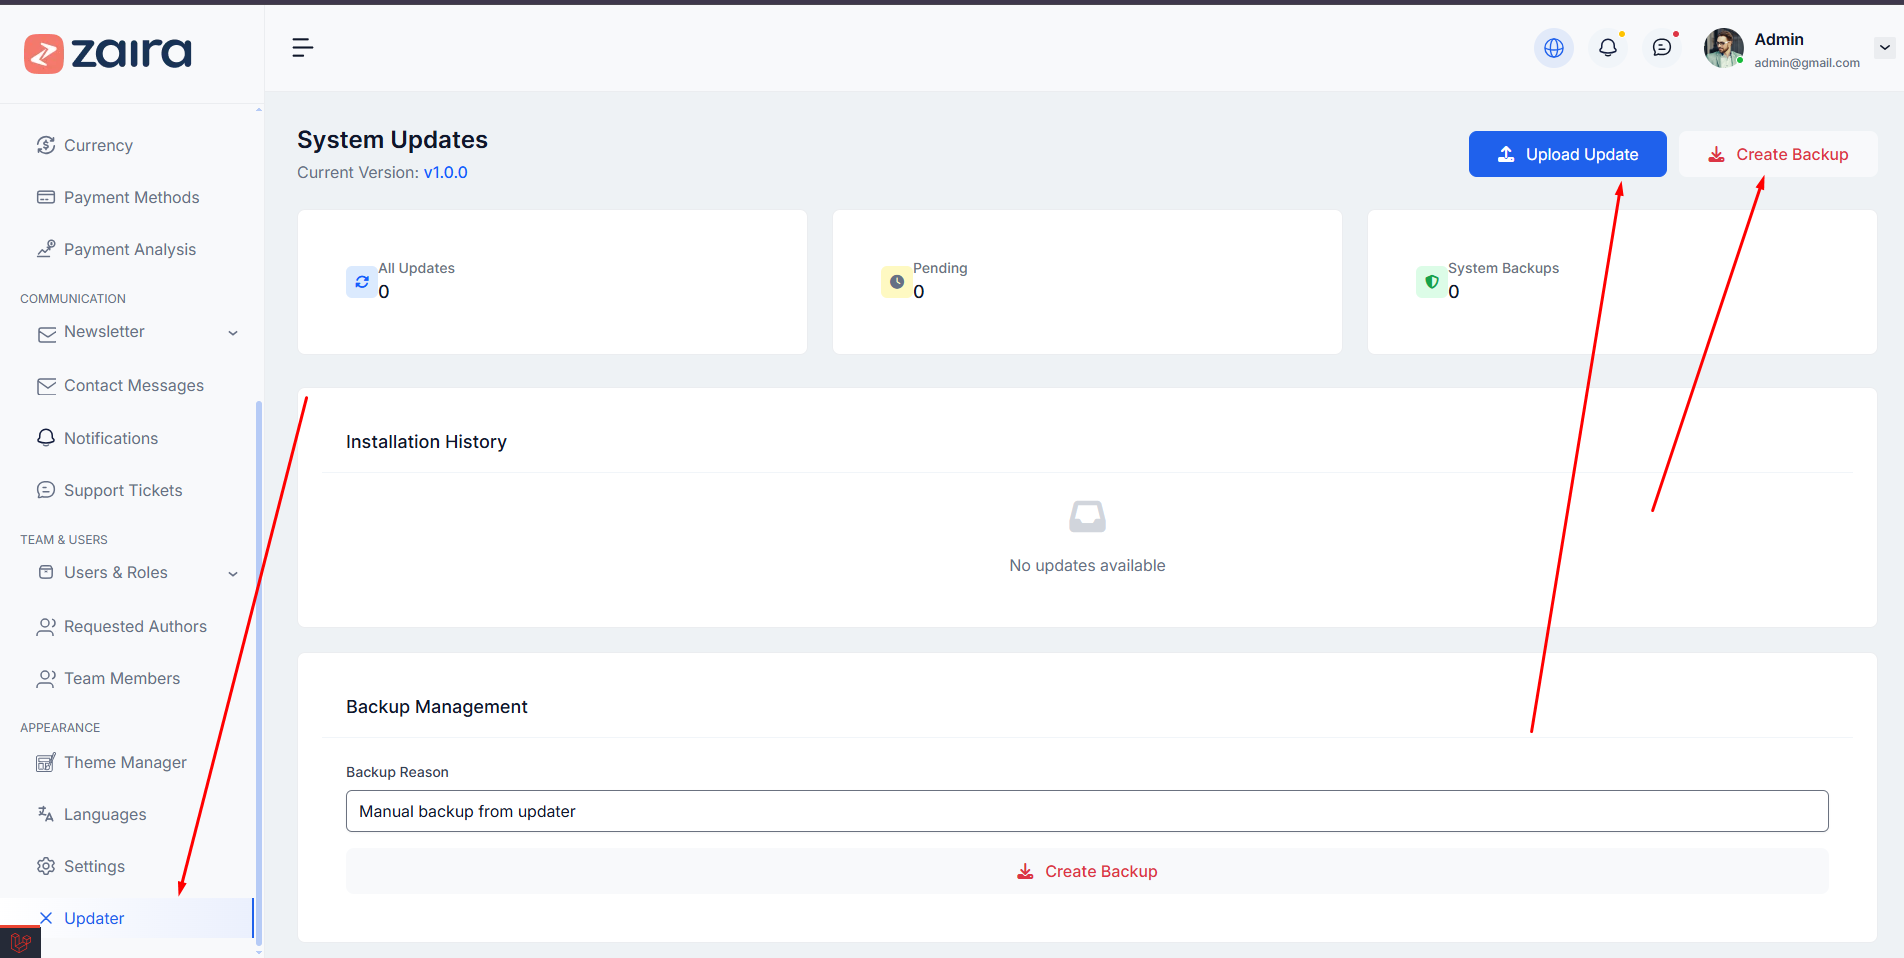
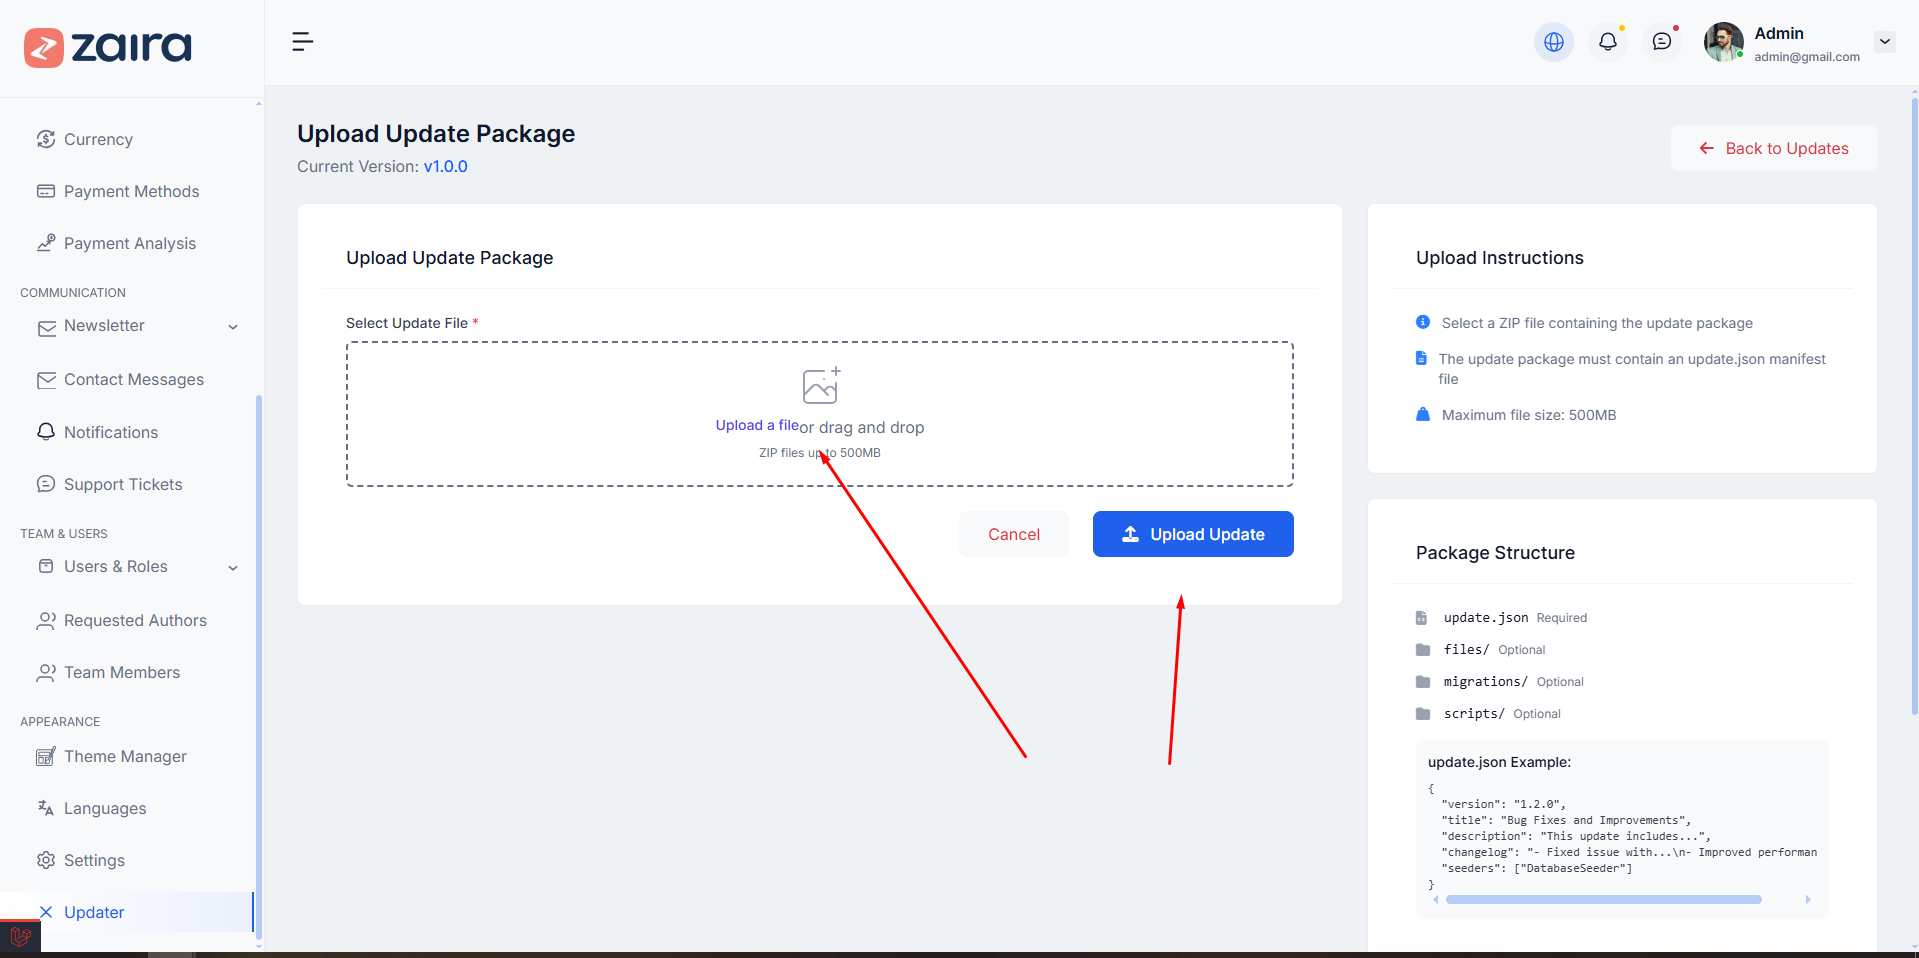
How to update the script version ?
After download the script from codecanyon you can get a zip file. After unzip the file you can total 3 folders. In the 'main_files' folder you can see 2 folder. In the 'main_files' folder there are main laravel script exist. Inside the 'all version' folder you can see version list. See:
To update the script version, you can follow the steps below:
Go to Dashboard → Updates → Update Now
Click on Update Now to update the script version.
Note Before Update Kindly make a backup your self both sql or database and also complete files
Thank you for use this theme.
Once again, thank you so much for purchasing this theme. As I said at the beginning, I'd be glad to help you if you have any questions relating to this theme. No guarantees, but I'll do my best to assist. If you have a more general question relating to the themes on Codecanyon, you might consider visiting the forums and asking your question in the "Item Discussion" section.